
Introduction
Overview of IKEA Craft Room Hacks
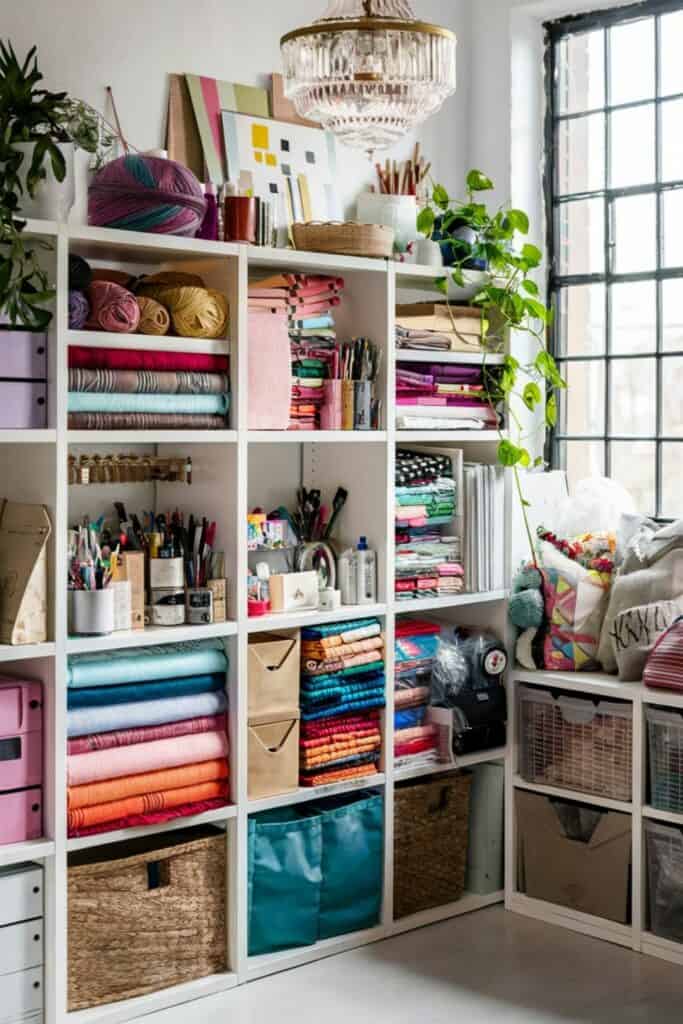
Crafting is so much more than just a hobby; it’s a way to express yourself, unwind, and unleash your creativity. Creating an inviting craft room is essential for fostering that creative flow. If you’re looking to maximize your space and potential, IKEA craft room hacks are the perfect solution. Imagine transforming your drab, cluttered workspace into a sleek, organized haven without breaking the bank. IKEA’s versatile and affordable furniture makes it easy to tailor your craft room to fit your unique style and needs. From multifunctional tables to smart storage solutions, IKEA offers a plethora of options that can be effortlessly customized to enhance your crafting experience. You could start with simple updates like adding a pop of color or repurposing a piece of furniture you already own. One of my personal favorites is using the versatile KALLAX shelving units. You can easily adapt them to suit any size or shape of a room, and their cube-like compartments are perfect for neat organization. Whether you use baskets for fabric scraps or clear bins for your tools, KALLAX makes your supplies easy to access at a moment’s notice.
Benefits of Optimizing Your Craft Room
Optimizing your craft room goes beyond mere aesthetics; it can greatly enhance your crafting experience. Here are some benefits of making those updates:
- Improved Efficiency: A well-organized space allows you to find the right tools and materials at a glance. Instead of rummaging through piles of paper or rummaging around drawers, everything is in its place, making it easier to dive into your next project.
- Enhanced Comfort: A thoughtfully designed craft room considers your comfort. When your workspace showcases good ergonomic choices, you’ll create for hours without discomfort. Investing in a comfortable chair and adjustable table height can significantly boost your productivity.
- Creative Inspiration: A curated space often breeds more creativity. With a color scheme or decor that inspires you, every moment in your craft room is filled with motivation. Simple elements like wall art or showcasing completed projects can instill a sense of pride and spark your imagination.
- Flexibility: Craft rooms should be dynamic and adaptable. Whether you switch between sewing, painting, or scrapbooking, having a multi-purpose setup ensures you can modify your space based on your current projects.
- Stress Reduction: Clutter can be visually overwhelming and mentally draining. By keeping your supplies organized and your workspace tidy, you cultivate a serene atmosphere that promotes focus and relaxation—allowing your creativity to flourish.
Incorporating these strategies will lead you to a space that feels less like a storage area and more like a creative sanctuary. So gather your tools, embrace the IKEA strategy, and let’s get started on your crafting paradise! 🎨✨

Multi-Purpose Furniture Ideas
Using IKEA Bookcases for Storage
When it comes to optimizing your craft room, utilizing versatile furniture is a game changer, and IKEA bookcases lead the pack. Not only are they stylish and functional, but they also offer ample storage solutions for all your crafting essentials. Think about how often you dive into your projects with little time to waste. Having a well-organized bookcase can save you those precious minutes that would otherwise slip away while searching for supplies. I personally found my creativity increased simply by having an uncluttered space where everything was in its place. Here are a few ways to make the most of IKEA bookcases:
- Open and Closed Storage: Choose a bookcase with both open shelves and closed cabinets. Store items you use frequently on open shelves for easy access, while hiding away less attractive supplies, such as your collection of glue sticks and extra rolls of tape, behind cabinet doors.
- Color-Coded Bins: If you love a pop of color, consider adding some decorative bins to display on your shelves. Organizing materials by color can be both practical and aesthetically pleasing, making the overall look of your craft room feel cohesive.
- Adjustable Shelves: Many IKEA bookcases have adjustable shelves, allowing you to customize your storage height based on your needs. Whether it’s stacks of fabric, jars of buttons, or larger tools, you can fit everything in just the right spot!
Transforming Tables into Crafting Workstations
Don’t underestimate the power of a good table in your crafting space! A standard dining or office table can transform into the perfect crafting workstation with just a few tweaks. Here’s how you can elevate a simple table from mundane to magnificent:
- Acrylic Mats for Protection: Use transparent acrylic mats on top of your table to protect its surface. This way, you won’t stress about paint spills or glue stains; simply clean up the mat, and you’re good to go!
- Size Matters: If you’re into large-scale projects like quilting or woodworking, consider using an extendable table. You can spread out your materials when needed and simply condense the table back down for everyday use. This flexibility suits any crafting endeavor.
- Incorporate Drawers: If you have a table with built-in drawers, use them strategically for storing your most used items. Quick access to scissors, rulers, or your favorite pens will keep you in the creative flow without interruptions.
- Rolling Tables: For those who crave versatility, a rolling table is the ultimate solution. You can easily move your workspace around to catch the light or reconfigure the room layout based on your projects.
- Lighting Accessories: Enhance your table setup with a clamp-on lamp or LED strip lights beneath the tabletop for additional lighting. Good lighting is crucial, especially for detailed work, making it even easier to craft perfectly!
With these multi-purpose furniture ideas, you can easily infuse functionality into your craft room. Combining practicality with IKEA’s innovative designs ensures you have a space that invites creativity and encourages productivity. Get inspired and let the crafting commence! 🎨🛠️
Organization Techniques
Utilizing Drawer Dividers for Supplies
The secret to a productive crafting session often lies in how well your supplies are organized. One of my favorite hacks is using drawer dividers. Not only do they help avoid the dreaded crafting chaos, but they also make everything visually accessible in a snap. Imagine your crafting drawer overflowing with odds and ends—loose ribbons tangled with scissors, colored pencils mixed with buttons. It’s a nightmare! By incorporating drawer dividers, you can reclaim that space and bring order back into your life. Here’s how:
- Choose the Right Dividers: Whether you opt for adjustable dividers or fixed ones, make sure they suit your drawer size and your needs. IKEA offers various options, including those made from bamboo or plastic that can adapt to different widths.
- Group Similar Items: As you organize, group items that are similar. For example, keep all your cutting tools—scissors, rotary cutters, and craft knives—together. Label each divider so you can find your gear at a glance.
- Maximize Vertical Space: If your drawer is on the deeper side, consider stacking smaller containers within the dividers for a tiered effect. This strategy takes advantage of vertical space, allowing you to fit more supplies without adding clutter.
- Aesthetic Touch: Use decorative drawer liners or coordinating drawer dividers for a stylish look. Not only will it feel more inviting when you pull open that drawer, but it also makes organizing feel less like a chore!
Once you experience the convenience of drawer dividers, you’ll wonder how you ever crafted without them. Your supplies will be neatly tucked away and easy to access, creating a stress-free environment for your creativity.
Creating a Pegboard Wall for Tools and Materials
Another excellent method for organization is the clever use of a pegboard wall. For many crafters, the pegboard isn’t just a wall; it’s an open canvas ready to showcase your tools, materials, and even creativity. Here’s why I adore a pegboard and how to make the most of it:
- Customizable Layout: The beauty of a pegboard is its versatility. You can arrange hooks, shelves, and containers in any layout that suits your style and needs. This means you can keep everything from scissors to yarn spools within arm’s reach and tailor it as your needs evolve.
- Use Colorful Storage: Attach colorful baskets or clip-on containers for smaller supplies like washi tape, paint tubes, or thread. Mixing colors can liven up your craft room while keeping everything organized.
- Visual Inspiration: Your pegboard doesn’t have to be purely functional; it can also serve as a decor piece. Hang up inspirational images, swatches, or even a mini mood board. Surrounding yourself with visual cues can ignite those creative sparks!
- Easy Access and Visibility: No more digging through drawers or boxes to find what you need; with all your essentials on display, you can grab your tools and materials quickly. This enhanced visibility lets your ideas flow more freely, without interruption.
- Adaptable Accessories: Consider adding more accessories as needed—shelves for larger items, baskets for fabric rolls, and even dowel rods to keep your ribbons organized.
Harnessing the power of both drawer dividers and a pegboard wall can transform your crafting experience. Together, these organization techniques will create a seamless, inspiring workspace that fuels your creativity day in and day out. 🖌️🧵✨
Creative Storage Solutions
Using RASKOG Carts for Portability
When it comes to crafting, flexibility is key, and one of my go-to storage solutions that never disappoints is the RASKOG cart! This little gem from IKEA packs a punch in terms of functionality while offering a sleek, stylish appearance. What sets the RASKOG cart apart is its portability—perfect for anyone looking to maximize the use of their crafting space. Here’s why the RASKOG cart has become my best friend in the craft room:
- Multi-Level Organization: With three spacious tiers, it provides ample room for various supplies. I usually dedicate one shelf to paints, another for tools, and the last for paper and embellishments. This way, I can keep everything categorized and easily accessible.
- Wheeled Design: Its wheels make it incredibly easy to maneuver. Whether I’m crafting at the dining table, in my dedicated craft room, or outside on the patio, I can simply roll the cart over with all my supplies intact. This portability makes it easier to craft in different environments.
- Easy Accessibility: The open design means I can quickly grab what I need without fumbling through drawers or boxes. For a snappy project, having my essentials within arm’s reach is invaluable!
- Aesthetic Appeal: With various color options available, the RASKOG cart can either blend in with your decor or serve as a fun pop of color in your space. Some decorators even customize their carts with decals or paint to match their unique style.
- Versatile Usage: Once you’re done with crafting, the RASKOG cart can easily transition to be utilized in other rooms—organizing kitchen utensils or serving as a stylish bar cart for entertaining guests.
The RASKOG cart not only maximizes space but also encourages creativity by keeping all essential supplies organized and mobile.
Utilizing KALLAX Shelving Units for Display and Storage
Now, let’s talk about another fantastic IKEA staple: the KALLAX shelving unit. This versatile piece isn’t just limited to storage; it’s a stylish way to display your accomplishments alongside your supplies. Here are some creative ways to make the KALLAX unit work for your craft room:
- Versatility at Its Best: KALLAX comes in various shapes, sizes, and colors. Whether you need a narrow unit to fit in a corner or a wide one to fill up a wall, there’s a KALLAX solution for every space. I personally use a 4-cube unit that fits perfectly into my room, combining storage and display areas.
- Mix and Match: Fill each cube with attractive storage boxes, fabric bounds, or baskets to keep smaller supplies organized. You can also mix in open storage for showcasing completed projects, such as framed artwork, or even your favorite crafting books.
- Customize with Inserts: The KALLAX unit can be personalized using inserts, like drawers or doors, which can keep the look clean and tidy. For example, small drawers for things like glue and tiny tools can keep them hidden and neat.
- Create a Craft Station: By adding a small tabletop over the KALLAX unit, you can transform it into a compact craft station. Having everything within reach while being able to utilize the top as additional workspace is a clever use of space.
- Display Your Creative Work: KALLAX can act as a great gallery wall. Use open cubes to feature your favorite crafts and projects. Not only does this showcase your work, it can also inspire you to explore new ideas.
Both the RASKOG cart and KALLAX shelving units are game-changers when it comes to creating a functional and inviting craft space. With their innovative designs, you’ll find organization intuitive, while unleashing your creative flow. Let’s bring your crafting dream to life! 🌟🎨
Personalization and Decoration
Customizing IKEA Furniture with Decals or Paint
Once your craft room is organized, the fun of personalization begins! One of the best parts about IKEA furniture is their ability to serve as a blank canvas for your creativity. Customizing your IKEA pieces with decals or paint can take your space from ordinary to extraordinary. Here’s how you can add a personal touch to your IKEA furniture:
- Decals for Instant Impact: Using decals is one of the easiest ways to customize your pieces. You can find a variety of styles—everything from botanical prints to geometric designs. They’re simple to apply and can easily be changed up as your style evolves. I recently adorned my KALLAX shelving unit with some floral wall decals that instantly brightened up the room.
- Bold Paint Ideas: If you feel a little braver, why not paint your furniture? A fresh coat of paint can transform any bland piece into a vibrant statement. Use chalk paint for a matte finish or a glossy enamel spray for a glimmering effect. The world is your oyster! When I painted my RASKOG cart with bright turquoise, it brought a cheerful vibe to my crafting space.
- Mixing Textures: You can also mix different materials. Consider adding some fabric overlays to drawer fronts or utilizing textured contact paper to give surfaces a fresh, new feel. You might be surprised at how a single change can uplift your space!
- Personalized Handles: Swapping out hardware and handles is another quick way to personalize furniture. Look for unique knobs or pulls that resonate with your style. Whether vintage, modern, or funky, the right handles can completely change the character of your unit.
By personalizing your IKEA furniture, you not only enhance the look of your space but also make it a reflection of your personality.
Adding Greenery with Indoor Plants and Succulents
After customizing your furniture, the next step in sprucing up your craft room is to bring in some greenery! Indoor plants and succulents can infuse your crafting space with life and energy. Plus, they’re a fantastic way to improve air quality and create a calming atmosphere. Here’s how to effectively incorporate plants into your space:
- Choose the Right Plants: Not all plants thrive in every environment, so opt for low-maintenance varieties like succulents or pothos. I have a lovely pothos plant perched on my RASKOG cart; its trailing vines not only look beautiful but also require minimal care.
- Creative Plant Displays: Don’t just set plants on a shelf; get creative! Use hanging planters to save space and create visual interest. You can really play with different heights and placements to draw the eye across your room.
- Personalized Pots: Much like your furniture, you can customize your planters! Consider spray painting pots, wrapping them in jute rope, or writing uplifting quotes on ceramic pots with a paint marker. Adding a personal touch to the greenery makes the decor uniquely yours.
- Incorporating Herbs: If you enjoy cooking, think about incorporating an herb garden right in your craft room! Small pots of basil, mint, or thyme can add both fragrance and a touch of nature to your workspace—all while being practical for your kitchen adventures.
Creating a harmonious space involves finding the right balance between organization, personalization, and a touch of nature. By customizing your IKEA furniture with decals or paint and adding greenery, your craft room will not only look stunning but also inspire creativity. Let the transformation begin! 🌿✨

Lighting and Ambiance
Installing Proper Task Lighting
As any avid crafter will tell you, the right lighting can make all the difference in your creative process. Without proper task lighting, even the most intricate projects can be a challenge, leading to frustration and mistakes. That’s why it’s essential to invest in effective lighting solutions for your craft room. Here’s how to ensure you have the best task lighting possible:
- Choose Adjustable Options: Look for adjustable lamps or overhead lights that can direct light exactly where you need it. I use a clamp-on LED lamp over my workspace, and its flexibility means I can shine a bright beam directly onto what I’m working on—whether that’s sewing, painting, or scrapbooking.
- Evaluate Color Temperature: Aim for lights with a color temperature of around 5000K to 6500K. These give off a daylight effect, helping you see colors clearly and reducing eye strain. You’d be surprised at how much difference it makes when selecting fabric or paint shades!
- Layer Your Lighting: Combine different types of lighting to create a harmonious environment. Use ambient lighting—like overhead fixtures—to provide overall light, while also adding task lights, and possibly even accent lights. For instance, my room features a warm, dimmable ceiling light paired with my task lamp, creating layers that help set the mood.
- Avoid Shadows and Glare: Make sure to position your task lighting correctly; it should enhance, not hinder, your work. Avoid placing lights directly above or behind you to minimize shadows during detailed projects.
With the right task lighting, your craft room can feel bright and inviting, allowing your creativity to flow freely without the hindrance of dim spaces.
Creating an Inspiring Atmosphere with Decorative Lights
Once you’ve tackled the basics of task lighting, it’s time to think about ambiance. Decorative lighting can transform your craft room into a source of inspiration, elevating your projects from ordinary to extraordinary. Here are some delightful ideas to brighten up your creative space:
- String Lights for Whimsy: One of my favorite additions to my craft room is a strand of string lights hung above my workstation. The gentle glow creates a cozy vibe, perfect for evening crafting. Plus, they come in all shapes and colors!
- Mood Lamps: Consider incorporating color-changing LED mood lamps to set the atmosphere. Depending on what project you’re tackling, you can shift the ambiance with serene blues for calm sewing sessions or vibrant reds for bursts of creativity.
- Task Lighting with Style: Combine functionality and aesthetics by using unique lamps. Think of lamps with artistic bases or colorful shades that complement your decor. These touches can make lighting not only a necessity but also a statement piece in your room.
- Candle Accents: For a more relaxing atmosphere, consider incorporating battery-operated candles. I find that the flickering light gives a soft glow, making it perfect for winding down after a long day of crafting or while working on delicate projects.
- Decorative Fixtures: Lastly, don’t forget about statement light fixtures! A beautiful pendant lamp or a decorative floor lamp can add instant character to your space while providing illumination.
Incorporating both proper task lighting and decorative lights creates a craft room that not only functions well but also inspires you every time you enter it. Let your creativity shine bright as you enjoy the perfect blend of light and ambiance in your unique crafting sanctuary! 🌟💡✨

Upcycling and DIY Projects
Repurposing IKEA Items for Craft Storage
Transforming mundane IKEA items into functional craft storage solutions is an exhilarating part of the crafting process that not only saves you money but also sparks your creativity. Perhaps you already own some Ikea products but are not quite using them to their full potential. It’s time to rethink their use and give them a fresh purpose! Here are some ideas I’ve loved implementing in my own craft room:
- BILLY Bookcase: If you have a BILLY bookcase lying around, consider using it for more than just displaying books. By adding clear bins or baskets, you can easily sort everything from fabric scraps to sewing patterns. The open shelving method also allows you to showcase your beautiful supplies, making everything visually appealing.
- FÖRVARA Boxes: These boxes designed for kitchen storage can be perfect repurposed for craft supplies. I use them for organizing my acrylic paints and brushes. They fit nicely on the KALLAX shelving unit and keep everything organized—plus, they’re easy to pull out when inspiration strikes.
- KALLAX Inserts: If you already have a KALLAX unit, consider incorporating different inserts. You can transform those cubes into customizable drawers for your smaller supplies or even add a wine rack insert to store rolled-up fabrics or large sheets of paper.
- RÅVAROR Fabric Sample Packs: If you’re someone who enjoys sewing, don’t overlook IKEA’s fabric samples and rolls. They can serve not just for your sewing projects but can also be creatively combined into art pieces or fabric-wrapped storage boxes.
Repurposing IKEA items gives your existing furniture new life while optimizing your crafting setup. It’s a win-win!
DIY Desk Organizers and Decor Pieces
Once you’ve sorted out your storage issues, why not take things a step further with some DIY projects? Creating your own desk organizers and decor pieces not only helps you stay organized but also adds a personal touch to your space. Here are a few DIY ideas that I’ve thoroughly enjoyed:
- Corkboard Organizer: Transform a simple corkboard into a multifunctional organizer. You can pin notes, inspiration, and even tools like scissors or small paintbrushes! Simply decorate the edges with washi tape or paint to match your craft room decor.
- Mason Jar Organizers: Mason jars are a staple in crafting spaces. Grab any extra jars you have, and use them to hold everything from buttons to paintbrushes. You can also paint the lids or label them with a chalk marker for an organized look.
- Hanging Ribbon Organizer: I found some small wooden dowels and repurposed an old wooden frame to create a unique ribbon display. Simply attach the dowels across the frame, thread your ribbons through, and hang it on the wall. This way, my ribbon collection not only stays organized but doubles as decor!
- Customized Drawer Dividers: If you’re feeling crafty, turn leftover cardboard boxes into custom drawer dividers. Measure your desk drawers and cut the boxes to size, then paint or cover them with fabric for a polished look. I made dividers for all of my crafting cords, and it saved me plenty of time searching for the right charger.
Embracing upcycling and DIY projects in your craft room not only enhances functionality but also reflects your unique style. These creative pursuits can turn an ordinary workspace into a vibrant and inspiring sanctuary. Happy crafting! 🎨💪✨

Budget-Friendly Tips
Shopping IKEA’s Sale Section for Deals
Creating a dream craft room doesn’t have to destroy your budget, and one of the best-kept secrets is shopping IKEA’s sale section! Every time I visit, I make a point to swing by this area first. You never know what treasures you might find at a fraction of the original price. Here’s how to make the most of the sale section:
- Keep an Open Mind: Sometimes, you might find items that aren’t in the perfect color or style. That’s okay! Consider how you could personalize or repaint them. For example, I once snagged a slightly scratched KALLAX unit for half price, and after a coat of paint, it fit perfectly into my craft room.
- Frequent Visits: IKEA’s sale section changes often, so make it a habit to check back regularly. You never know when your ideal piece might go on sale. I try to visit at least once a month, and it has paid off handsomely!
- Browse Online First: IKEA often lists their sales online, allowing you to scout deals before visiting the store. If you have a particular item in mind, check online for any price drops before making the trek.
- Look at Display Models: Sometimes, display models are sold at significant discounts. If you’re not picky about minor blemishes, asking about available demos can save you a bundle. The last time I was at IKEA, I grabbed an elegantly displayed table that had a small scratch on the leg—at 30% off!
Shopping the sale section can uncover incredible deals simply waiting for you to give them a new home!
Using Coupons and Discounts for Cost Savings
In addition to finding sales, maximizing your savings through coupons and discounts is another smart strategy. With a little effort, you can significantly reduce your overall spending. Here’s how to take advantage of all available savings:
- Join IKEA Family: By signing up for the IKEA Family program, you gain access to exclusive discounts, member-only offers, and even occasional free coffee at the store café—what’s not to love? I joined right away and have enjoyed various perks alongside my shopping.
- Watch for Promotions: Keep an eye out for seasonal promotions or special events. IKEA frequently offers discounts on certain categories or specific items during holiday sales. I’ve scored great deals during back-to-school sales that helped me stock up on organizational items for my craft space.
- Collect Coupons: Sometimes, IKEA partners with other promotional companies to offer coupons. You can usually find these online or in local newspapers. I’ve saved a few bucks by using a coupon I stumbled upon in a crafting magazine.
- Bulk Buying Discounts: If you plan to purchase multiple units of an item, don’t hesitate to ask about discounts. For example, when I coordinated a DIY project with friends, we bought several organizers together and secured a bulk discount, making each of our costs much lower.
By wisely utilizing the sale section and being on the lookout for coupons and discounts, you can create the perfect craft room without breaking the bank. With a little patience and creativity, you’ll soon have a functional and stylish space that inspires your creativity at a fraction of the cost! 💰🏷️✨

Ergonomic and Comfort Ideas
Choosing Comfortable Seating Options
Creating a craft room is not just about storage or aesthetics; it’s also about your comfort while you create. One of the most critical components is seating. Comfortable seating helps you stay focused and productive without causing strain on your body—something I learned the hard way! For a while, I used a standard dining chair, and after hours of crafting, my back would be screaming for relief. Here’s how to choose the right seating for your creative oasis:
- Invest in an Ergonomic Chair: Look for chairs with adjustable heights, lumbar support, and cushioned seating. Brands and options vary, but I recommend testing out chairs in-store to find what feels best for you. A chair with good back support changed the way I craft—no more backaches after a long session!
- Consider a Stool or Drafting Chair: If you have a higher table, a stool or drafting chair can offer flexibility. These can be adjusted in height and allow for movement while you work. I use a drafting chair for my sewing station, which also gives me the ability to swivel around and grab supplies easily.
- Cushioned Floor Mats: If you stand while working, invest in anti-fatigue mats. These can make a world of difference, relieving pressure on your feet and joints. I placed a mat in front of my cutting table, and I’ve noticed a significant reduction in fatigue after long projects.
- Footrest for Additional Comfort: A footrest allows your feet to rest while keeping your legs at a good angle—that subtle elevation can prevent discomfort over time. I keep a small, adjustable footrest under my desk which I can adjust based on whether I’m sitting or standing.
Taking the time to choose the right seating options ensures that your creativity can flourish without the distraction of discomfort.
Setting Up a Relaxation Corner for Breaks
In addition to ensuring comfort while working, it’s equally important to create a relaxation corner in your craft room. Crafting can be physically demanding and mentally taxing, so having a designated space to unwind can truly enhance your crafting experience. Here are some ideas to create your perfect relaxation nook:
- Cozy Seating: Consider a comfortable chair or bean bag exclusively for relaxing breaks. I have a plush armchair tucked into one corner, wrapped in a warm throw blanket. It’s perfect for a little downtime between projects!
- Soft Lighting: Add a table lamp or string lights to create an inviting atmosphere. Soft lighting can make your relaxation corner feel cozy, inviting you to take a breather with a good book or just some quiet time. My little corner lights feel like a hug when the room gets a bit dim.
- Incorporate Nature: If you’ve added plants to your craft room, placing a few in your relaxation corner can increase that calming effect. Access to nature—whether it’s through actual plants or beautiful images—can rejuvenate your mind.
- Stock Up on Comfort Essentials: Have a small basket with items that encourage relaxation, like your favorite craft magazines, art supplies for doodling, a sketchbook, or herbal tea. When I take breaks, I love to sip on tea and brainstorm my next project.
- Play Soft Music: Consider adding a small Bluetooth speaker to play calming music or nature sounds. I often listen to soft instrumental playlists while I unwind—it’s a great way to reset my mindset.
Creating an ergonomic and comfortable crafting environment enhances your overall experience while allowing you to recharge effectively. With the right seating and a cozy relaxation corner, you can ensure that both your body and mind are ready to tackle any creative challenge that comes your way! 🌼🪑✨
Maintenance and Organization Tips
Regularly Decluttering and Sorting Supplies
Now that you’ve set up your craft room with comfort and style, it’s essential to maintain that organized haven. One of the best ways to do this is by regularly decluttering and sorting your supplies. I can’t stress enough how this practice keeps my creativity flowing and prevents overwhelm. Here are some tried-and-true strategies for effective decluttering:
- Establish a Schedule: Set a recurring date to declutter. It could be monthly, seasonally, or even weekly if you’re ambitious! I mark my calendar at the beginning of each month to do a quick check of my supplies, and it prevents me from getting buried under a mountain of materials.
- Sort Essentials from Non-Essentials: As you tackle your supplies, create piles to separate what you truly need from what you can part with. Donate surplus materials to local schools, charities, or friends. I recently donated some craft kits I’d never opened, and it felt great to know they’d find a new home!
- Use the One-Year Rule: If you haven’t used an item in the past year, it might be time to let it go. I find this rule helps me avoid sentimental attachments to things I simply don’t use—be it a half-used skein of yarn or a craft supply I purchased on a whim.
- Incorporate Storage Solutions: Take time during your decluttering sessions to reassess your storage methods. Label baskets and bins for easy identification. I’ve found that weeding through clutter often reveals a better way to organize everything.
Regularly decluttering will help you keep your supplies in check and create a space that continuously inspires you to craft without frustration. 🙌✨
Implementing a Cleaning Routine for a Tidy Space
Along with decluttering, maintaining a cleaning routine is essential to keep your craft room tidy and inviting. A clean space encourages creativity and gives you the mental clarity to let those ideas flow! Think of it as setting a welcoming stage for your projects. Here’s how to establish an effective cleaning routine:
- Daily Tidying: Take just a few minutes at the end of each crafting session to put things back in their respective places. I find that even a quick five-minute tidy-up can drastically improve the look of my space.
- Weekly Deep Clean: Set aside time once a week for a deeper clean. Dust surfaces, wipe down your work area, and get rid of any crumbs or scraps that may have accumulated. Having a clean slate ready for your next project is worth the effort!
- Organize as You Go: Every time you finish a project, make it a habit to organize leftover materials immediately. This saves you the trouble of dealing with clutter later on, making the next crafting session more enjoyable. I keep a small bin nearby to toss scraps into as I work.
- Involve Your Crafting Community: Consider organizing group tidying parties with friends who also craft. Not only does it make the cleaning process more enjoyable, but you can also share ideas and learn from one another’s setups!
- Make Cleaning Fun: Listening to your favorite playlist or podcast while you tidy up can make the process feel less of a chore. I love cranking up some upbeat music; it transforms the cleaning session into an uplifting moment.
By regularly decluttering and implementing a cleaning routine, you’ll maintain a craft room that’s organized and inviting. Your workspace will be ready to spark creativity and support your crafting endeavors! Remember, a tidy room can lead to a tidy mind. 🧹🌈✨