
Introduction to Craft Paper Crafting
Craft paper crafting opens up a world of creative possibilities! Whether you’re a seasoned artist or a complete beginner, working with paper can be delightful and satisfying. It’s all about expressing yourself through colors, textures, and designs that reflect your personality. The beauty of it is that you don’t need fancy tools or materials to start your crafting journey. Just grab some paper, scissors, and glue, and you’re on your way! ✂️
Why Craft Paper?
Craft paper is incredibly versatile. Here are a few reasons why it’s a fantastic medium:
- Affordable: Most craft paper is budget-friendly, allowing you to create without breaking the bank.
- Eco-Friendly: You can use recycled paper or repurpose old materials, making it a sustainable choice.
- Accessible: You likely have crafting papers lying around your house, from old magazines to wrappers.
When I first dove into the world of craft paper, I started making simple greeting cards for friends and family. It was an instant hit! I loved seeing the joy on their faces when they received something unique and handmade.
Getting Started
To kickstart your adventure in craft paper crafting, consider the following tips:
- Choose Your Paper Wisely: Experiment with various weights and textures of paper—different papers can lead to unique results!
- Simplify Tools: Keep your tools simple—paper, scissors, glue, and maybe a ruler.
- Follow Tutorials: Online resources and tutorials can provide inspiration and guidance.
Craft paper crafting isn’t just a hobby; it’s a pathway to endless creativity. You can turn mundane items into something extraordinary. So gather your materials and get ready for a crafting adventure! 🌟

Beautiful Origami Creations
Transitioning from the world of craft paper, let’s delve into the enchanting art of origami! This traditional Japanese practice not only sparks creativity but also encourages mindfulness as you bring paper to life through intricate folds. Two of the most beautiful and iconic origami creations are paper cranes and flower bouquets. Let’s explore these delightful projects! 🌸
Paper Crane Tutorial
The paper crane is a symbol of peace and hope, and folding one can be an incredibly rewarding experience. Here’s a simple step-by-step guide to get you started:
- Materials Needed:
- A square piece of paper (ideally, start with a colorful origami sheet).
- Folding Steps:
- Step 1: Fold the paper in half diagonally, forming a triangle, and unfold it.
- Step 2: Fold in the corners to meet at the center, creating a kite shape.
- Step 3: Lift the top layer of the bottom point up, this will form the crane’s neck and tail.
- Step 4: Fold down the wings, and voilà! You have a beautiful crane! 🕊️
I remember the excitement of folding my first paper crane! Each fold carries a bit of magic, transforming a flat sheet into something meaningful.
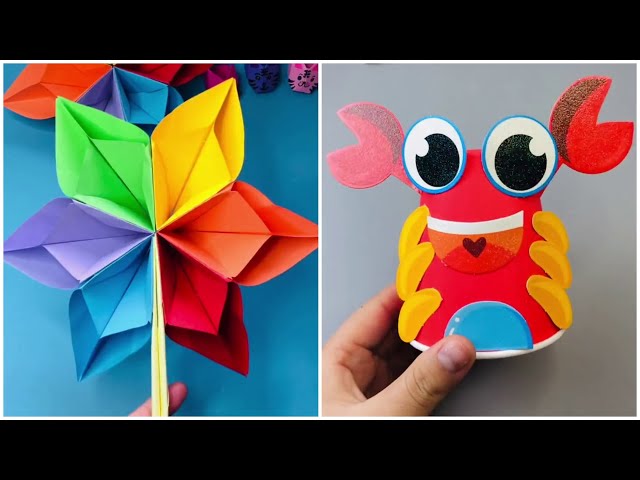
Origami Flower Bouquet
Next up, let’s brighten your day with an origami flower bouquet. It’s a lovely gift or decoration that can last forever! Here’s how to create a simple flower:
- Materials Needed:
- Colored paper (you can use different colors for vibrant petals).
- A green paper straw or stick for the stem.
- Folding Steps:
- Step 1: Start with a square piece of paper and fold it in half diagonally to form a triangle.
- Step 2: Fold the corners to the top point, then fold the new triangle in half.
- Step 3: Create a petal shape by twisting the ends outward. Repeat for multiple flowers! 🌼
- Step 4: Attach flowers to your green stem with tape or glue.
Creating beautiful origami flowers can be an enjoyable way to add a personal touch to any occasion. I’ve often made bouquets as centerpieces for family gatherings—they’re always a hit! With these origami creations, you can fill your space with joy and creativity! 🌷

Useful Paper Mache DIY Projects
Continuing with our crafting journey, let’s explore the wonderful world of paper mache! This technique, combining strips of paper and a glue-like solution, allows you to create stunning, functional items while having loads of fun. Two fantastic projects to try are making a paper mache bowl and creating customized masks. Let’s dive into these exciting DIY ventures! 🎨
Paper Mache Bowl
Creating a paper mache bowl is a practical and artistic project. It can be used for storage, decor, or even as a gift. Here’s how to create your own:
- Materials Needed:
- Strips of newspaper or craft paper.
- A balloon (to use as a mold).
- Flour and water for the paste (or use white craft glue).
- Acrylic paints (optional) for decoration.
- Steps to Make Your Bowl:
- Step 1: Inflate the balloon to your desired size and tie it securely.
- Step 2: Mix flour and water to create a paste, then dip the paper strips into it, removing excess paste.
- Step 3: Layer the strips over the balloon until you have several layers (about 4-5 for sturdiness).
- Step 4: Let it dry completely before popping the balloon and carefully removing it from inside.
- Step 5: Paint and decorate your bowl as you like! ✨
I remember making a colorful paper mache bowl for my sister’s birthday—she loved it! Every time she uses it, it reminds her of our crafting day.
Customized Mask Making
Now let’s get a bit adventurous with customized mask making! Masks are perfect for parties, Halloween, or simply expressing your creativity. Here’s how you can make your own:
- Materials Needed:
- Cardboard or thick paper for the base.
- Paper mache supplies (strips and paste).
- Paints, glitter, and embellishments for decoration.
- Steps for Your Custom Mask:
- Step 1: Cut out a basic mask shape from cardboard. Make sure to include eye holes.
- Step 2: Apply paper mache strips over the mask, building it up for texture.
- Step 3: Once dry, paint it any way you like! Add feathers, sequins, or other decorations to make it stand out.
- Step 4: Attach a string or elastic band to wear your masterpiece proudly! 🎭
Making customized masks can be incredibly fun, especially with friends or family. I’ve co-created masks for masquerade parties, and it became a highlight of our gatherings! Both of these paper mache projects will unleash your creativity and give you practical crafts to show off. Let the fun begin! 🌟
Quilling for Beginners
Now that we’ve explored the playful nature of paper mache, let’s glide into the intricate world of quilling! This mesmerizing art form involves rolling, shaping, and gluing strips of paper to create stunning designs. It’s a relaxing craft that anyone can pick up, and it’s perfect for adding a personal touch to your projects. So, let’s get started on quilling basics before diving into one of the most popular applications: creating beautiful quilled greeting cards! 🎨✨
Basic Quilling Techniques
Before you jump into your first project, let’s cover some fundamental quilling techniques that you’ll need:
- Tools Required:
- Quilling tool (or a simple toothpick).
- Paper strips (usually 1/8 inch wide).
- Glue (a fast-drying liquid glue is best).
- Scissors for trimming.
- Essential Techniques:
- Coiling: This is the foundation of quilling. Roll a strip of paper around your quilling tool, hold it tightly, and let it go to form a coil. Secure it with a dab of glue.
- Shaping: After coiling, you can pinch or manipulate the coil into various shapes, like teardrops or hearts.
- Squeezed shapes: By pinching the edges of your coil, you can create different forms that add variety to your designs.
I still remember the thrill of my first simple coil! It felt like magic as the paper transformed under my fingers.
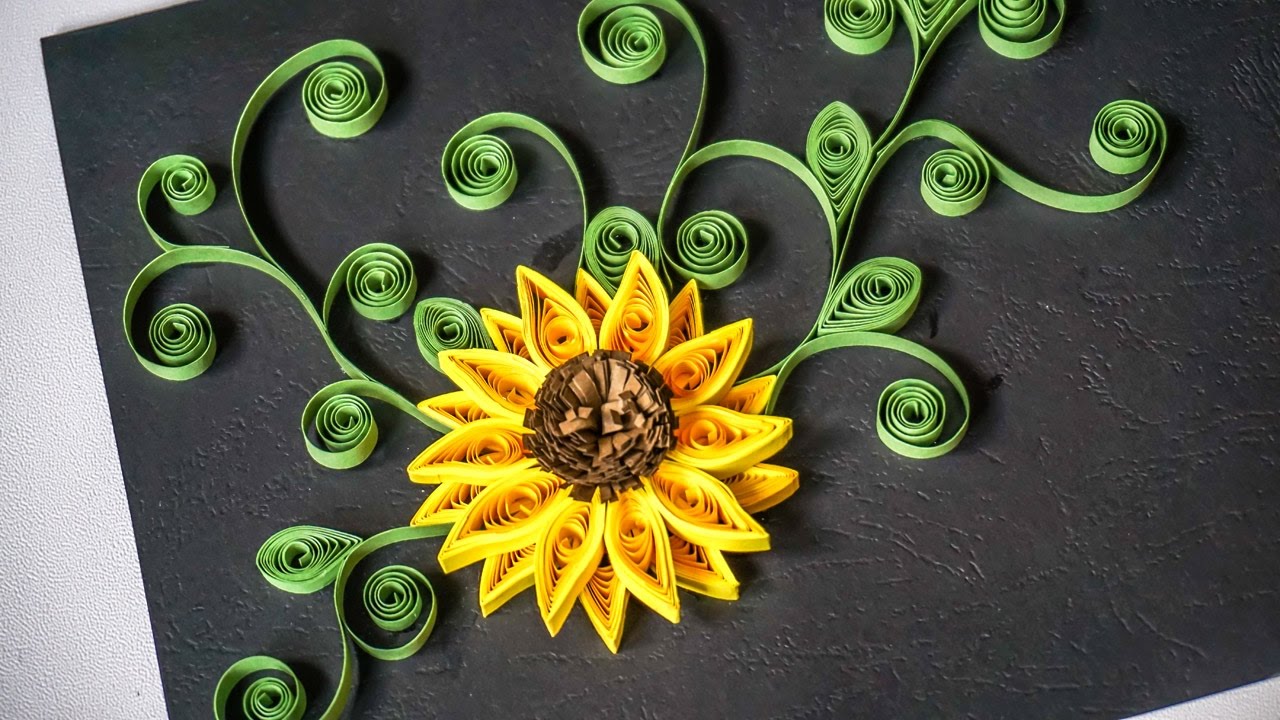
Quilled Greeting Cards
Once you’ve grasped the basics, it’s time to put your skills to use in creating stunning quilled greeting cards. They’re perfect for any occasion! Here’s how you can make your own:
- Materials Needed:
- Blank card stock or pre-made cards.
- Quilling paper strips in various colors.
- Your basic quilling supplies from earlier.
- Creating Your Card:
- Step 1: Design your layout! Sketch a simple arrangement of flowers, hearts, or any shape you prefer.
- Step 2: Start rolling your paper strips and form the shapes you need according to your design.
- Step 3: Glue each piece onto the card stock, layering them thoughtfully for dimension.
- Step 4: Once everything is glued down, write a heartfelt message inside. Your quilled card is ready to shine! 🎉
I’ve made several quilled cards for birthdays and holidays, and they have always been well-received. Sharing a piece of your creativity is truly a gift that keeps on giving! Now, it’s your turn to dive into the world of quilling and create something beautiful! 🌼
Decorative Paper Lanterns
Transitioning from the delightful world of quilling, let’s illuminate your crafting space with beautiful decorative paper lanterns! These vibrant creations can brighten up any room or garden, creating a magical atmosphere for gatherings or quiet nights at home. Whether you’re hosting a party or just want to add a cozy touch to your living area, paper lanterns offer endless possibilities. Let’s explore how to make mini paper lanterns and some creative designs that will inspire your imagination! 🏮✨
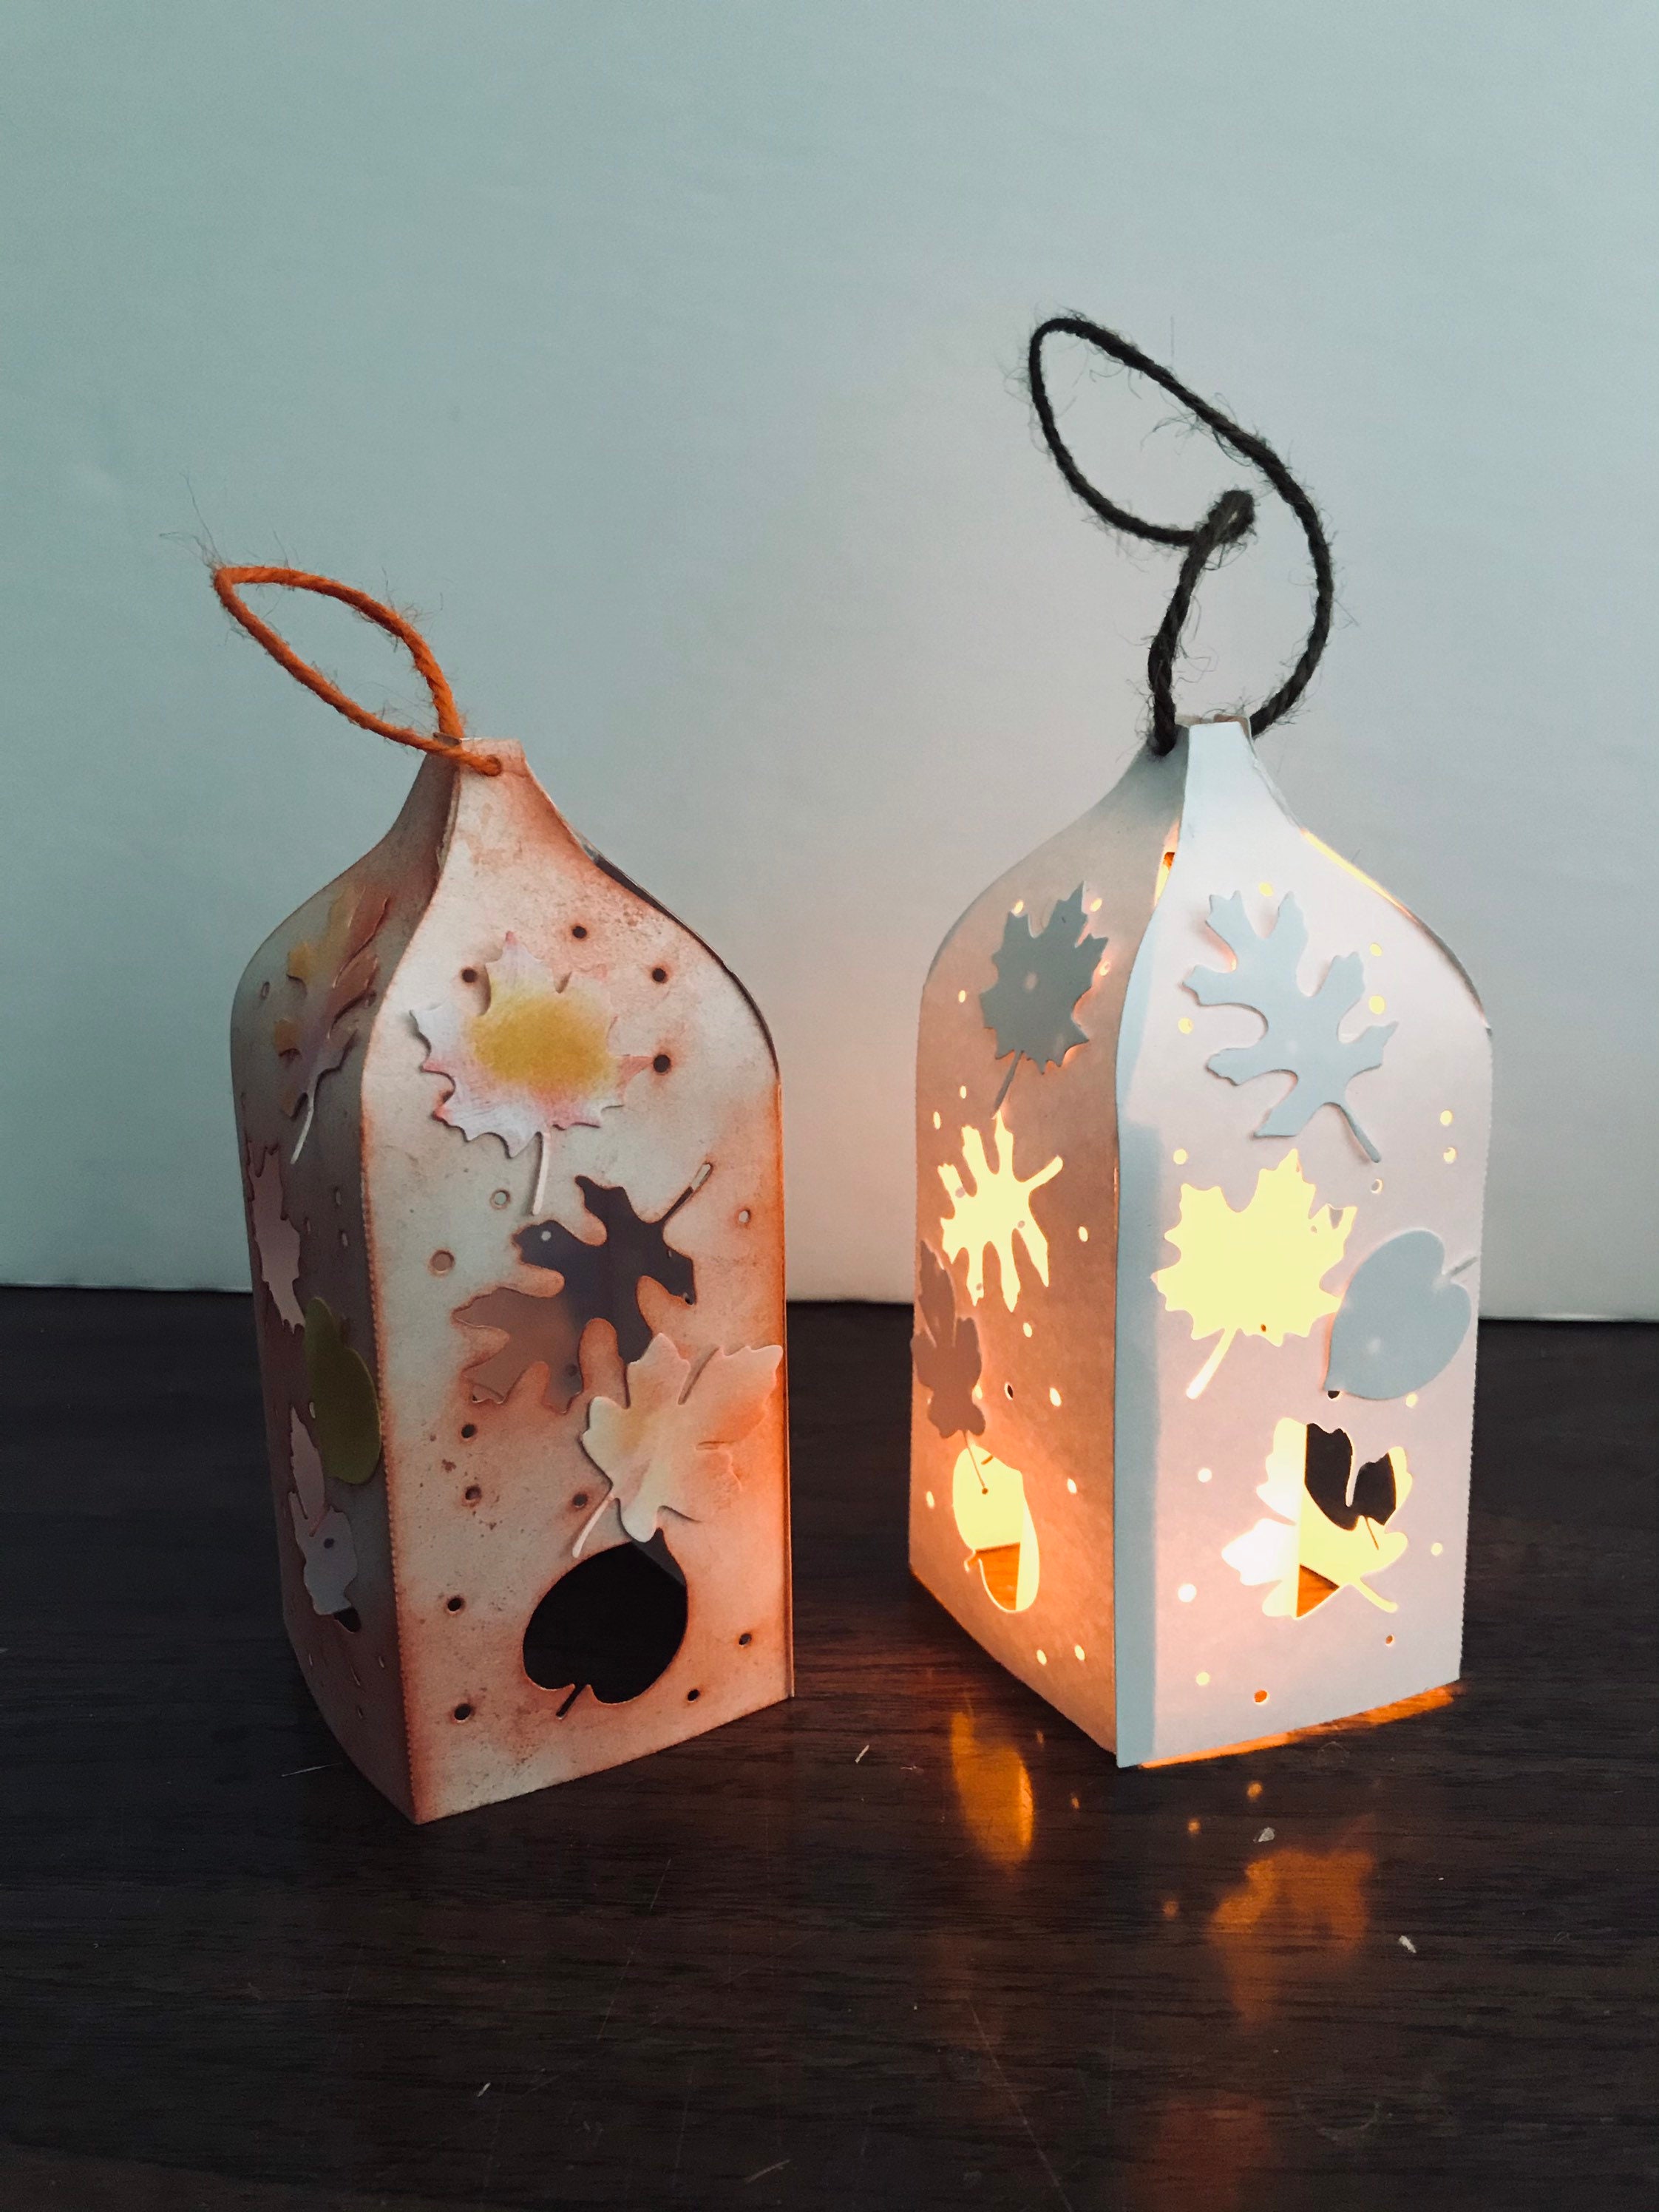
Mini Paper Lanterns
Mini paper lanterns are adorable and perfect for adorning tables, shelving, or outdoor spaces. Here’s how to make them:
- Materials Needed:
- Colored or patterned paper.
- Scissors.
- Glue or double-sided tape.
- A small LED tealight (for safety).
- Steps to Create Mini Lanterns:
- Step 1: Cut a rectangular piece of paper (about 4 inches by 6 inches). Feel free to use solid colors or fun patterns!
- Step 2: Make vertical cuts along the length, leaving 1 inch uncut at the top and bottom to form tabs.
- Step 3: Roll the paper into a cylinder shape and glue the ends together, then fold the tabs at the top to secure them to create a handle.
- Step 4: Place your LED tealight inside, and voilà—your mini paper lantern is ready to shine! ✨
I’ve often used these mini lanterns for birthday parties—setting them up at the dessert table always brings a smile to everyone’s face!
Creative Lantern Designs
Now that you’ve got the basics down, let’s explore creative lantern designs to take your crafting to the next level:
- Globe Lanterns: Use round paper balloons as the base for larger lanterns. Cover them with decorative paper, and once dry, pop the balloon for a stunning globe lantern effect.
- Layered Lanterns: Create a cascading effect by layering different sizes of lanterns. Cut varying lengths and widths of paper, and stack them for a dramatic visual impact.
- Theme Lanterns: Customize your lanterns based on themes—holiday-themed colors for Christmas, or pastel colors for spring decorations. 🎉
My favorite project was crafting lanterns for a garden party using floral patterns. When the sun set, the glow was enchanting, making for an unforgettable evening! With these ideas, it’s time to channel your creativity into making beautiful paper lanterns that invite warmth and light into any space. Let your imagination run wild! 🌈

Easy Paper Bag Crafts
Continuing our creative journey, let’s dive into the wonderful world of easy paper bag crafts! Paper bags, whether plain or colorful, offer a delightful canvas for crafting projects that are fun, functional, and environmentally friendly. Two standout ideas that you can easily try at home are creating paper bag puppets and personalized gift bags. Let’s jump right in! 🎭🎁
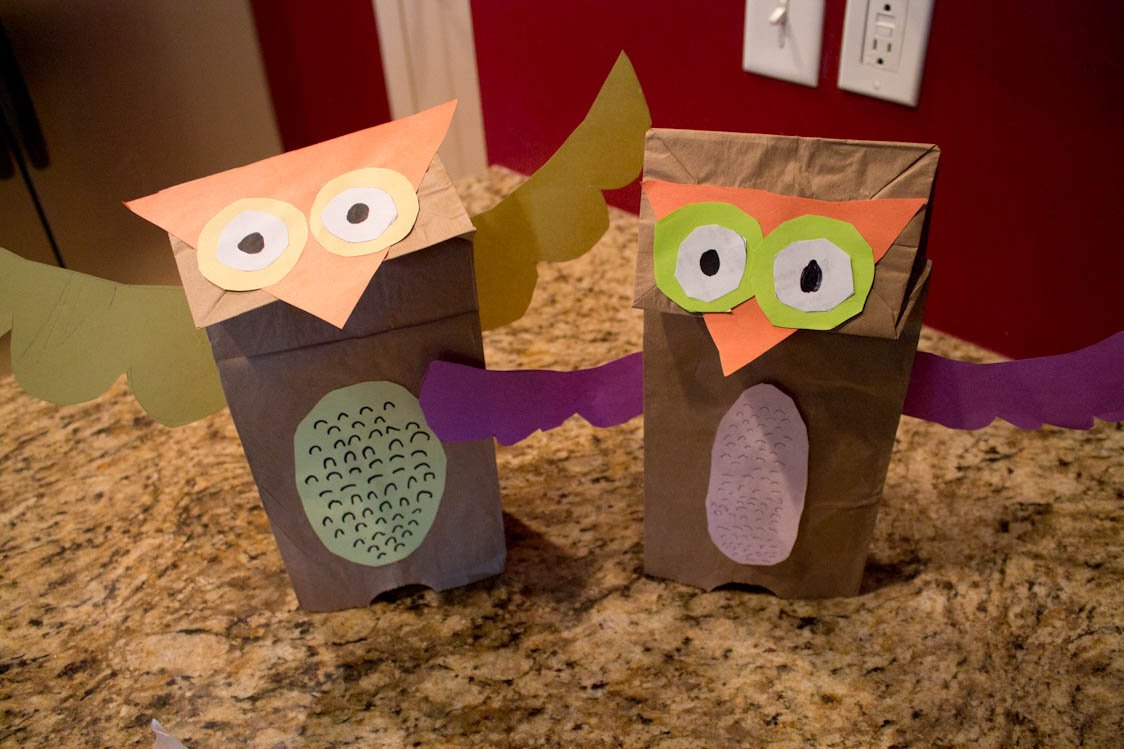
Paper Bag Puppets
Making paper bag puppets is not only a fantastic way to spark creativity, but it also encourages storytelling and imaginative play! Here’s how you can whip up your very own puppet friends:
- Materials Needed:
- Brown paper bags (or any colored bags you have).
- Markers, crayons, or colored pencils.
- Glue and assorted craft supplies (like googly eyes, fabric scraps, and yarn).
- Steps to Create Puppets:
- Step 1: Start with a plain paper bag; this will be the base of your puppet.
- Step 2: Use markers or craft supplies to draw or attach features like eyes, noses, and mouths. You can create animals, people, or even monsters!
- Step 3: Add yarn or fabric for hair, and any other embellishments to personalize it.
- Step 4: Now, let your imagination run wild by bringing your puppet to life through a little puppet show! 🎉
I crafted a whole troupe of animal puppets for my niece’s birthday party, and they were a huge hit! The kids loved putting on their own performances to showcase their creativity.
Personalized Gift Bags
Next up, let’s explore how you can turn humble paper bags into beautiful personalized gift bags! Perfect for any occasion, these bags add a personal touch to your gifts. Here’s how to make some:
- Materials Needed:
- Plain paper bags (gift or lunch bags work great).
- Stamps, stickers, or decorative paper to customize.
- Ribbon or twine for a finishing touch.
- Steps for Personalization:
- Step 1: Decorate the entire bag using stamps or stickers that match the occasion (think balloons for birthdays or leaves for fall).
- Step 2: Write a special message or the recipient’s name on the bag with markers.
- Step 3: Add some ribbon or twine to the handles for an extra flair! 🎀
I’ve made personalized gift bags for holidays and special occasions, and there’s nothing more rewarding than seeing the recipient’s face light up when they notice the special touch! With these easy paper bag crafts, you can transform ordinary bags into extraordinary creations. Get your supplies ready and let the fun begin! 🌈

Fun and Functional Bookmark Ideas
As we continue exploring the creative world of paper crafts, let’s shine a light on an everyday necessity: bookmarks! Not only do they serve a practical purpose, but they can also express your personal style and creativity. Today, we’ll dive into two delightful types of bookmarks: corner bookmarks and tassel bookmarks. Perfect for readers of all ages! 📚✨
Corner Bookmarks
Corner bookmarks are not just functional; they add a whimsical touch to your reading experience. They slip right onto the corner of your page, making them easy to use and hard to lose. Here’s how to make one:
- Materials Needed:
- A square piece of paper (origami paper works beautifully).
- Markers, stickers, or washi tape for decorating.
- Steps to Create Corner Bookmarks:
- Step 1: Fold the square paper in half diagonally to form a triangle.
- Step 2: With the triangle pointing towards you, take the two bottom corners and fold them up to meet the top point, creating a smaller triangle.
- Step 3: Flip it over and decorate the front with fun designs or characters. 🎨
- Step 4: Slip it onto the corner of your book page. Easy peasy!
I crafted several corner bookmarks with my kids, and we loved decorating them to look like animals. They turned out so cute that the kids started using them as fancy toys too!
Tassel Bookmarks
For a more sophisticated flair, tassel bookmarks are a fantastic choice. They add elegance and a touch of color to your reading adventures. Let’s explore how to make one:
- Materials Needed:
- A sturdy piece of cardstock for the base.
- Embroidery thread or thin yarn for the tassel.
- Scissors and glue.
- Steps for Creating Tassel Bookmarks:
- Step 1: Cut a piece of cardstock to your desired bookmark size (around 2 inches by 6 inches is ideal).
- Step 2: To make a tassel, cut a length of yarn (about 12 inches), wrap it around your fingers several times, and tie off one end.
- Step 3: Attach the tassel to one end of the bookmark using glue or by punching a small hole. 🎀
- Step 4: Personalize the base with patterns, quotes, or embellishments!
I created a tassel bookmark for my best friend’s birthday, pairing it with her favorite book. She loved it so much that it now holds a special place on her reading shelf! With these fun and functional bookmark ideas, you can combine creativity and practicality. Grab your supplies and start crafting gorgeous bookmarks that will inspire your reading journey! 🌟

Pretty Paper Flower Decor
As we shift from bookmarks to something a bit more vibrant, let’s dive into the delightful realm of paper flower decor! Paper flowers can add elegance and charm to any space without the fuss of maintenance. Today, we’ll explore two beautiful projects: creating crepe paper flowers and designing a DIY floral wreath. Both options are perfect for brightening your home or gifting to someone special! 🌸✨
Crepe Paper Flowers
Crepe paper flowers are known for their realistic appearance and vibrant colors. They’re not only stunning but also relatively easy to make. Here’s how you can craft your own:
- Materials Needed:
- Crepe paper sheets (in various colors).
- Scissors.
- Floral wire and tape.
- Glue (optional).
- Steps to Make Crepe Paper Flowers:
- Step 1: Cut out strips of crepe paper (about 1 inch wide and 10-12 inches long).
- Step 2: Fold the strip to create petals and use floral wire to secure it tightly at the bottom.
- Step 3: To shape the petals, stretch and twist the crepe paper gently.
- Step 4: Repeat the process to create multiple blooms and bundle them together using floral tape. 🌼
I once spent an afternoon making a bouquet of crepe paper flowers for my mother’s birthday, and she couldn’t believe they were made of paper! They made such a thoughtful and personalized gift.
DIY Floral Wreath
Next up, let’s elevate your decor with a stunning DIY floral wreath. It’s perfect for front doors, special occasions, or simply adding a touch of color to your walls. Here’s how to make your own:
- Materials Needed:
- A foam wreath form or a grapevine wreath base.
- Various paper flowers (like the ones you just made!).
- Greenery (can also be made from paper or faux leaves).
- Hot glue gun or tacky glue.
- Steps to Create Your Wreath:
- Step 1: Start by attaching your greenery around the wreath form using glue.
- Step 2: Strategically place your paper flowers, gluing them onto the wreath until you’re satisfied with the layout.
- Step 3: Add other embellishments, such as ribbons or pearls, for a personal touch.
- Step 4: Once dry, hang it proudly on your door or wall! 🚪💐
I made a floral wreath for a friend’s baby shower, and it became the focal point of the party decor. Everyone loved it, and it was a delightful way to celebrate the occasion! With these pretty paper flower decor ideas, you can easily enhance any space with creativity and charm. Gather your materials, and let your imagination bloom! 🌼🌷

Handmade Paper Jewelry
Shifting from vibrant decor to wearable art, let’s explore the fascinating world of handmade paper jewelry! This unique craft allows you to express your creativity while making stunning pieces that can lighten up any outfit. Today, we’ll focus on two delightful projects: paper bead necklaces and quilled earrings. Both are perfect for gifting or adding a personal touch to your accessories! 💖✨
Paper Bead Necklace
Creating a paper bead necklace is a fun and eco-friendly way to make beautiful jewelry. By repurposing paper, you can create unique beads that reflect your personal style. Here’s how to make one:
- Materials Needed:
- Colorful paper (magazines, old book pages, or scrapbook paper).
- Scissors and a ruler.
- Toothpick or small skewer for rolling the beads.
- Clear varnish or Mod Podge (for sealing).
- Steps to Make Your Necklace:
- Step 1: Cut the paper into triangles; the wider the base, the bigger the bead! For example, cut strips that are about 1 inch wide at the base and 6 inches long.
- Step 2: Starting from the base, roll the paper tightly around the toothpick and secure the end with glue.
- Step 3: Once you have several beads, coat them with varnish to give them a nice finish and protect them from wear.
- Step 4: String the beads onto a cord or chain to complete your necklace. 🎀
I used this technique to create a custom necklace for my best friend’s birthday. She loved the vibrant colors and always gets compliments when wearing it!
Quilled Earrings
For a touch of elegance, let’s dive into quilled earrings. This project combines the delicate art of quilling with jewelry making, resulting in lovely pieces that can brighten your look! Here’s how you can create your own:
- Materials Needed:
- Quilling strips in various colors.
- Quilling tool (or a toothpick).
- Earring hooks and jump rings.
- Glue for securing shapes.
- Steps to Create Quilled Earrings:
- Step 1: Roll several quilling strips into loose coils and shape them into interesting designs (like drops or circles).
- Step 2: Secure the shapes with glue and allow them to dry completely.
- Step 3: Attach your quilled shapes to earring hooks using jump rings.
- Step 4: Let your creativity shine—experiment with different shapes and colors! 🎨
I recently made a pair of quilled earrings in bright turquoise for a summer wedding. They were a big hit and added just the right pop of color to my outfit! With handmade paper jewelry, you can create one-of-a-kind accessories that tell a story. So gather your materials and let your creativity shine through paper! 🌟

Cute Paper Puppetry
As we transition from the world of handmade jewelry, let’s step into the playful universe of cute paper puppetry! This delightful craft not only entertains but also ignites creativity in both young and old. Today, we’ll explore two charming projects: finger puppets and paper doll dress-up. Each project promises fun and laughter, whether you’re putting on a show or dressing up characters! 🎭🌈
Finger Puppet Tutorial
Finger puppets are an engaging way to bring stories to life. They can easily be made from simple materials that you likely already have at home. Here’s how to create your own finger puppets:
- Materials Needed:
- Colored construction paper or felt.
- Scissors and glue.
- Markers or crayons for decoration.
- Steps to Make Finger Puppets:
- Step 1: Cut a rectangular piece of paper that’s about 3 inches wide and 5 inches tall.
- Step 2: Fold the rectangle in half lengthwise, making sure the inside is smooth. This will be the puppet’s body.
- Step 3: Cut out features like eyes, mouth, and ears from other colored papers or felt, then glue these onto the puppet.
- Step 4: Once dry, slip the puppet onto your finger and let the storytelling begin! 🌟
I once held a puppet show for my niece’s birthday, using finger puppets of her favorite animals. It was a hit, and the laughter still resonates in my memories!
Paper Doll Dress-Up
For a more interactive project, paper doll dress-up is an absolute gem. It allows creativity to explode as you design outfits and accessories for your paper friends. Here’s how to create your own:
- Materials Needed:
- Sturdy paper or cardstock.
- Markers, crayons, and decorative items like sequins or fabric scraps.
- Scissors and a glue stick.
- Steps for Paper Doll Dress-Up:
- Step 1: Draw a simple outline of a doll on cardstock, ensuring you leave tabs at the edges for the clothes.
- Step 2: Create separate clothing pieces by drawing, cutting, and decorating them on additional paper.
- Step 3: Use the tabs on each outfit to attach them to the doll seamlessly.
- Step 4: Mix and match outfits for endless fun and creativity! 👗
I remember spending joy-filled afternoons as a kid dressing up my paper dolls, making them ready for an imaginary adventure—such cherished moments! Both finger puppets and paper dolls are wonderful ways to encourage creativity and storytelling. These projects promise to inspire delightful playtime, so gather your supplies and let your imagination run wild! 🌟
Colorful Decoupage Projects
Now that we’ve ventured through the whimsical world of puppetry, let’s explore the vibrant art of decoupage! This delightful technique transformsn everyday items into unique, personalized pieces through layering and gluing decorative materials. Today, we’ll focus on two fun projects: decoupage coasters and a makeover for an upcycled tray. Both are fantastic ways to infuse a splash of color and creativity into your home! 🎨✨
Decoupage Coasters
Creating decoupage coasters is a simple yet effective way to protect your surfaces while showcasing your artistic flair. Here’s how to make your own:
- Materials Needed:
- Plain cork or wooden coasters.
- Decorative paper (old magazines, napkins, or scrapbook paper).
- Mod Podge or any waterproof glue.
- Paintbrush for application.
- Sealant (optional for added protection).
- Steps to Make Your Coasters:
- Step 1: Cut your decorative paper into squares or circles that are slightly larger than your coasters.
- Step 2: Apply a layer of Mod Podge to the coaster surface, then place your paper on top, smoothing out any bubbles.
- Step 3: Once dry, apply a few more layers of Mod Podge over the top for durability. 🎉
- Step 4: Optionally, finish with a sealant to protect your coasters from moisture.
I made a set of floral coasters for my coffee table, and they sparked conversations with guests about their beauty! 🌸
Upcycled Tray Makeover
Another exciting project is giving an old tray a fresh lease on life through decoupage. Perfect for serving drinks or displaying decor, it’s a functional piece that tells a story. Here’s how to upcycle your tray:
- Materials Needed:
- An old wooden or plastic tray.
- Decorative paper or fabric scraps.
- Mod Podge or craft glue.
- Paintbrush and scissors.
- Steps for Your Tray Makeover:
- Step 1: Clean your tray thoroughly, removing any dirt or grease.
- Step 2: Cut your decorative material into pieces that fit the tray’s surface. You can use one large piece or multiple smaller ones for a collage effect.
- Step 3: Adhere the material to the tray using Mod Podge, smoothing the surface gently.
- Step 4: Once dried, apply several layers of Mod Podge over the top for protection. 🎨
I recently transformed an outdated tray with vibrant patterned paper that matches my kitchen decor. It’s now my favorite item for serving snacks during movie nights! 🍿 With these colorful decoupage projects, you can upcycle and revitalize items around your home while unlocking your creative potential. Gather your materials and let the fun begin! 🌟
XII. Recycled Paper Wall Art
Transitioning from the colorful world of decoupage, let’s dive into the imaginative realm of recycled paper wall art! This eco-friendly craft not only helps you repurpose old materials but also allows you to create stunning pieces for your home. Today, we’ll explore two creative projects: rolled paper art and collage wall decor. Both of these projects turn everyday paper into beautiful expressions of art! 🎨🌿
Rolled Paper Art
Rolled paper art is a delightful and visually striking way to utilize leftover paper scraps or old magazines. This technique involves rolling strips of paper into various shapes to create stunning designs that can be framed or displayed. Here’s how you can create your own:
- Materials Needed:
- Old magazines, colored paper, or cardstock.
- Scissors and a quilling tool (or a toothpick).
- Glue and a canvas or sturdy cardstock for the base.
- Steps to Make Rolled Paper Art:
- Step 1: Cut strips of paper about 1/4 inch wide in varying lengths.
- Step 2: Roll the strips tightly around the quilling tool, then secure them with glue to maintain the shape.
- Step 3: Arrange and glue your rolled shapes onto the canvas or cardstock in a design of your choice (think flowers, abstract shapes, or intricate patterns). 🌼
- Step 4: Once dry, frame your creation or display it as is!
I once created a vibrant mandala design for my living room, using a plethora of colorful paper strips. It has become a conversation starter for guests!
Collage Wall Decor
Another fantastic way to create wall art is through collage. This project allows for endless creativity as you mix and match different materials and designs. Here’s how to make a stunning collage:
- Materials Needed:
- Various papers (newspapers, magazines, book pages, art paper).
- Canvas or a sturdy piece of cardboard.
- Mod Podge or glue.
- Scissors and paintbrush.
- Steps for Collage Wall Decor:
- Step 1: Gather inspiration by deciding on a theme or color palette for your collage.
- Step 2: Cut out images, words, and shapes from your selected papers.
- Step 3: Arrange your cutouts on the canvas before gluing them down to ensure a pleasing composition. ✂️
- Step 4: Once satisfied with the layout, use Mod Podge to secure all the pieces, applying a layer over the top for a finished look.
I created a travel-themed collage using old postcards and maps that I had collected over the years. Every time I walk by it, I’m reminded of my adventures! 🌍 By embarking on these recycled paper wall art projects, you can infuse your space with creativity while being eco-conscious. Gather your materials and let your artistic side shine! 🌟

XIII. Embossed Paper Crafts
As we move from the vibrant world of recycled paper wall art, let’s explore the wonderful technique of embossing in paper crafts! Embossed designs add depth and texture to your creations, elevating simple projects into stunning works of art. Today, we’ll delve into two enjoyable embossed paper projects: creating embossed greeting cards and experimenting with texture painting techniques. Both are perfect for making your crafts stand out! 🎨✨
Embossed Greeting Cards
Embossed greeting cards offer a beautiful way to convey heartfelt messages while showcasing your artistic flair. These cards feel visually appealing and add a tactile experience for the recipient. Here’s how to create your own:
- Materials Needed:
- Blank cards or cardstock.
- Embossing folder (available at craft stores) or various stencils.
- Ink or embossing powder and a heat gun (if you want to do heat embossing).
- A brayer or rolling pin for applying pressure.
- Steps to Make Embossed Greeting Cards:
- Step 1: Place the blank card inside the embossing folder or secure your stencil on the card.
- Step 2: Run it through an embossing machine or apply pressure with a brayer to create the embossed pattern.
- Step 3: If using ink or powder, apply it to the raised areas for added dimension and color.
- Step 4: Once complete, write your message inside and you have a beautiful, personalized greeting card! 🎉
Creating embossed cards for special occasions has become a yearly tradition of mine. Friends and family always appreciate the personal touch!
Texture Painting Techniques
Next, let’s dive into the world of texture painting! This technique adds an artistic touch to your crafts, transforming flat surfaces into lively, dynamic pieces of art. Here’s how to get started:
- Materials Needed:
- Canvas or thick paper.
- Acrylic paints and modeling paste (or thick glue).
- Palette knife or brush for application.
- Steps for Texture Painting:
- Step 1: Using a palette knife, apply modeling paste to the canvas to create textured designs or patterns.
- Step 2: Once the paste has dried, paint over it with your choice of colors. The raised areas will catch the light and create interesting shadows.
- Step 3: Experiment with different tools; stencils or sponges can create unique effects as well. 🌟
I experimented with texture painting to create a nature scene, and the results were breathtaking! The raised leaves and flowers added a wholly new dimension to the artwork. 🌿 By incorporating embossed techniques into your crafts, you can elevate your creations while exploring your artistic side. Gather your materials and start crafting beautiful embossed art that resonates with your unique style! 🌈

XIV. Personalized Paper Stationery
Continuing our creative journey, let’s immerse ourselves in the charming world of personalized paper stationery! Custom stationery adds a unique touch to your correspondence and makes everyday note-taking enjoyable. Today, we’ll explore how to create DIY envelopes and custom notepads, perfect for anyone looking to infuse their personal flair into their writing supplies! ✉️✍️
DIY Envelopes
Crafting your own envelopes is a fantastic way to elevate any letter or card. It’s easy to do and allows you to coordinate your stationery perfectly. Here’s how to make your own unique envelopes:
- Materials Needed:
- Colored or patterned paper (scrapbook paper works wonderfully!).
- A ruler and pencil for measuring.
- Scissors and glue or double-sided tape.
- Steps to Create DIY Envelopes:
- Step 1: Start by selecting your paper and cut it into a square (typically 8×8 inches works well).
- Step 2: Fold the square diagonally to form a triangle and unfold it. This crease will guide your folds.
- Step 3: Fold the two opposite edges inward to meet at the center crease, creating the envelope’s flap.
- Step 4: Fold the bottom point up to form the base of the envelope, secure it with glue, and your personalized envelope is ready to use! 🎉
I used this technique for my holiday cards last year, matching my envelopes to the card designs. It created a polished and thoughtful presentation that family and friends appreciated!
Custom Notepads
Next, let’s create custom notepads that add a touch of personality to your everyday notes. Perfect for jotting down reminders or to-do lists, these notepads can be easily personalized. Here’s how to whip one up:
- Materials Needed:
- Several sheets of paper (printer paper or decorative paper).
- Cardstock for the backing.
- A strong adhesive (like glue or double-sided tape).
- A cutting tool or paper trimmer.
- Steps to Make Custom Notepads:
- Step 1: Stack your sheets of paper and cut them into your desired notepad size (like 4×6 inches or 5×7 inches).
- Step 2: Take a piece of cardstock and cut it to match the dimensions of your sheets; this will serve as the backing.
- Step 3: Align the papers and apply a row of adhesive along the edge to bind them together, letting them dry completely.
- Step 4: For an extra touch, decorate the top with your favorite designs or quotes using stamps or markers. 🌸
Creating a custom notepad filled with motivational quotes became a personal project for me a while back. It kept my spirits high while organizing tasks! By diving into personalized paper stationery projects, you unleash your creativity while creating functional and beautiful items. Gather your supplies and let your imagination guide you as you craft unique stationery that’s truly your own! 🌟

XV. Creative Papercutting Designs
Continuing our exploration of personalized stationery, let’s dive into the enchanting world of creative papercutting designs! This intricate art form transforms simple sheets of paper into mesmerizing works of art. Whether you’re crafting beautiful papercut art or stylish geometric cutouts, this craft is a fantastic way to express your creativity. Let’s delve into two exciting projects: intricate papercut art and geometric paper cutouts! ✂️✨
Intricate Papercut Art
Creating intricate papercut designs can be incredibly rewarding and meditative. With patience and precision, you can craft stunning pieces that can be framed or used as decorations. Here’s how to dive into this art form:
- Materials Needed:
- High-quality paper (like cardstock).
- A sharp craft knife or an X-Acto knife.
- Cutting mat for protection.
- A pencil for sketching your designs.
- Steps to Create Intricate Papercut Art:
- Step 1: Sketch a detailed design on your paper. Flowers, animals, or whimsical patterns work beautifully.
- Step 2: Carefully cut along the lines of your design using the craft knife, ensuring you’re working on the cutting mat to protect your surfaces.
- Step 3: Once cut, you can mount your art on a contrasting background to enhance the visual effect. 🖼️
I once made a special papercut art piece featuring a tree design for my friend’s wedding gift. Its intricate details captured the essence of everything they loved, and it made for a memorable present!
Geometric Paper Cutouts
For a modern twist, geometric paper cutouts are a stylish option that adds flair to your home decor. They can be used for wall art, party decorations, or even as unique card designs. Here’s how to create them:
- Materials Needed:
- Colored paper or patterned scrapbook paper.
- Scissors or a craft knife.
- Ruler and pencil for drawing shapes.
- Steps for Geometric Paper Cutouts:
- Step 1: Decide on the geometric shapes you want to create—triangles, hexagons, or abstract forms work well.
- Step 2: Using a ruler and pencil, measure and mark your shapes on the paper.
- Step 3: Cut out the shapes carefully. You can arrange these cutouts in layers on a canvas for added dimension. 🎉
I crafted a geometric wall hanging for my living room using this technique and love how it brightens up the space with its modern vibe! With these creative papercutting projects, you can transform basic paper into striking, artistic pieces. Gather your materials and let your imagination guide you through the world of papercutting! 🌈