
Introduction
Crafting is more than just a hobby; it’s a joyful expression of creativity. Whether you’re painting, knitting, scrapbooking, or indulging in DIY projects, having a well-organized workspace can significantly enhance your crafting experience. Imagine a space where everything you need is easily accessible, where tools and materials are neatly arranged, and a workspace that inspires you to dive right into your projects! In this guide, we’ll explore how to achieve that organized crafting oasis using budget-friendly solutions from IKEA. You don’t need to be an organization guru or have a big budget; IKEA offers a variety of options that cater to every crafter’s needs.
The Benefits of Organized Craft Storage
A clutter-free and organized crafting space boosts your productivity and sparks creativity. Here are some key benefits of having your craft supplies organized:
- Increased Efficiency: When you know exactly where each item is, you spend less time searching for supplies and more time creating.
- Reduced Stress: A well-organized space creates a calming environment. You’ll find crafting less overwhelming and more enjoyable.
- Enhanced Creativity: With your materials neatly arranged, you’re more likely to feel inspired to try new projects.
- Flexible Layout: Many IKEA products allow you to customize your storage solutions according to your space and needs.
Before diving into the various solutions IKEA offers, you might want to assess your crafting needs. Take a moment to consider the types of crafts you enjoy and the materials you frequently use. Knowing this will guide you in selecting the right storage solutions.
Understanding Your Crafting Needs
Every crafter has unique requirements. Let’s think about the kinds of supplies you may have:
- Small Tools: Scissors, glue guns, and brushes.
- Fabrics and Papers: Different colors and textures that require easy access.
- Organization Tools: Bins or shelves for various crafting items.
- Project Kits: Organizing supplies specific to ongoing or future projects.
Create a list of your crafting supplies and their quantities to visualize what you need to store. Understanding your inventory will help you make informed decisions when selecting IKEA’s craft storage solutions.
Key Considerations When Choosing Storage Solutions
When browsing through IKEA, look out for these factors to ensure you select the best storage options for your crafting zone:
- Space Availability: Assess your workspace dimensions. Is it a small corner, a room, or just a desk? Your space will dictate the size and number of storage units you can utilize.
- Style Compatibility: Consider the aesthetic you want to achieve. Do you prefer a minimalist look, or are you drawn to colorful and vibrant designs?
- Functionality: Look for products that are not just pretty but also practical. Can they easily hold the weight of your supplies? Are they easy to move around?
Creating the Perfect Crafting Setup
Once you’ve assessed your needs and mapped out your space, it’s time to start envisioning your ideal craft area. Picture this: a bright, airy workspace filled with joyful colors and neatly organized supplies. Here are a few ideas to inspire you:
- Visualize Your Space: Draw a rough layout of your crafting area. Decide where larger items like tables will go and how smaller storage solutions can fit around them.
- Incorporate Multi-Functional Furniture: Items that double as storage and work surfaces can maximize your space efficiency.
- Use Clear Storage Solutions: Being able to see your supplies makes it easier to grab what you need quickly.
As we venture through various IKEA products, you’ll find innovative and inspiring ways to organize your crafting area, making every crafting session a delightful experience! Now, let’s explore some of the creative, stylish configurations that will transform your craft storage into a vision of beauty and efficiency!
Why Use IKEA for Craft Storage?
Now that you’ve assessed your crafting needs and envisioned your ideal workspace, let’s delve into why IKEA stands out as a fantastic option for craft storage solutions. Known for its innovative designs and budget-friendly prices, IKEA makes it easier to cultivate a crafting space that not only looks good but also serves your functional requirements.
Variety of Products
One of the most appealing aspects of IKEA is its vast selection of products. Whatever your crafting style or the materials you use, you’re likely to find something that suits your needs. Here’s a quick rundown of what IKEA offers:
- Shelving Units: Great for storing everything from boxes of paint to rolls of fabric.
- Storage Boxes: Available in a plethora of sizes and colors, perfect for sorting smaller supplies.
- Carts and Trolleys: Mobile storage units that can easily be moved around, making them perfect for flexible work areas.
- Work Tables: Sturdy and spacious, giving you ample room to spread out your projects.
Each of these categories provides multiple options, ensuring you’ll find something that fits your space.
Budget-Friendly Pricing
We all know that crafting can get expensive. However, IKEA’s prices make it possible to create an organized craft space without breaking the bank. Many IKEA products are designed to be affordable, meaning you can buy multiple items for a cohesive look without feeling guilty about overspending. For example, you can easily create a stunning craft storage setup with:
- A KALLAX shelving unit for $70
- A RASKOG cart for $50
- Various SOCKERBIT boxes for just $10 each
By purchasing these items, you can achieve a stylish and organized craft area for around $150!
Easy Assembly and Customization
Another benefit of IKEA products is how approachable they are when it comes to assembly and customization. Most items come with clear instructions and require minimal tools, making it simple to set up your crafting space.
- Modular Designs: Many products allow you to mix and match. For instance, you can combine different KALLAX units to create a customized shelving system that caters specifically to your needs.
- Add-On Accessories: Items like SKADIS pegboards come with various hooks and containers, allowing you to tailor your organization strategy based on your specific supplies.
Stylish and Functional
IKEA has a knack for marrying style with functionality. Their clean, modern aesthetics not only make your crafting area look chic but also ensure it remains practical. For example:
- Transparent Storage: Many bins and boxes come clear or translucent, allowing you to see your materials at a glance.
- Color Variety: From bold statement colors to neutral shades, there’s something for everyone. This flexibility lets you build a space that reflects your personality.
Sustainable Choices
For those who are eco-conscious, IKEA also emphasizes sustainability in their product lines. Many of their items are made from renewable materials or recycled products, allowing you to craft with an eco-friendly mindset. Considering the rise in awareness concerning environmental impacts, having a crafting space that supports sustainability is a significant plus.
Personal Anecdote
Having used IKEA for my own crafting setup, I can testify to the impact it made on my creative process. Before I organized my space with IKEA, I often felt overwhelmed by clutter. Once I incorporated a simple RASKOG cart to hold my frequently used tools and a couple of SKADIS pegboards for easy access to my materials, crafting became more enjoyable. Now, I can just roll my cart to wherever I want to work!
Conclusion
In summary, IKEA is an unbeatable choice for crafting storage solutions. With its extensive product range, budget-friendly pricing, easy assembly options, stylish designs, and commitment to sustainability, it opens up endless possibilities for creating an organized, inspiring craft space. So, let your creativity shine by setting it up just the way you want! Ready to dive into some specific IKEA products that can enhance your craft storage? Let’s continue exploring!

Utilizing RASKOG Carts
With a solid understanding of why IKEA is a go-to for craft storage, let’s dive into specific products that can transform your crafting space. First on our list is the versatile RASKOG cart. If you haven’t come across this gem yet, it’s a three-tiered cart on wheels that has become a favorite among crafters, and for good reasons!
Why RASKOG Is Essential for Crafters
The RASKOG cart isn’t just a pretty piece of furniture; it’s a practical tool that can adapt to the ebb and flow of your creativity. Here’s what makes it a must-have:
- Mobility: The wheels on the RASKOG cart make it easy to move your supplies around. If you like crafting on the couch one day and in your craft room the next, this cart ensures you can roll your materials to wherever inspiration strikes.
- Storage Capacity: Each tier offers ample space for all kinds of supplies. You can dedicate one level to paper, another for painting supplies, and the bottom for tools. The possibilities are endless!
- Compact Design: The RASKOG cart is designed to fit snugly in small spaces. You can tuck it away in a corner or slide it between furniture, making it ideal for craft rooms of any size.
How to Organize Your RASKOG Cart
To get the most out of your RASKOG cart, consider the following organizing strategies:
- Categorize Your Supplies: Group similar items together. Keep all your paint supplies on one shelf, and perhaps your cutting tools on another. This way, when you need something specific, you can find it quickly without digging through everything.
- Utilize Bins or Trays: Add small bins or trays to each tier to keep smaller items from falling over. For instance, use a small, shallow bin for brushes, while larger trays can hold larger supplies.
- Label Everything: If you have multiple carts or just a lot of supplies, labeling can save you precious time. Simple labels, whether handwritten or printed, will help you locate supplies at a glance.
- Change It Up: Don’t be afraid to rearrange items! As your crafting habits evolve, your cart can too. There’s no right or wrong when it comes to organizing; just do what works best for you.
Organizing with SKADIS Pegboards
Next up in our crafting arsenal is the SKADIS pegboard system, a fantastic addition to your wall space that complements the RASKOG cart beautifully. If you’ve ever felt frustrated searching for tools or supplies hidden in a box, the SKADIS system is your answer!
Why Choose SKADIS Pegboards?
The SKADIS pegboard system offers a wealth of organizational options while keeping your materials visible and accessible:
- Customizable Storage: You can mix and match various hooks, shelves, and containers. There’s no limit to how you can arrange your items—whether you’re showcasing tools or displaying your favorite art supplies.
- Saves Floor Space: By utilizing wall space, you free up your work area and keep the floor tidy. This is especially useful in smaller craft rooms where every inch counts!
- Versatile Hook System: The included hooks are strong, allowing you to hang heavier items like scissors, rulers, or even small paint cans.
Tips for Organizing Your SKADIS Pegboard
To make the most of your SKADIS pegboard, implementation is key. Here are some easy steps you can follow to create an organized masterpiece:
- Plan Your Layout: Before drilling holes, visualize your layout. Place frequently used items within arm’s reach, while less commonly used supplies can go higher up.
- Combine with Other Storage: Use SKADIS with other IKEA storage solutions! For instance, it pairs excellently with the RASKOG cart, allowing you to create a comprehensive organizational unit.
- Add Personal Touches: Decorating your pegboard with colors and artwork not only serves a functional purpose but can create a beautiful display that inspires you every time you enter your space.
- Regular Maintenance: Periodically assess your pegboard. Crafting supplies often multiply or change, so taking time to reorganize ensures your setup remains functional.
Conclusion
Utilizing the RASKOG cart and SKADIS pegboards together creates a harmonious and visually appealing crafting environment. The ability to adapt, customize, and keep everything within reach can make a significant difference in your crafting routine. By maximizing both movement and visibility, these solutions will allow your creativity to flourish in a beautifully organized space. Ready to explore more IKEA products that can elevate your crafting experience? Let’s dive in!

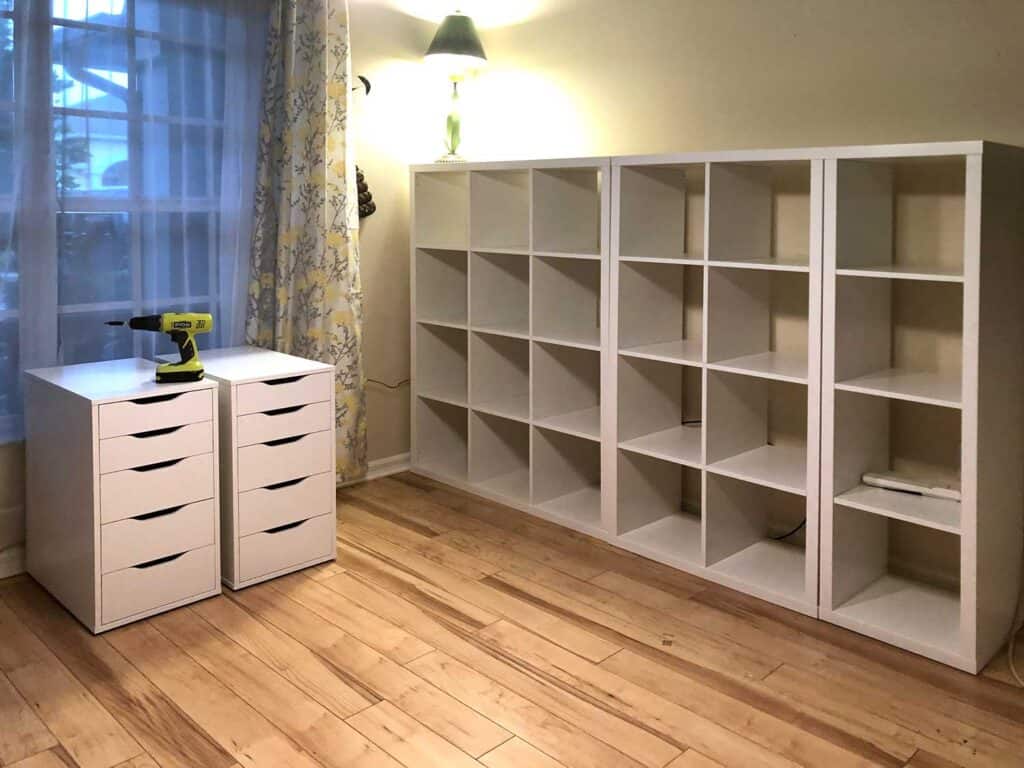
Customizing KALLAX Shelving Units
Now that you have your RASKOG cart and SKADIS pegboards in place, it’s time to take your craft storage to the next level with the KALLAX shelving units. These versatile shelves are not just functional; they can be customized to fit your unique style and needs perfectly. When you think about organizing your craft supplies, KALLAX is truly a game changer.
Why KALLAX Units Are Ideal for Crafters
KALLAX units come with a variety of features that make them an excellent choice for crafty individuals:
- Multiple Sizes and Configurations: KALLAX units are available in different sizes and configurations, so whether you have a large room or a small nook, there’s a KALLAX to fit your space. You can choose a tall five-cube unit or a low three-cube unit depending on your needs.
- Customizable: You can personalize these shelves to make them your own! KALLAX is very versatile. You can add doors, baskets, or even fabric boxes—a whole world of options to make the unit work for you.
- Open and Closed Storage: The combination of open cubes and the option for closed storage allows you to display beautiful supplies while hiding the less aesthetically pleasing items. This balance helps maintain an inviting workspace.
Organizing Your KALLAX Unit
To turn your KALLAX unit into a functional centerpiece for your crafting area, consider these organizing tips:
- Use Baskets and Boxes: Utilize baskets or boxes within the cubes to keep supplies organized. This not only looks visually pleasing but also makes it easy to pull out items quickly.
- Color Code Items: If you’re a visual person, arrange your items by color within the cubes. This helps not only with organization but also adds a pop of color to your crafting area.
- Fill It with Purpose: Designate each cube for a specific type of craft. For instance:
- One cube for fabric and sewing supplies.
- Another for paper, markers, and scrapbooking materials.
- A third for tools like scissors and punches.
This way, everything has its place, and you know exactly where to find it!
- Add Decorative Touches: Consider adding personal embellishments to the unit, such as framed photos, plants, or art pieces. This makes your KALLAX unit not just a storage solution, but an integral part of your craft space.
Storing Supplies in SOCKERBIT Boxes
To enhance the functionality of your KALLAX unit even further, let’s talk about the SOCKERBIT boxes. These boxes complement the shelving units and can really help in achieving an organized and tidy craft area.
The Benefits of SOCKERBIT Boxes
SOCKERBIT boxes are not only stylish but also incredibly practical for crafting supplies:
- Variety of Sizes: SOCKERBIT boxes come in various sizes, so you can choose the right fit for your items—from small embellishments to larger fabric rolls.
- Clear Plastic Design: The transparent nature of these boxes allows you to see the contents easily, making it perfect for quick access to your supplies without rummaging through everything.
- Stackable: They can be neatly stacked, which maximizes vertical space in your KALLAX unit, keeping everything organized and tidy.
Tips for Using SOCKERBIT Boxes Effectively
Implementing SOCKERBIT boxes into your KALLAX setup maximizes both form and function. Here’s how to use them effectively:
- Fill and Label: Consider labeling your boxes for easier identification. For example, label one box “Buttons” and another “Ribbons.” This cuts down on searching time and maintains organization.
- Group Similar Items Together: Just as you would with your KALLAX unit, use SOCKERBIT boxes to group similar crafting materials. Keep all your markers in one box, washi tape in another, and adhesives in yet another.
- Create a Themed Box: For specific projects, create a themed SOCKERBIT box. If you’re working on a scrapbook, gather all relevant supplies—such as stickers, paper, and tools—into one box for easy access.
- Utilize Tidy Storage under Tables: If you have space beneath your crafting table, stack some SOCKERBIT boxes there for additional storage. This keeps your workspace clutter-free while having supplies close at hand.
Conclusion
By customizing KALLAX shelving units and utilizing SOCKERBIT boxes, you’re well on your way to creating a beautifully organized crafting haven. These storage solutions not only make your supplies easier to find but also enhance the overall aesthetic of your crafting area. Remember, a well-organized space nurtures your creativity and allows your inspiration to flow freely. Ready to discover more IKEA treasures to enhance your craft space? Let’s keep going!
Maximizing Space with FJALLA Magazine Files
As we continue our journey through IKEA’s fantastic storage solutions, let’s focus on FJALLA magazine files. These aren’t just for storing magazines; they’re a multipurpose tool that can help maximize your craft space by organizing various supplies neatly and efficiently.
The Versatility of FJALLA Magazine Files
FJALLA magazine files are sleek, stylish, and functional, making them a perfect addition to any crafting area. Here’s why they are a must-have:
- Space-Saving Design: These files utilize vertical space, an often-overlooked resource in craft rooms. By standing upright, they minimize their footprint while holding multiple items.
- Customizable Labels: FJALLA files come with spaces for labels. This feature allows you to categorize your supplies, making it easier to find exactly what you need when you need it.
- Wide Range of Uses: While they excel at holding magazines, you can also store folder-based items, loose sheets of paper, and even small sketchbooks or patterns. This versatility truly makes them a fantastic investment.
Effective Ways to Use FJALLA Magazine Files
To harness the full potential of your FJALLA magazine files, consider the following strategies:
- Categorize Your Paper Supplies: Dedicate one file for card stock, another for scrapbooking papers, and yet another for organized printouts of projects. This not only keeps everything sorted but also enhances your workflow when working on crafting projects.
- Organize Techniques and Inspirations: Use FJALLA files to store inspiration pieces or how-to printouts related to your projects. When I was planning my last scrapbooking adventure, having a dedicated file with all my project ideas made the process smoother!
- Create a “Projects in Progress” Folder: If you tend to juggle multiple projects at once (who doesn’t?), designate a FJALLA file specifically for projects you’re currently working on. Keep all relevant material in one spot so you can easily pick up where you left off.
Sorting with SAMLA Storage Boxes
In conjunction with the FJALLA magazine files, let’s take a closer look at the SAMLA storage boxes. These boxes add an essential layer of organization in your craft space and work brilliantly alongside the magazine files.
The Advantages of SAMLA Storage Boxes
SAMLA boxes are transparent plastic containers available in various sizes, making them incredibly functional for organizing supplies:
- Clear Visibility: The transparent design allows you to see what’s inside without opening every box. No more wasted time searching for that one specific item!
- Multiple Size Options: From small boxes ideal for beads and embellishments to larger bins for fabric or tool storage, you can find the perfect size for your needs.
- Stackable Design: SAMLA boxes are designed for stacking. When floor space is at a premium, being able to vertically store boxes helps keep the clutter off your work surfaces.
Practical Tips for Using SAMLA Storage Boxes
To make the most of your SAMLA boxes, here are some effective organizing tips:
- Group By Items: Sort your supplies into categories that make sense for you. For example, create one SAMLA box for all your paint supplies, another for embroidery threads, and a third for cutting tools. This makes it easier to pull out a specific type of material.
- Label Everything: Use labels on your SAMLA boxes to help identify contents easily. A quick glance will tell you exactly what’s inside, boosting efficiency during your crafting sessions.
- Incorporate into Your KALLAX: The SAMLA boxes fit perfectly in KALLAX units. Use them to store frequently used supplies at eye level, allowing for both easy access and maintaining an organized look.
- Seasonal or Project-Specific Boxes: Keep SAMLA boxes dedicated to specific themes or seasons. For instance, if you’re preparing for holiday crafts, have a box ready to hold festive materials that you can pull out easily when it’s time to craft.
A Personal Touch
Adopting FJALLA magazine files and SAMLA storage boxes in my own craft space has made a noticeable difference. I set up two FJALLA files—one for my scrapbook paper and another for DIY project tutorials. Pairing them with SAMLA boxes allowed me to tackle my clutter efficiently. I can now locate materials in seconds, fostering a productive and enjoyable crafting atmosphere.
Conclusion
Maximizing your crafting space is all about utilizing the right storage solutions! With FJALLA magazine files and SAMLA storage boxes, you can keep your craft supplies organized, accessible, and attractive. Embracing these solutions ensures that your creative space remains functional while still reflecting your unique style. Ready to see how to further enhance your craft space with more innovative IKEA products? Let’s dive deeper!

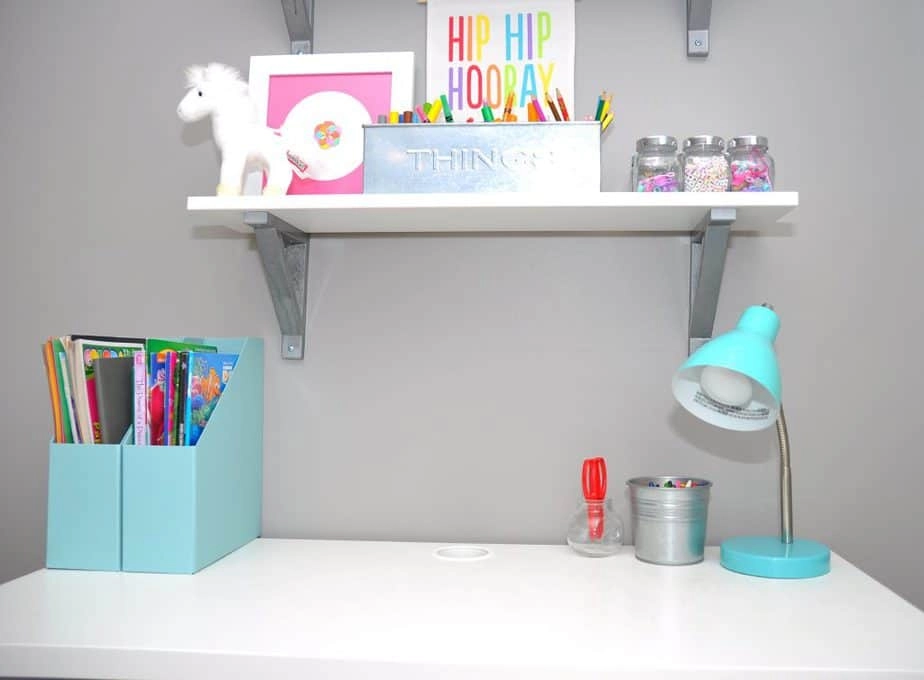
Displaying with MOSSLANDA Picture Ledges
Now that you’ve efficiently organized your craft supplies with FJALLA magazine files and SAMLA storage boxes, it’s time to add a bit of flair to your workspace. Enter the MOSSLANDA picture ledges—an incredibly stylish way to display your supplies or finished projects while keeping your space visually appealing.
Why MOSSLANDA Picture Ledges Are a Must-Have
MOSSLANDA picture ledges are designed for showcasing artwork, but their versatility makes them an excellent choice for crafting supplies as well. Here’s why they should be a staple in your creative area:
- Easy Display: Use them to showcase finished projects, such as framed artwork or scrapbook pages, elevating your craft space into a gallery—an inspiring view for every crafting session.
- Space-Saving: By utilizing wall space, you can clear up valuable desk or table space, allowing you to work freely without clutter.
- Interchangeable Decor: You can easily swap out the items displayed on the ledges to reflect seasonal themes or your evolving art style. This means that as your crafting style changes, your display can evolve without much hassle.
Creative Ways to Use MOSSLANDA Ledges
To really capitalize on the beauty and functionality of MOSSLANDA picture ledges, here are some ideas for your creative space:
- Showcase Craft Projects: After completing a piece you’re particularly proud of, hang it on the ledge. Not only does it serve as a beautiful decoration, but it can also inspire future projects.
- Display Craft Supplies: Consider using decorative containers or jars on the ledges to hold washi tape, scissors, or markers. This not only looks chic but also keeps your most-used supplies readily accessible.
- Incorporate Inspirational Quotes: Print or frame your favorite quotes and display them alongside your craft supplies to create a motivating environment. Every time you sit down to work, you’ll be reminded of your creative passions!
- Create a Themed Display: Rotate your display based on seasons or holidays. For instance, during fall, you might display autumn-themed crafts, while in spring, you could showcase floral projects.
Personal Anecdote
I recently decorated my craft space with two MOSSLANDA picture ledges. Initially, I was hesitant about how they would look, but they turned my room into a mini-gallery! I now display some of my completed scrapbook pages and funky art pieces, which have become conversation starters. Each time friends visit, they love looking at the pieces I’ve created, and it keeps me motivated to try new techniques.
Securing with BROR Shelving System
In addition to fabulous displays provided by the MOSSLANDA picture ledges, let’s discuss the importance of sturdy storage with the BROR shelving system. This robust shelving solution complements your crafting area by providing secure and reliable storage for heavier items.
Why Choose the BROR Shelving System
The BROR shelving system stands out for its durability and versatility, particularly for crafting areas that require strong storage capacity. Here’s why you might consider including it in your craft space:
- High Weight Capacity: Constructed from durable steel, BROR units can support heavier items, such as large crafting tools or bins filled with supplies—ideal for serious crafters.
- Adjustable Shelves: The adjustable shelves mean you can create a custom fit for various items, whether it’s larger bins for fabric or smaller boxes for tools, hence adapting to changing storage needs over time.
- Modular System: BROR’s modular design means you can easily expand your storage as your crafting supplies grow. Need more space? Simply add another shelf or configure the layout differently.
Tips for Organizing with BROR Shelving
To harness the full potential of the BROR shelving system, here are some practical organizing tips:
- Group Supplies by Use: Keep similar supplies together. For example, organize all your paint supplies on one shelf and fabric items on another. This allows you to find exactly what you need without rummaging through everything.
- Maintain a Tidy Appearance: Use bins or boxes on the shelves to keep smaller items contained. This not only keeps everything organized but also creates a clean, cohesive look across your craft space.
- Create a Dedicated Tool Section: Designate a section strictly for tools—like your cutting mats, scissors, and adhesives. Keeping these items together saves you time and makes your crafting more streamlined.
- Label Everything: As with all organizational settings, clear labeling is crucial. By labeling bins or sections, anyone working in your space can easily find what they need.
Conclusion
Combining the MOSSLANDA picture ledges with the BROR shelving system not only enhances your craft space but also creates an inspiring and efficient environment. While the ledges allow you to beautifully display your projects and supplies, the BROR shelving secures your heavier items and keeps everything accessible. Together, these solutions empower you to turn your crafting area into a well-organized, stylish haven where creativity can flourish. Ready to discover additional ways to enhance your crafting experience? Let’s dive into even more inspiration!
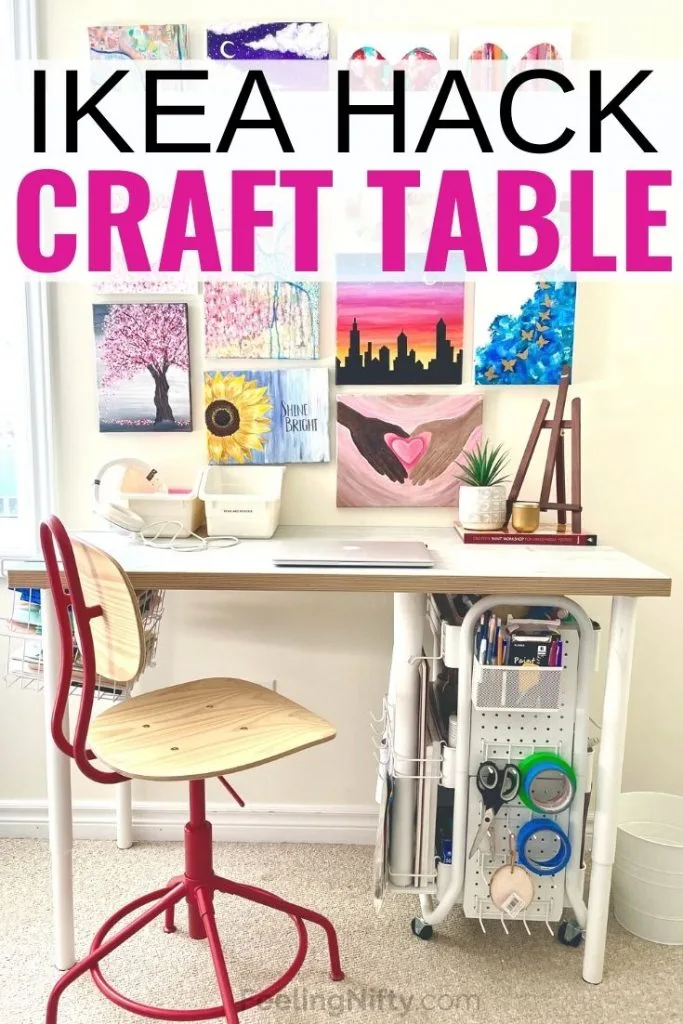
Crafting Station with LINNMON Table Tops
With your craft supplies organized and displayed beautifully, it’s time to discuss how to create the perfect crafting station. A functional workspace can elevate your crafting experience from chaotic to creative bliss. Enter the LINNMON table tops from IKEA—offering simplicity, durability, and versatility, they form an excellent foundation for your crafting table.
Why Choose LINNMON Table Tops?
The LINNMON table tops are a favorite among crafters for several reasons:
- Durable Surface: Made from particleboard with a melamine finish, these table tops are resilient. They can withstand all the glue spills, paint drips, and crafting chaos that come with creative projects.
- Customizable Size: Available in various sizes, you can choose a LINNMON that perfectly fits your space. Whether you need a spacious area on which to spread out or a compact surface in a corner, there’s an option for you.
- Versatile Colors: The LINNMON tops come in multiple colors and finishes, allowing you to easily match your aesthetics or create a pop of color in your craft room.
Setting Up Your Crafting Station
To create the ideal crafting station with a LINNMON table top, consider the following tips:
- Select the Right Height: Depending on your crafting style, you may want to pair the table top with adjustable legs, or even taller options if you prefer to stand while working. This adaptability can help reduce strain during long crafting sessions.
- Organize Underneath: Utilize the space beneath your table to store additional supplies. Open shelving, like the BROR system, or tote bins can be tucked underneath, keeping everything out of sight yet easily accessible.
- Personalized Touches: Personalize your crafting space without sacrificing function. Add a colorful tablecloth, a few plants, or even a cute chair that inspires creativity while remaining comfortable for long hours of crafting.
- Create a Dedicated Zone: If you often switch between different types of crafting, consider establishing zones on your table for each craft. For instance:
- One side for paper crafting materials,
- Another for sewing tools,
- And a small space for electronics like your cutting machine.
- Keep it Clean: Adding a small caddy or tidy drawer organizer on your tabletop can help you manage essential tools like scissors, washi tape, or rulers while keeping everything within reach and easy to find.
Hanging Tools on SUNNERSTA Rails
Now that your crafting station is organized, let’s maximize its efficiency further with the SUNNERSTA rails. This ingenious solution allows you to hang tools and supplies right where you need them, freeing up table space for your creative process.
Benefits of SUNNERSTA Rails
The SUNNERSTA rails are not only functional, but they also add a decorative element to your workspace:
- Robust Design: Made from robust steel, they securely hold your tools in place. Not to mention, they’re easy to install!
- Customizable Layout: You can arrange SUNNERSTA rails horizontally or vertically—whatever fits best in your available wall space.
- Variety of Accessories: The system includes hooks, containers, and sieve-like baskets that allow you to adapt and customize to your specific needs.
How to Use SUNNERSTA Rails Effectively
Here are some practical ways you can implement SUNNERSTA rails in your crafting area:
- Hang Commonly Used Tools: Place frequently used tools such as scissors, rotary cutters, or utility knives on the rail. Having them at eye level eliminates the need to dig through drawers every time you need something.
- Add Baskets for Supplies: Attach small baskets to hold smaller items like threads, markers, or brushes. Simultaneously, you maintain easy access and keep the table clear of clutter.
- Incorporate Decorative Elements: The SUNNERSTA system can blend functionality with aesthetics. You could add beautiful ceramic cups for brushes or washi tape, making your crafting station as much a piece of art as a workspace.
- Rotate with Seasons or Projects: Just as you would with your MOSSLANDA picture ledges, rotate items on your SUNNERSTA rails based on seasons or current projects. This keeps your space fresh and continues to inspire you to craft.
Personal Anecdote
When I first set up my crafting space, I struggled with finding a place for everything. After installing a LINNMON table top paired with SUNNERSTA rails, my workflow transformed completely! I now have all my tools hanging directly under my workstation. The combination of an organized table and hanging tools made all the difference. I can work on multiple projects at once without feeling overwhelmed by clutter.
Conclusion
Creating a crafting station with LINNMON table tops and enhancing it with SUNNERSTA rails strikes the perfect balance between functionality and style. By organizing your workspace, showcasing your tools, and allowing for creativity to flow, you set yourself up for crafting success! Ready to discover even more innovative storage solutions that simplify your crafting experience? Let’s keep exploring!

Conclusion
As we wrap up our exploration of IKEA’s exceptional storage solutions for crafting, it’s clear that creating an organized and inspiring workspace is within your reach. We’ve journeyed through various IKEA products—from the multifunctional RASKOG carts and SKADIS pegboards to the versatile LINNMON table tops and SUNNERSTA rails. These options allow you to shape your crafting area into a functional and aesthetically pleasing environment that enhances creativity and productivity.
The Importance of an Organized Crafting Space
An organized crafting space does more than just streamline the process of creating; it ignites inspiration. Here’s why having a dedicated crafting area is essential:
- Enhances Creativity: When your materials are organized and easily accessible, you’re more likely to experiment and try new things. An untidy space can feel overwhelming, discouraging you from engaging in your favorite projects.
- Saves Time: With everything in its designated place, you spend less time searching for supplies. This allows you to focus more on the creative aspects and less on the logistical challenges.
- Encourages Consistency: Having an established crafting station means you can consistently dip into your creative side, whether it’s for a quick project or a lengthy undertaking.
Personalizing Your Crafting Space
While we’ve discussed practical solutions, don’t forget the personal touch! Your crafting area should reflect you. Choose colors, themes, and decorations that inspire you. Remember to consider elements like:
- Color Psychology: Colors can affect your mood and creativity. Soft blues and greens may evoke calmness, while vibrant reds and yellows might stimulate energy and inspiration.
- Inspirational Decor: Incorporate items that motivate you, like framed quotes, recent projects, or images that spark joy.
- Comfort: Invest in a comfortable chair and adjust the height of your table to suit your crafting style, ensuring that long hours spent creating remain enjoyable.
Maintaining Your Space
Creating an organized crafting oasis is just the beginning—maintenance is key. A few simple practices can keep your space tidy:
- Regular Clean-Up: Allocate some time at the end of your crafting day to tidy up your workspace. This could mean putting away loose items or resetting your station for the next project.
- Re-evaluate Your Setup: Every few months, revisit your organization method. This could involve reorganizing items, swapping out decor, or adjusting storage solutions based on your evolving crafting habits and preferences.
- Use Storage Efficiently: Make sure you’re utilizing all storage options efficiently—from vertical spaces with FJALLA files to deep storage with SAMLA boxes, ensuring that every inch of your workspace serves a purpose.
Final Thoughts
Setting up and maintaining a thoughtfully organized crafting space is a journey—one that can be incredibly rewarding. Throughout this guide, you’ve seen how IKEA’s products empower you to create a functional yet inviting studio that can accommodate any crafting passion. On a personal note, I can vouch for the transformative effect a well-organized craft space has had on my own creativity. It’s not just about aesthetics; it’s about creating an environment where ideas can flourish and projects can come to life. So, as you embark on your organizational journey, take inventory of your needs and desired aesthetic. Mix and match products that resonate with your crafting style, and don’t hesitate to adapt solutions to suit your unique space. Your crafting oasis awaits, ready to inspire your next masterpiece! Happy crafting! 🎨✨