
Introduction
Importance of Recycling Toilet Paper Rolls
Recycling toilet paper rolls is more than just a creative way to keep waste out of landfills; it’s a fantastic opportunity to transform everyday items into useful and beautiful crafts. These seemingly insignificant cardboard pieces have a second life, serving both practical and aesthetic purposes. As someone who has always appreciated the potential in everyday objects, I can tell you that it’s incredibly satisfying to think outside the box and make something new out of what most people consider trash. Why should we bother recycling these rolls? Here are a few compelling reasons:
- Environmental Benefits: Toilet paper rolls are made of recyclable cardboard, reducing the need for new materials and helping to cut down on deforestation. By repurposing them, you’re also lowering your carbon footprint.
- Creative Expression: Engaging in crafts enhances creativity. When you take a couple of rolls and turn them into something uniquely yours, you tap into your imaginative side. I remember the first time I crafted a mini plant pot—how rewarding it felt to see my little herbs thriving in something I’d almost thrown away!
- Cost-Effective: Why spend on expensive decorations or plant pots? Recycling these rolls is a budget-friendly alternative. You can enjoy crafting without any guilt associated with overspending.
- Educational Opportunities: Involving kids in recycling projects is an excellent way to educate them about sustainability. I frequently host crafting sessions with my nieces and nephews, turning this into a fun learning experience about the importance of reducing waste.
Let’s talk about what you can create:
- Mini Plant Pots: Easily transform rolls into plant pots perfect for starting an herb garden. Just cut it down to your desired height, fill it with soil, and your plants will thrive for as long as they need before transferring them outdoors.
- DIY Bird Feeders: With some peanut butter and birdseed, you can create a simple but effective feeder. Nature lovers in your family will appreciate the sight of local wildlife enjoying a meal courtesy of your creativity.
- Wall Art: Think of using the rolls to create stunning wall decor. With a splash of paint or some colorful paper, those tubes can be formed into beautiful floral wreaths to brighten up your living space.
- Kids’ Crafts: Speak to any parent, and they’ll vouch for the joy of keeping children engaged in crafting. Simple designs like binoculars can turn endless playtime into an adventure.
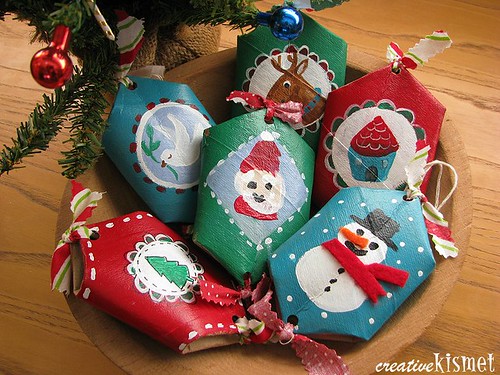
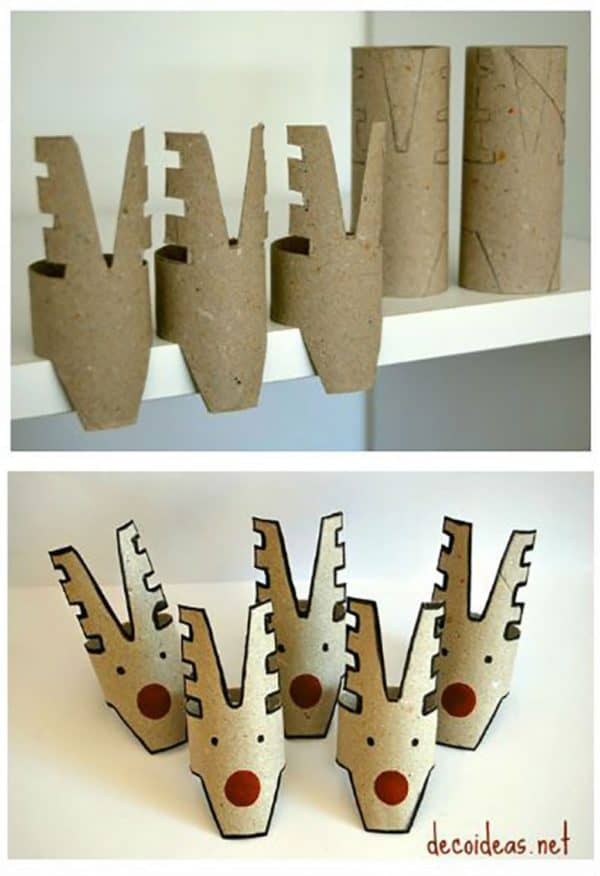
- Holiday Decorations: With the festive seasons upon us, consider making Christmas ornaments from the rolls. You can transform them into reindeer or snowmen for an extra touch of charm.
When you look at toilet paper rolls as versatile crafting materials instead of waste, not only do your creative possibilities expand, but you also contribute positively to the planet. So, the next time you finish a roll, don’t toss it! Instead, envision the art or use it can have in your home or garden. It’s about time we recognized the beauty in recycling and embraced creativity! 🌍✨

Mini Plant Pots
Herb Garden
Continuing our journey into the world of recycling, let’s dive into one of my favorite projects—turning toilet paper rolls into mini plant pots for a delightful herb garden! This project is perfect for anyone interested in gardening and those looking to add a bit of greenery to their home without spending much. 🌱 Making your own mini plant pots is not only a fun activity, but it also gives you the chance to cultivate your herbs right from your kitchen countertop. I remember when I first started my herb garden in recycled pots; it felt so satisfying to see fresh basil, thyme, and mint thriving, all for the cost of a little soil and some seeds.
Why Herbs?
Herbs are the perfect plants to start your gardening journey because they’re generally easy to grow and maintain. Plus, having your own fresh herbs at home can elevate your cooking to new heights! Here are a few reasons to consider growing your own:
- Freshness: Nothing beats the smell and flavor of freshly picked herbs.
- Convenience: No more last-minute grocery trips just for a handful of basil!
- Cost-Effective: Buying fresh herbs at the store can add up; growing your own is much cheaper in the long run.
Creating Your Mini Plant Pots
Here’s how you can turn those pesky toilet paper rolls into charming little pots for your herb garden:
- Materials Needed:
- Empty toilet paper rolls
- Potting soil
- Herb seeds (like basil, parsley, or cilantro)
- Scissors
- A small tray or dish to catch excess water
- Steps:
- Cut the Rolls: If you want taller pots, you can leave the rolls as they are. Otherwise, cut them down to about 3 to 4 inches.
- Make Drainage Holes: Puncture a few small holes at the bottom of the rolls for proper drainage. This helps prevent overwatering, which is essential for keeping your herbs healthy!
- Planting: Fill each roll with potting soil, leaving some space at the top. Sprinkle herb seeds on the surface and cover lightly with more soil.
- Water: Give your planted rolls a gentle watering. Place them in a sunny spot, and keep an eye on moisture levels.
- Maintenance:
- Water the mini pots regularly, ensuring the soil remains slightly moist but not soggy.
- Once your herbs start to sprout, you might want to thin them out a little bit for better growth.
Transplanting Your Herbs
Once your herbs have grown sufficiently, you can transplant them into larger pots or your garden. The great thing about using toilet paper rolls is that they can plant directly into the soil without needing to remove the roll. It will eventually break down, enriching the soil as the herbs continue to grow. Getting started with mini plant pots for an herb garden is a rewarding way to repurpose cardboard while simultaneously bringing a bit of nature indoors. Plus, watching your herbs flourish will give you a sense of pride and accomplishment. So grab your toilet paper rolls, a few seeds, and get ready to enjoy the fruits (or herbs) of your labor! 🌿💚
DIY Bird Feeder
Seed Dispenser
Now, let’s shift gears and explore another fantastic project: creating a DIY bird feeder using our repurposed toilet paper rolls! This fun activity not only helps revive these cardboard tubes but also invites our feathered friends into our gardens or patios. Watching birds flit about and enjoying a snack is truly a joy that adds life and activity to any outdoor space. 🐦✨
Why a Bird Feeder?
Setting up a bird feeder is an excellent way to connect with nature right from your home. It’s an opportunity to observe local wildlife up close, plus it offers a boost to the birds that may be struggling for food. With just a few materials—you guessed it, including those toilet paper rolls—you can create a functional seed dispenser that is both easy and efficient.
What You’ll Need
To make your own bird feeder, gather these simple materials:
- An empty toilet paper roll
- Peanut butter (smooth works best)
- Birdseed (you can find a variety at your local store)
- String or twine (optional, for hanging)
- A plate or shallow dish
- Scissors
Steps to Create Your Seed Dispenser
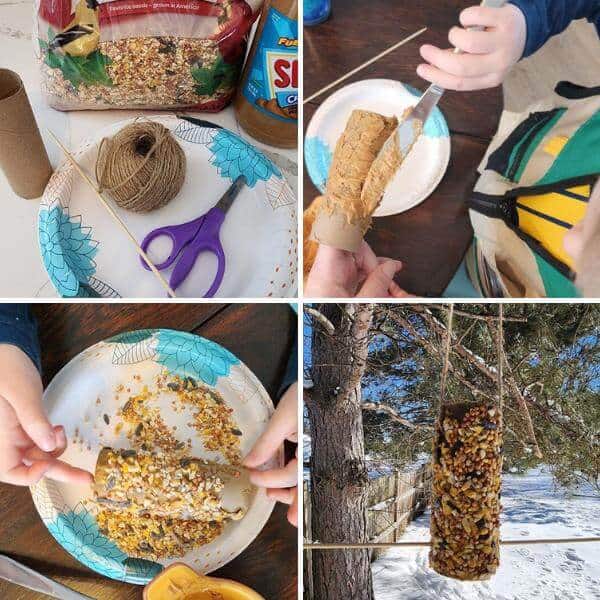
- Prepare the Roll: Start by spreading a generous layer of peanut butter all over the toilet paper roll. This will act as the adhesive for the birdseed and also provide a tasty treat for the birds.
- Coat with Birdseed: Once the roll is thoroughly coated with peanut butter, roll it in a plate of birdseed, making sure to cover every inch. I’ve found that rolling it several times ensures an even coat, which attracts more birds!
- Hanging the Feeder (optional): If you want to hang your bird feeder, use scissors to cut a piece of string or twine about 24 inches long. Thread it through the roll and tie it securely, creating a loop for easy hanging.
- Select a Spot: Choose a location to hang the feeder where you can easily see the birds. A tree branch, backyard hook, or even a balcony railing can be perfect. Make sure it’s at a safe distance from any pets roaming around.
- Refill as Needed: As the birds snack away, keep an eye on your feeder. Tuck in more birdseed as required or whip up another one when the birds clear it out!
Birds of a Feather
Don’t be surprised if more than just the usual visitors come knocking. You may attract a variety of local birds, including chickadees, finches, and even cardinals, depending on your area. Last summer, I once watched a family of jays flock around my DIY feeder, all thanks to this easy project! Creating a DIY bird feeder using toilet paper rolls is a fun and fulfilling way to give back to nature while making use of what you already have at home. By inviting birds to your space, you also create a lively atmosphere, perfect for family gatherings or quiet moments of reflection. So, get ready to spread the joy of gardening and crafting with your feathered friends! 🌼🐦
Wall Art Decor
Floral Wreath
As we continue to explore the magic of transforming toilet paper rolls into creative home decor, let’s turn our attention to a lovely project: a floral wreath! This project is not only visually stunning but also adds a personal touch to your home’s decor. I remember the first time I hung a wreath made from rolled cardboard on my front door; it instantly refreshed the space and gave it a warm, inviting vibe. 🌺✨ Creating a floral wreath from toilet paper rolls is one of those delightful crafts that can be tailored to suit any season or occasion. Whether you’re celebrating spring with bright colors or creating a cozy fall theme, the options are endless!
Why Create a Floral Wreath?
Wreaths have been a traditional symbol of hospitality and warmth. They decorate our homes and often make stunning statement pieces. Here are a few compelling reasons to make your own floral wreath:
- Personalization: You can design a wreath that reflects your style and preferences. Choose colors and flowers that match your decor.
- Cost-Effective: Creating a wreath from toilet paper rolls is an affordable way to decorate without breaking the bank.
- Sustainable Crafting: This project promotes recycling and shows how you can make beautiful things from materials you already have.
Materials Needed
To get started on your toilet paper roll floral wreath, you’ll need:
- 4-6 empty toilet paper rolls
- Scissors
- Hot glue gun (or craft glue)
- A sturdy wire or cardboard base (you can cut cardboard into a circle)
- Acrylic paint (optional for coloring)
- Faux flowers or silk flowers
- Greenery (like faux leaves or vines)
- Ribbon for hanging (optional)
Step-by-Step Guide
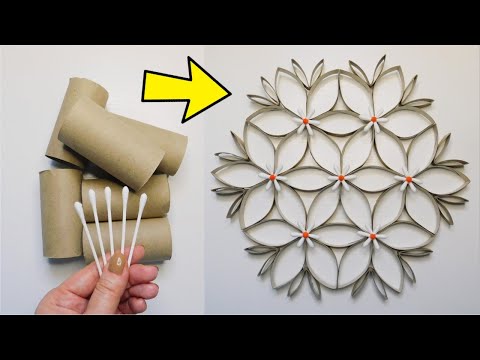
- Prepare Your Rolls: Cut the toilet paper rolls into equal sections, about 1-inch wide. This will become the base for the flowers. If you want to add some color, you can paint them before proceeding.
- Shape the Flowers: Take each roll section and pinch one end to create a floral petal shape, securing it with a dab of glue. Repeat this with several sections until you have enough petals to create flowers.
- Assemble the Wreath: Begin gluing your flower shapes onto your wire or cardboard base. Layer the flowers by mixing different sizes and colors for added dimension. This step is where your creativity can shine!
- Add Greenery: Once your flowers are securely attached, tuck in sprigs of greenery between the flowers. This will give your wreath a fuller, lush appearance.
- Final Touches: If you desire, make a pretty bow out of ribbon to add to your wreath. This can be centered at the bottom or at the top for a charming touch.
- Display Your Creation: Hang your beautiful floral wreath on a door, wall, or even in a window to brighten up your living space.
A Personal Touch
Creating a floral wreath is one of those relaxing projects where you can truly lose track of time while you immerse yourself in colors and textures. I often find myself reaching for different shades and arrangements as I create my own. Plus, it’s a fantastic conversation starter, whether you’re hosting a gathering or just enjoying the beauty in your home. In short, crafting a floral wreath from toilet paper rolls is not only enjoyable but also a beautiful way to showcase your artistic flair! Let your creativity blossom and decorate your space with a personal touch that reflects your unique style. 🌸💖
Kids’ Crafts
Binoculars
Continuing our journey into the world of creative recycling, let’s delve into a super fun and engaging project: making binoculars! This activity isn’t just for kids; it’s a delightful way for you to bond with them while encouraging their imagination and curiosity about the world around them. I fondly remember the joy on my nephew’s face when he crafted his first pair of binoculars—it was like he was suddenly a mini-explorer ready for adventures in the backyard. 🕵️♂️✨ Creating binoculars out of toilet paper rolls is not only an excellent way to recycle but also helps kids develop fine motor skills and encourages outdoor play. This craft can spark a love for nature and exploration, making it even more rewarding.
Why Binoculars?
There’s something inherently magical about binoculars. They open up a world of exploration for children, allowing them to observe birds, bugs, and other fascinating things up close. Here are a few reasons why making binoculars is an excellent craft project:
- Encourages Imagination: Once crafted, the kids can use these binoculars for pretend play, turning their imaginations into reality.
- Physical Activity: With binoculars in hand, children have a reason to head outdoors, promoting exercise and interaction with nature.
- Educational: This activity offers a chance to learn about the animals and plants they observe, fostering curiosity and knowledge.
Materials Needed
To make your own binoculars, gather the following:
- 2 empty toilet paper rolls
- String or ribbon (to hang around the neck)
- Scissors
- Tape or glue
- Paint, stickers, or markers (for decoration)
- Optional: small hole punch
Step-by-Step Guide
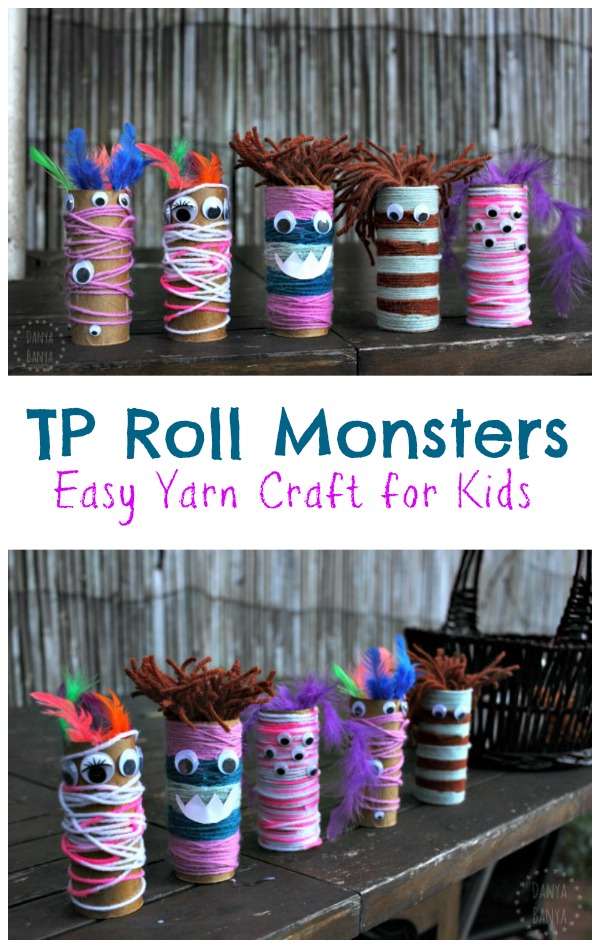
- Prepare the Rolls: Start by taking two empty toilet paper rolls—these will serve as the lenses of the binoculars. If desired, you can color or paint the rolls to add a personalized touch.
- Attach the Rolls: Position the two rolls side by side and secure them together with tape or glue. Make sure they’re aligned evenly so they look neat and tidy.
- Add String: Cut a piece of string or ribbon about 24 inches long (adjust as necessary). You can use a hole punch to make small holes on either side of the binoculars, or simply tape the string to the insides of the rolls. This ensures kids can hang their binoculars around their necks for easy access.
- Decorate: Allow the kids to use paint, markers, or stickers to decorate their binoculars. Encourage them to get creative—design patterns, draw animals, or even glue on glitter!
- Ready to Explore: Once the binoculars are complete, take them outside for a mini-adventure! Let the kids observe birds, insects, or distant landscapes, making it a learning experience.
Adventure Time!
Encouraging kids to use their newly crafted binoculars helps facilitate discussions about the outdoors. You might find them eagerly pointing out the interesting creatures they spot—a great opportunity to nurture a sense of wonder about the world. I once took a pair of homemade binoculars on a nature walk, and soon, both kids and adults found themselves engaged in the beauty of the surroundings—sharing tidbits about different birds or the types of trees we passed was truly memorable. Crafting binoculars from toilet paper rolls fosters creativity while offering endless possibilities for outdoor exploration. It’s not just about the craft; it’s about the experiences you share together. So grab those rolls, let the kids unleash their creativity, and get ready for some fun-filled adventures! 🌿🔭
DIY Desk Organizer
Pen Holder
Shifting gears once again, let’s dive into a practical and crafty project: creating a DIY pen holder using those handy toilet paper rolls! This project is not just about organizing your workspace—it’s also a fun way to personalize your desk while contributing to sustainability. As someone who often finds themselves surrounded by scattered pens and markers, I can vouch for the joy that comes from having a neat and tidy writing space. Plus, making your own pen holder allows you to sneak in a bit of creativity! ✏️🌟
Why Make a Pen Holder?
Having a designated spot for your pens and pencils can make a significant difference in productivity. Here are some reasons to consider crafting your own pen holder:
- Organization: Keep your writing utensils at arm’s reach and easily accessible. No more digging through drawers or bags to find that elusive blue pen!
- Personalization: Customize your pen holder to match your decor. Choose colors, patterns, and styles that reflect your personality.
- Sustainability: By reusing toilet paper rolls, you’re not only crafting something functional but also contributing to reducing waste.
Materials Needed
To create your DIY pen holder, gather the following materials:
- 1-3 empty toilet paper rolls (depending on how large you want your holder to be)
- Craft scissors
- Adhesive (hot glue or craft glue)
- Paint or markers (for decoration)
- Decorative paper or washi tape (optional)
- A sturdy base (like cardboard or a small tray)
Step-by-Step Guide
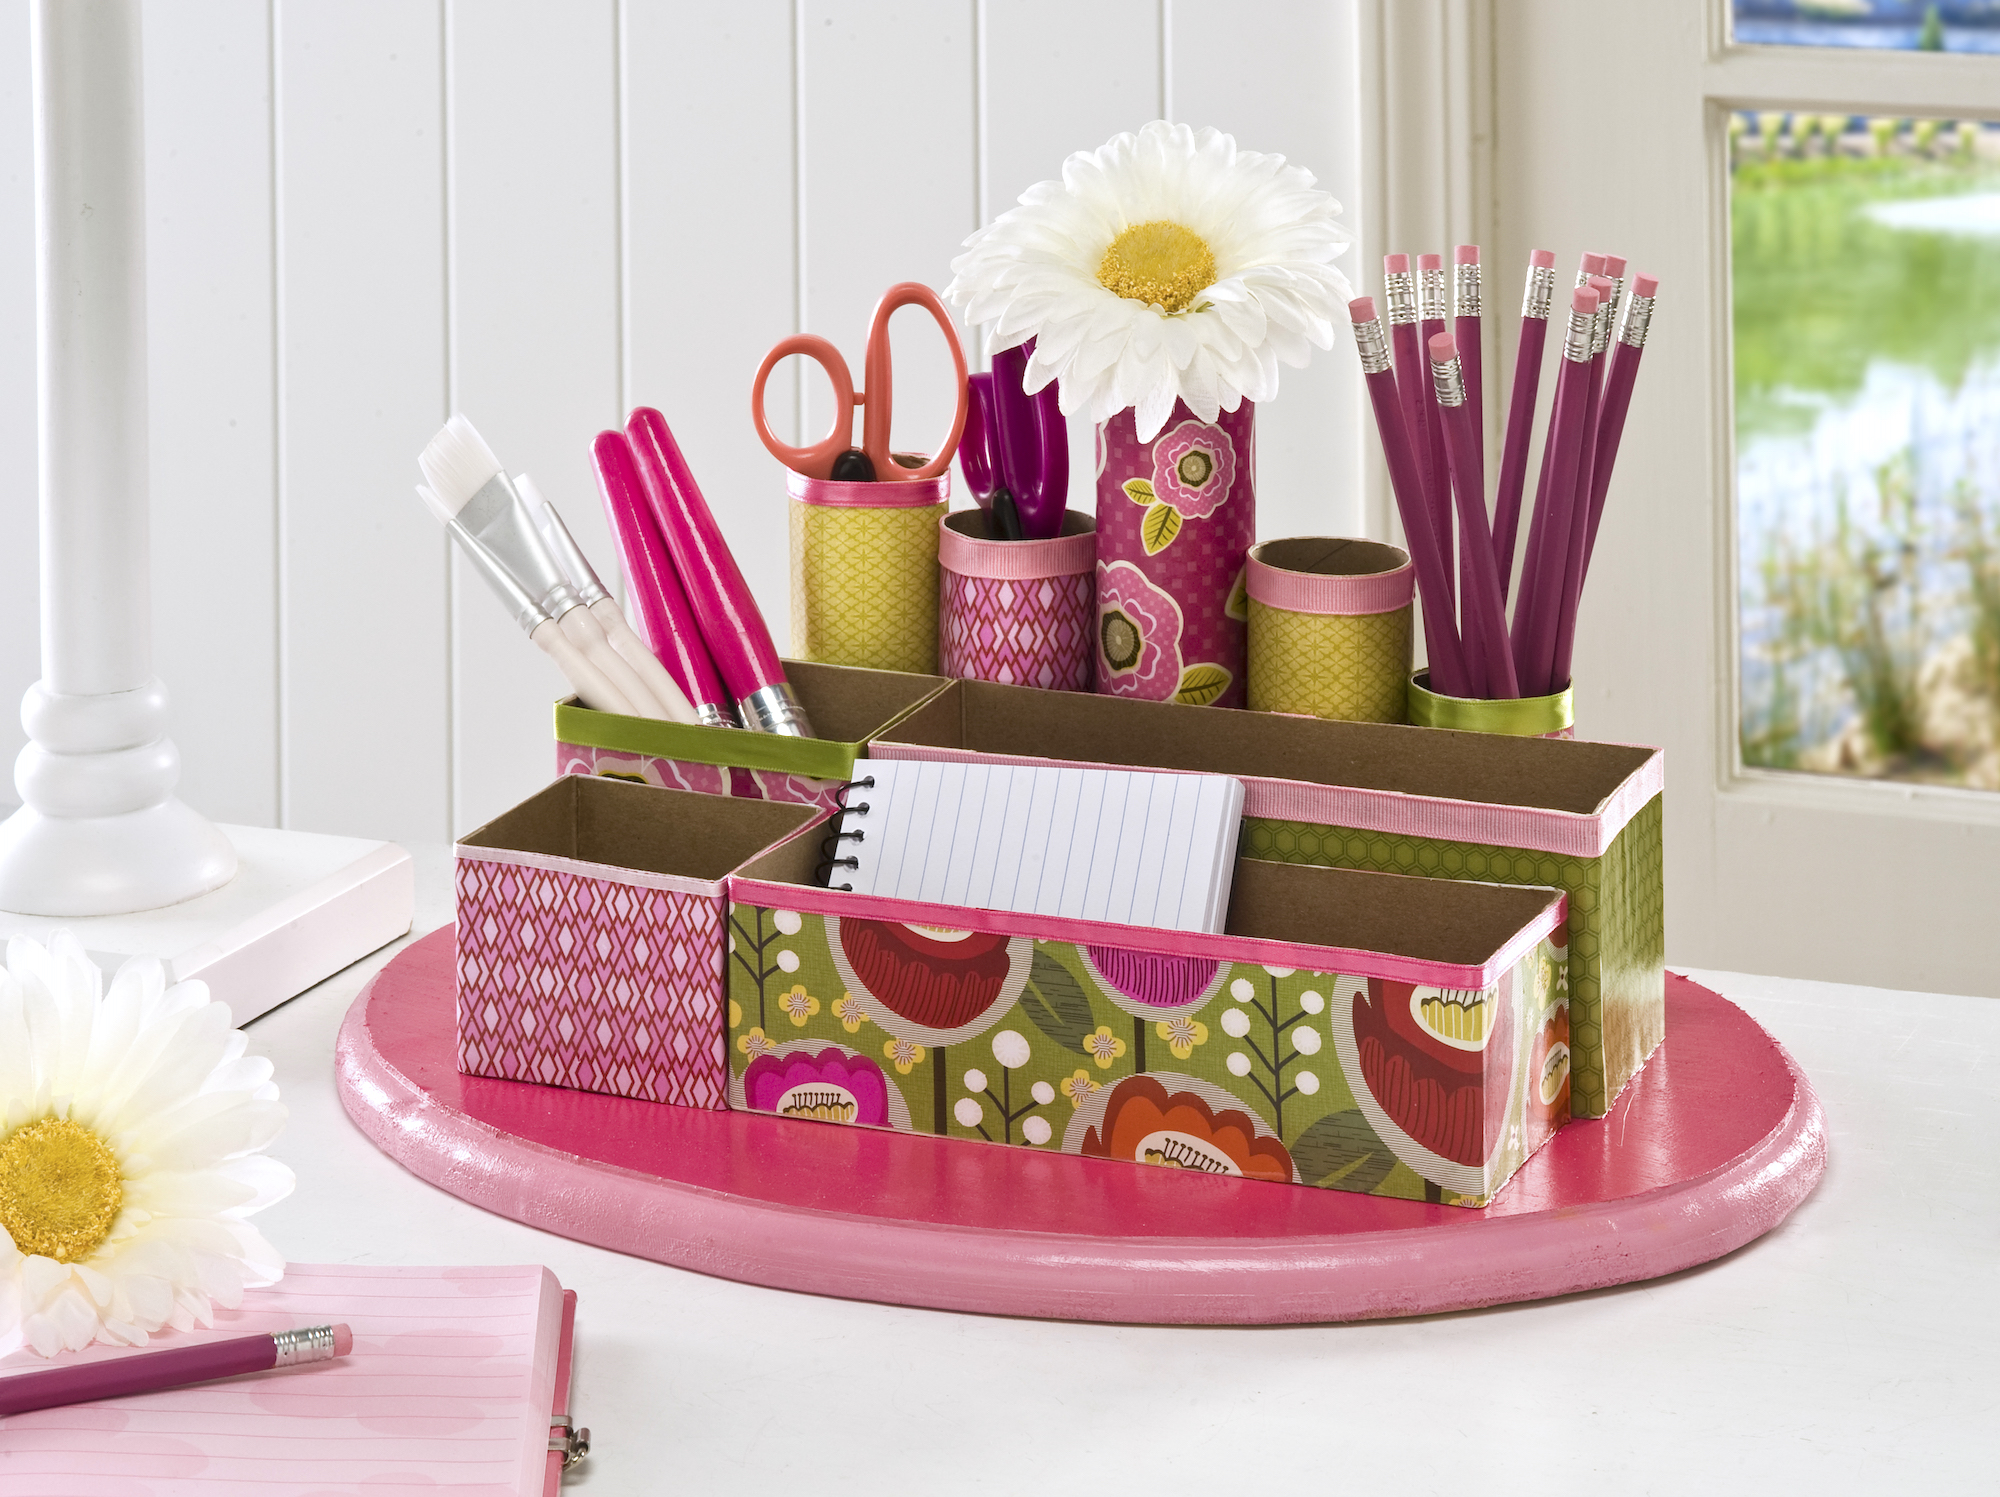
- Prepare the Rolls: If you want a taller pen holder, you can keep the toilet paper rolls as they are. For a more compact design, cut the rolls to your desired height, generally around 4 to 6 inches.
- Create a Base: If you’re using multiple rolls, consider attaching them to a sturdy base for added stability. A piece of cardboard can work perfectly for this. Just cut a square or rectangle slightly larger than the base of your rolls.
- Attach the Rolls: Use your adhesive to secure each roll onto the base. If using multiple rolls, arrange them in a cluster or a straight line based on your preference. Make sure they’re glued down firmly, so they don’t tip over easily.
- Decorate Your Holder: This is where the fun really begins! Allow your creativity to flow—paint the rolls in your favorite colors, cover them with decorative paper, or add washi tape for a pop of pattern. I often turn on my favorite music and let loose with colors when customizing my desk accessories.
- Final Touches: Let everything dry completely before placing your pens and pencils inside. You might also want to add some felt or fabric to the bottom to avoid scratching your desk.
Using Your New Pen Holder
Once your DIY pen holder is complete, it’s time to put it to good use! Start organizing your favorite writing tools—place your colored pens, highlighters, and pencils in the holder. If you want to take it up a notch, consider labeling the pens by purpose or color-coding them for a quick reference. I remember hosting a crafting day with some friends, and we made these pen holders together. It was not just about the crafting; it turned into a delightful afternoon filled with laughter and creativity. Plus, everyone walked away with personalized desk organizers that brought a smile to their face! Crafting a DIY pen holder from toilet paper rolls is a rewarding way to declutter your workspace while expressing your creativity. With just a few steps, you can turn waste into a charming and functional accessory for your desk. So gather your materials, let your imagination guide you, and enjoy the process of creating something uniquely yours! 🖌️🌈

Holiday Decorations
Christmas Ornaments
As we leap into the festive spirit, let’s explore a heartwarming project that bridges creativity and holiday cheer: making Christmas ornaments from toilet paper rolls! There’s something truly special about adding personal touches to your holiday decor, and crafting your own ornaments allows you to infuse your style and memories into the season. I distinctly remember sitting around the dining table with my family during the holidays, crafting beautiful ornaments that would become cherished keepsakes for years to come. 🎄✨ Creating Christmas ornaments out of repurposed materials is not only cost-effective but also a meaningful way to celebrate the season. This project embodies the essence of holiday spirit—connection, creativity, and a sprinkle of joy!
Why Make Your Own Ornaments?
Making your own Christmas ornaments has several advantages, including:
- Personalization: Each ornament can reflect your personality, style, or cherished memories. Whether it’s a favorite color or a significant design, the options are endless!
- Family Bonding: This craft can become a beautiful tradition, gathering family and friends to create together, share stories, and celebrate the holidays.
- Sustainability: By recycling toilet paper rolls, you’re contributing to a greener planet while enjoying creative pursuits.
Materials Needed
To craft your Christmas ornaments, gather the following materials:
- Toilet paper rolls (how many depends on how many ornaments you want to make)
- Scissors
- Acrylic paint or colored markers
- Glitter, sequins, or small embellishments (optional)
- Ribbon or twine for hanging
- Craft glue (or a glue gun)
- Hole puncher (optional)
Step-by-Step Guide
- Cut the Rolls: Start by cutting the toilet paper rolls into various shapes. You can create circular rings, star shapes, or even festive trees, depending on your creativity. Aim for sections that are about 1-2 inches thick.
- Paint and Decorate: Use acrylic paint or colored markers to decorate each piece. Let your imagination run wild! You might choose to go traditional with reds and greens, or opt for more modern color schemes. You can also sprinkle some glitter or glue on sequins for that extra festive sparkle.
- Add Embellishments: Consider adding themed decorations, such as small stickers, beads, or buttons. If you’re crafty, you might want to string beads onto twine or ribbon to create a hanging effect.
- Make the Loop: If you’d like to hang your ornament, use a hole punch to create a small hole at the top of each ornament. Cut a piece of ribbon or twine, threading it through the hole to make a loop for hanging.
- Display Your Creations: Once the ornaments are dry, hang them on the Christmas tree, along your mantel, or even throughout your home for that festive touch!
Sharing the Spirit
One year, I hosted a Christmas ornament-making party, inviting friends and family to join in on the fun. We shared laughs and stories while crafting, and it turned into a memorable evening filled with creativity and holiday cheer. Each ornament we made represented our own unique styles, creating a beautiful collection on my tree that everyone admired. Creating Christmas ornaments from toilet paper rolls merges sustainability with the festive spirit, helping you craft memories that will last a lifetime. So grab your materials, gather your loved ones, and let the crafting begin—this holiday season can be filled with joy, creativity, and a touch of you! 🎅🎁
Eco-friendly Gift Wrapping Ideas
Gift Tags
Continuing our journey into eco-friendly holiday preparations, let’s shine a spotlight on a simple yet impactful aspect of gift wrapping: gift tags! Using gift tags not only adds a decorative touch to your presents but also provides an opportunity to get creative while being mindful of waste. I personally love crafting my own tags, as it transforms an ordinary gift into something extra special. 🎁💚 Creating your own gift tags can be an incredibly rewarding project, allowing you to personalize your gifts while showcasing your artistic flair. Plus, when you use recycled materials, you’re significantly reducing your carbon footprint during the holiday season.
Why DIY Gift Tags?
Here are a few reasons why making your own eco-friendly gift tags is a great idea:
- Personal Touch: Handmade gift tags show that you took the time and effort to create something unique, making the recipient feel extra special.
- Sustainability: By reusing materials, you’re minimizing waste and promoting an eco-friendly approach to holiday giving.
- Cost-Effective: DIY gift tags are an inexpensive way to add some charm to your gifts without shelling out for store-bought options.
Materials Needed
To craft your own gift tags, gather the following supplies:
- Old greeting cards or recycled wrapping paper
- Scissors
- String or twine (for attaching the tags)
- Hole puncher (for making holes)
- Markers, stamps, or pens (for decorating)
- Decorative items (like buttons, stickers, or dried flowers) — optional
Step-by-Step Guide
- Cut the Tags: Begin by cutting shapes from your old greeting cards or wrapping paper. You can opt for traditional rectangles or get creative with fun shapes like stars or hearts. A standard size for tags is about 2 inches wide and 3 inches tall.
- Punch a Hole: Use a hole puncher to create a hole at the top of each tag. This will allow you to thread your string or twine through for easy attachment to your gifts.
- Personalize Your Tags: Now’s the fun part! Write the recipient’s name or a sweet message on the tag. You can also decorate it with markers, stamps, or even glue on some embellishments. Last year, I used dried lavender from my garden to add a fragrant touch to my gift tags—such a lovely detail!
- Attach Your String: Cut a piece of string or twine, about 8-10 inches long. Tie it through the hole at the top of your tag to create a loop.
- Style it Up: Finally, attach the tags to your gifts using the string. You can tie them around the gift box or even incorporate them into the ribbon.
Let Your Creativity Shine
A few years ago, I organized a small crafting night with friends to make holiday gift tags. We played holiday music, and shared snacks while busily cutting and decorating. It was a wonderful way to bring everyone together, and now we all look forward to using our one-of-a-kind tags for our holiday gifting each year. Making eco-friendly gift tags from recycled materials not only enhances your presents but also embodies the spirit of giving and sustainability. As you gift your lovingly wrapped treasures, remember that your effort in creating those tags shows a deep thoughtfulness that the recipient will surely appreciate. So, gather your materials, get creative, and let your gift tags shine brightly this holiday season! 🌟✨
Upcycled Home Décor
Wall Mirror
As we continue our creative journey into upcycled home décor, let’s dive into a project that not only enhances your space but also adds a touch of elegance: making a wall mirror from recycled materials! Mirrors are often a focal point in any room, and crafting your own can give you a sense of pride while also making a unique statement. I remember the first time I hung a mirror I made from upcycled items—it instantly brightened my space and sparked countless compliments from friends and family. ✨🪞 Creating a wall mirror from upcycled materials is an excellent way to combine functionality with artistic expression. Plus, it’s a sustainable choice that can give new life to items you might have otherwise discarded.
Why Make Your Own Wall Mirror?
Here are a few reasons why crafting your own wall mirror is a wonderful idea:
- Personalized Design: You can customize the size, shape, and style of the mirror to match your décor, making it truly one-of-a-kind.
- Sustainable Living: Upcycling materials not only reduces waste but also promotes eco-friendly practices in home décor.
- Cost Savings: Creating your own mirror can be much cheaper than buying a decorative piece from a store, allowing you to invest those savings in other areas of your home.
Materials Needed
To craft your upcycled wall mirror, gather these materials:
- A round or square mirror (this can be a cheap mirror from a thrift store or one you already own)
- Old picture frames, wooden dowels, or cardboard (to create the frame)
- Paint or wood stain (for finishing touches)
- Hot glue gun (for assembly)
- Scissors
- Optional: decorative items like seashells, buttons, or fabric scraps
Step-by-Step Guide
- Choose Your Mirror: Start with a mirror that you have on hand or find one at a thrift store. Ensure it’s clean and in good condition.
- Create the Frame: Depending on the look you want, use old picture frames, wooden dowels, or even cardboard to design the frame. I often mix and match two or three old frames for a textured, layered effect. Cut them to fit around the mirror.
- Paint and Decorate: Give your frames a fresh coat of paint or wood stain to match your home’s color scheme. You can also embellish them further with decorative items. One year, I added seashells to mine, giving it a beachy vibe that my friends loved!
- Attach the Mirror: Once the frame pieces are ready, use a hot glue gun to attach them securely around the mirror’s edges. Make sure to reinforce the joints so the frame can hold its shape.
- Add Hanging Hardware: Attach a sturdy hook or two at the back of the frame for hanging. If the mirror is heavy, ensure that the hardware can support its weight.
- Hang and Enjoy: Choose a wall to display your handmade mirror, and hang it up! Step back and admire your work. It can really transform the space!
Reflecting on Creativity
I’ve always found that creating décor adds a special touch to a home. A friend once commented that my upcycled mirror gave the room an inviting vibe, so I ended up making a few more for different spaces throughout the house. Each mirror holds a story, as they’re all crafted with materials that have had their own journey. Making a wall mirror from upcycled materials is not only a creative endeavor—it’s a way to personalize your space while supporting sustainable practices. So gather your materials, unleash your creativity, and let your mirror reflect your unique style! 🌿💖

DIY Party Favors
Confetti Poppers
As we wrap up our creative series, let’s dive into one of the most exciting projects: DIY confetti poppers! These delightful little party favors are perfect for adding a festive touch to any celebration—be it birthdays, holidays, or even a fun get-together with friends. I can still remember the sheer joy of making and using these confetti poppers for my friend’s surprise party—it truly elevated the atmosphere, turning an ordinary moment into something magical! 🎉✨ Confetti poppers are not only a fun surprise for guests but also an excellent way to engage your creative side while enjoying a hands-on project that everyone will love. Plus, they can easily be made from recycled materials, making them an eco-friendly option for party favors.
Why Use DIY Confetti Poppers?
Here are some reasons why you should consider making your own confetti poppers:
- Easy and Fun: This project is straightforward and can be enjoyed by both kids and adults, making it a great group activity.
- Customizable: You can personalize the size, color, and type of confetti to match your party’s theme or color scheme.
- Cost-Effective: Making your own confetti poppers is much cheaper than buying pre-made ones, allowing you to save money for other party essentials.
Materials Needed
To make your confetti poppers, gather these materials:
- Empty toilet paper rolls
- Tissue paper or crepe paper (in fun colors!)
- Confetti (store-bought or homemade from shredded colorful paper)
- Tape or a glue stick
- Scissors
- Ribbon or string (for decoration)
- Optional: candy or small toys for added surprise
Step-by-Step Guide
- Prepare the Rolls: Start by cutting the empty toilet paper rolls in half if you want smaller poppers. You can leave them whole for a more substantial effect.
- Create the Top: Cut a piece of tissue or crepe paper into a square that’s large enough to fit over one end of the roll. You’ll want it to be about 4-5 inches wider than the end of the roll. Secure the tissue paper over the end with tape or glue, making sure it’s tight and secure.
- Fill with Confetti: Before sealing up the other end, fill the roll with confetti. You can also toss in small candies or toys to double the surprise! I’ve found that mixing both confetti and candy adds an extra layer of excitement when they pop!
- Seal the Bottom: After filling, cut another piece of tissue paper and secure it over the open end of the roll, just like you did the first end.
- Decorate: Use ribbon or string to tie the ends of the tissue paper, creating a fun bow or decorative flair. This adds a cheerful touch that guests will appreciate!
- Using Your Confetti Poppers: When it’s time to celebrate, simply pull the strings to pop the confetti out!
Celebrate in Style
I once hosted a birthday party where we made confetti poppers as a DIY activity before the guests arrived. It not only kept the kids engaged but added another layer of anticipation to the celebration. The highlight was when everyone counted down to popping them at the same time, showering the party with vibrant colors! Creating these DIY confetti poppers is a fantastic way to infuse a celebration with joy and fun while keeping things interactive. So, gather your materials and get ready to make some noise! Your guests will undoubtedly love the surprise that awaits them as they pop these lovely creations! 🎈🎊