
Introduction
Overview of Lead Crafting
When it comes to exploring the vast world of Minecraft, players often find themselves in need of tools that can help manage their wildlife. Among these tools, leads stand out as a versatile item that every Minecraft player should have in their inventory. Crafting leads is relatively simple, yet mastering this skill can significantly enhance your gameplay experience. To craft a lead, you’ll need just a couple of essential resources: slimeballs and string. This straightforward process allows you to connect with various animals—from cows to pigs—and even some mobs, making them easier to control or transport. Imagine finally getting that elusive pet after chasing it around for ages! 🎉 Here’s a quick overview of the crafting recipe:
- 2 Slimeballs: Obtained from slimes, which usually spawn in specific biomes.
- 4 Strings: Easily gathered from spiders, breaking cobwebs, or fishing.
Once you have these materials, crafting your first lead will feel rewarding; it’s a small victory that enables you to forge deeper connections with the digital creatures around you.
Importance of Leads in Minecraft
Leads serve a fundamental purpose in managing your animals and aiding in exploration. Not just a simple rope, leads elevate your gameplay by offering ways to corral, transport, and even showcase your animal collection. Here are a few key reasons why leads are important in Minecraft:
- Animal Transportation: Moving animals from one location to another can be tedious. Leads make this so much easier, enabling you to guide them through otherwise treacherous terrains without fear of losing them.
- Animal Breeding: When breeding animals, having them close is crucial. Leads let you pull your animals to your breeding pen without hassle, ensuring a smooth process.
- Mob Control: Did you know you can also use leads on certain mobs like ghasts and ocelots? This can prove invaluable in specific situations or challenges.
- Enhanced Gameplay: The ability to corral and manage animals gives players more control over their farms and pet collections, adding a layer of depth to the survival and creative aspects of the game.
One of my favorite memories is when I first discovered how to use leads. I had spent hours impotently chasing chickens, only to realize that with just a few string and slimy drops, I could craft leads. With a simple tug, I managed to pull them to my newly built chicken coop. The relief was palpable, and it set the foundation for a flourishing farm!
Benefits of Using Leads
- Easier Farm Management: Leads help keep your farm organized, preventing animals from wandering off.
- Creative Builds: Use leads in creative builds to create enclosures or decorative features involving animals.
- Community Fun: You can even lead your friends on an animal train, creating a playful atmosphere among players in multiplayer settings!
In summary, crafting leads and understanding their importance in Minecraft fundamentally transforms how you interact with animals and explore the game. Whether you’re trying to gather resources, explore new biomes, or build a homestead, leads are versatile tools that enhance your gameplay experience. So, gather those slimeballs and strings, and start crafting! Your adventures await! 🐾

Gathering Resources
Finding Slimeballs
After understanding the significance of leads and how they can elevate your Minecraft experience, the next step is gathering the necessary resources—starting with slimeballs. These squishy items are essential for crafting leads, and locating them can be both an adventure and a challenge. Slimeballs can only be obtained from slimes, which spawn in specific areas of the Minecraft world. Here’s what you need to know about finding these bouncy creatures: 1. Biomes Matter:
- Slimes typically spawn in the Swamp biome during the night or in any light levels below 7.
- To increase your chances, look in these biomes:
- Swamps: The ideal location with plenty of open water and flat ground.
- Overworld: In addition to swamps, they can spawn at specific Y-levels in certain chunks.
2. Time of Day:
- Since slimes only spawn at night in swampy areas, be prepared to venture out under the moonlight.
3. Chunk Generation:
- Slimes spawn in ‘chunks.’ These are 16×16 blocks and usually, slimes will spawn in the same chunk repeatedly if they get killed or despawn. A little extra work in exploring will increase your chances!
4. A Strategy for Slime Hunting:
- Utilize a bed and set your spawn point near a swamp biome. Sleep through the day to maximize your hunting at night.
- Bring a few weapons or armor to help fend off hostile mobs that might be roaming around while you’re on the prowl for slimes.
On one of my adventures, I spent hours swatting at skeletons and zombies only to discover that my slime hunting was futile. It wasn’t until I noticed that slimes only spawn when I was least expecting them, haunting me from the depths of my game’s night. On a whim, I built a simple platform high above the swamp. And to my surprise, I ended up with not just one or two slimes, but a whole batch! Trust me, the reward of collecting those green gooey balls is beyond satisfying. 🎉
Acquiring String
Next up on your resource list is string, another essential ingredient in crafting leads. Fortunately, string is relatively easier to find compared to slimeballs. Here’s a rundown of effective strategies for collecting string: 1. Spiders:
- The most common source of string is, of course, spiders. You’ll often encounter them at night or in dark caves.
- Make sure to engage spiders strategically:
- Have a weapon ready.
- Be cautious when nearing the cave; watch for larger groups!
2. Cobwebs:
- You can also obtain string by breaking cobwebs found in abandoned mineshafts and strongholds.
- Use a sword or shears to break them:
- Shears will yield more string without damaging the webs.
3. Fishing:
- In a twist, you can also get string by fishing. Certain fishing loot drops can include string, especially when you’re not expecting it!
Tips for Efficient Gathering:
- Be Prepared: Carry enough torches to light up caves or dark areas where spiders might lurk.
- Explore: Regularly explore caves and mineshafts to stockpile string and perhaps even some other resources.
- Avoid Combat: If you want to save time, try luring a spider into the daylight; they burn up and drop string without you having to engage in a fight!
Collecting string might seem minor, but every little bit helps as it lays the groundwork for crafting your leads. In essence, both slimeballs and string are crucial, and having a solid strategy for gathering them can set you on a path to success in your Minecraft journey. Happy crafting! 🕷️✨

Crafting Basics
Crafting Recipe for Leads
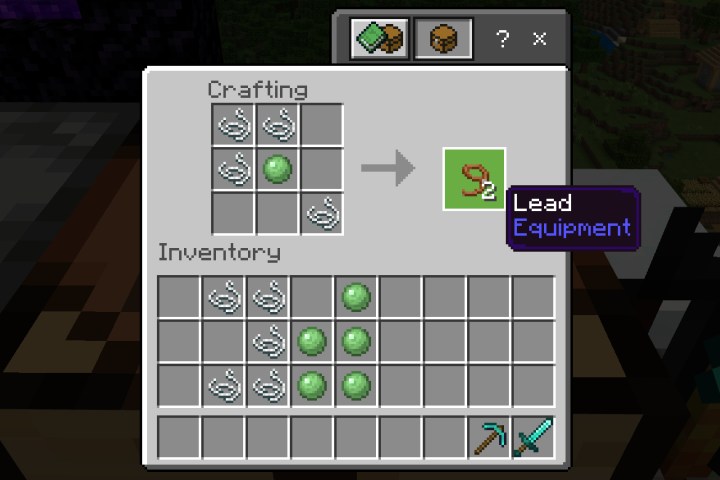
Now that you’ve gathered your slimeballs and strings, it’s time to dive into the fun part—crafting your leads! Knowing the right recipe is essential to ensure that you’re able to make the most out of your hard-earned resources. To craft a lead, follow this simple recipe:
- Collect Your Ingredients: You’ll need:
- 2 Slimeballs
- 4 Strings
- Crafting Layout: Open your crafting table and arrange your materials as follows:
- Place the strings in a Yformation:
- Top Row: String, String
- Middle Row: Slimeball, Slimeball
- Bottom Row: String, String
This arrangement will effectively create one lead for you! Here’s a quick visual representation:
String String Slimeball Slimeball String String - Place the strings in a Yformation:
- Craft and Collect: Once arranged, just click on the lead in the crafting output box and drag it to your inventory. Easy peasy! 🎉
That’s all there is to it! Crafting leads is a straightforward process, but every time you craft new ones, remember that you’ve taken a crucial step toward enhancing your gameplay. My first time crafting a lead was a personal milestone—I eagerly connected it to my pet sheep, and it felt like suddenly having a trusty sidekick on all my adventures. 🐑
Using Crafting Table
Using a crafting table is essential for creating leads, and it’s a skill that every Minecraft player should master. Crafting tables can be easily made from four wooden planks, making them accessible right from the start of your journey. Place your crafting table in a well-lit area—whether it’s inside your cozy home or out in the open—for convenience. Here’s how to use your crafting table effectively: 1. Crafting Table Setup:
- Right-click (or tap) on your crafting table to open the 3×3 crafting grid. This interface provides additional space compared to the regular 2×2 crafting grid you find in your inventory.
2. Item Arrangement:
- Just like you did previously, place your ingredients in the crafting table:
- Input them following the Y formation that we discussed before.
3. Understand Crafting Recipes:
- Getting familiar with various crafting recipes can be a game-changer in your Minecraft journey. It helps to have a reference guide on hand. Check out online resources or keep a notepad to jot down important recipes, including those for leads.
4. Practice Makes Perfect:
- The more you use your crafting table, the more adept you’ll become at recognizing patterns and layouts. So don’t hesitate to experiment with your spare resources.
I remember when I first started using the crafting table. Initially, I was a bit overwhelmed by the larger grid compared to the inventory crafting space. But as soon as I crafted my first set of leads, it opened up a world of possibilities. Not only could I manage my animals more effectively, but I also had a deeper appreciation for how crafting in Minecraft works.
Tips for Efficient Crafting:
- Stay Organized: Keep your materials neatly stored in chests, so you can quickly access what you need.
- Centralize Crafting: Place your crafting table near your primary workspace or farm for easy access.
- Use Craftable Guides: Download or keep a crafting guide handy for more complicated recipes.
In conclusion, crafting leads may seem like a small task, but it’s a stepping stone to creating memorable adventures in Minecraft. With the crafting recipe mastered and your crafting table in hand, you’re well on your way to taming the wilderness and exploring the depths of your creativity. Happy crafting! 🛠️🌟

Taming Animals
Lead Mechanics with Animals
Now that you’ve crafted your leads and gathered your resources, we can dive into one of the most enjoyable aspects of Minecraft—taming animals! Using leads gives you a special power to manage and control them in ways that enhance your gameplay experience. Understanding Lead Mechanics: Leads allow you to connect to various animals, such as cows, pigs, sheep, and even certain mobs like ocelots and villagers. So how does it all work? Here’s the breakdown:
- Attaching Leads: Simply approach an animal and right-click (or tap) while holding the lead. You’ll see a visible string joining you to the animal, ensuring it follows you wherever you go. This can be especially handy when you want to move your newly tamed companion back to your base without losing them.
- Movement: While the lead is attached, the animal follows you closely. If you go too far, they will tug against the lead but won’t be able to break free unless you remove it or they somehow escape when moving through an enclosed space.
- Multiple Animals: You can even tie multiple animals to a fence post or a single lead to corral them! It’s like having your little parade of livestock right behind you.
During my gameplay, I remember wanting to create a farm but struggling to keep my animals from wandering off. After discovering leads, I was able to gather my animals and lead them back to my farm in one trip, and it felt like an accomplishment. Picture this: a train of sheep happily following along, and I couldn’t help but laugh at the sight! 🎉
Tips for Animal Taming
Taming animals in Minecraft can be a delightful experience, especially when you know a few tricks to make the process smoother. Here are some tips that will help you be a successful animal tamer: 1. Know Your Animals:
- Different animals have different taming needs. While cows and pigs are content just being led, other creatures like horses and ocelots require a bit more interaction. For example, horses need to be fed apples or hay bales to successfully tame them before you can lead them.
2. Use the Environment:
- Create a safe space for your animals. Fencing off an area can prevent them from wandering away while you work on taming them. You can even set up temporary pens using fences and gates for added security.
3. Be Patient:
- Taming some animals takes time. For instance, ocelots can be quite skittish and will run away if approached too quickly. If you want one as a companion, simply crouch and approach slowly while holding raw fish until the ocelot comes to you.
4. Utilize Leads Wisely:
- Use your leads strategically by attaching them to fence posts while you gather more animals. This way, you can create your farm without losing any animals that you’ve already captured.
5. Keep Calm:
- Animals can sense your excitement (or frustration). A calm approach often works better, whether you’re moving them or trying to tame them. When I hurriedly chased down a pig, I ended up scaring it away multiple times. But once I slowed down, I could successfully lead it back with ease.
6. Stack Up on Leads:
- Always have extra leads on hand! You never know when you’ll spot a new creature you want to tame or bring home, so being prepared is key.
In summary, taming animals using leads adds a fun layer to your Minecraft adventures. With the right mechanics and some handy tips under your belt, you can create a thriving farm, capture unique animals, and enrich your gameplay. Whether you’re transporting livestock home or attempting to tame an intimidating ocelot, embrace the joy of animal handling in your blocky universe! 🐖🐑✨
Exploration and Adventure
Using Leads for Exploration
As you journey deeper into the captivating world of Minecraft, exploring new biomes and terrains, you’ll quickly find that leads can be your trusty sidekick. They’re not just for managing animals; they can significantly enhance your exploration experience! One of the best uses for leads while exploring is managing the creatures you encounter. For instance, if you come across a stray horse or wandering llama, you can easily lead them back to your base or stable while continuing your adventure. Here are some fantastic tips on how to make the most of leads during your exploration:
- Create a Mobile Menagerie: Think of your leads as a tool to create a traveling farm. You can gather animals from various biomes as you explore. Every time I find a unique animal, I get excited about adding it to my collection. I once found a beautiful black horse in a plains biome, and with a lead securely attached, I was able to guide it back to my home while carrying on with my exploration! 🎉
- Map Your Journey: Take notes of interesting areas where you find animals or mobs. Using leads to collect them as you scout new territories can help you form a ‘map’ of your adventures filled with memorable encounters.
- Mob Control: While exploring, you may stumble upon some hostile mobs. Using leads on passive animals can distract them, allowing you to sneak past. However, keep in mind that some mobs, like ocelots, despite being skittish, can be lured by raw fish and made to follow you until you attach a lead.
Lead Hacks for Exploration:
- Attach leads to multiple animals at once to create a traveling group. This makes it easier to transport them back home.
- Don’t hesitate to use a boat! If you’re near water, placing your leads on animals and sailing with them can make for hilarious adventures.
Lead Applications in Adventure
Leads open up a range of applications that can enhance not only your exploration but also your overall Minecraft adventures. Whether you’re preparing for a challenging mission or simply wandering through the vast pixelated landscapes, leads can be invaluable tools.
- Taming New Companions: Discovering wolves or cats while exploring is exciting. With leads, you can easily bring them along as new companions. Having a trusty wolf by your side can help fend off monsters while you venture into caves or deep forests.
- Transporting Villagers: If you come across a village with potential, don’t forget that you can use leads to transport villagers! For instance, if you want to create a trading post, lead a couple of villagers back to your base to start your own fun community. Just be cautious, as the villagers will escape if you are not careful.
- Setting Up Campsites: Picture this: you’re on a long adventure and want to set up camp for the night. You can lead animals or mobs to a designated area, ensuring they’re safe and close by while you prepare for the night or hunt for resources.
- Farm Management While Adventuring: When you’re out gathering resources and happen to discover animals, don’t hesitate to lead them straight to your farm while still on your adventure. It saves you trips back and forth while maximizing your time.
I once found myself amid a thunderstorm in a dark forest, my heart racing. I spotted a village lit up in the distance and sprinted toward it, a couple of leads trailing behind. I grabbed a couple of villagers and after securing them inside the village walls, I felt triumphant! That experience highlighted the beauty of using leads—turning what could have been a terrifying night into an adventure filled with companionship. In conclusion, leads are powerful tools that can elevate your Minecraft exploration and adventure. By using leads wisely, you can gather unique animals, manage mobs, and bring home companions to enhance your gameplay. They open up a whole new dimension of creative possibilities, making your journey through the Minecraft world that much more exciting! 🌍🐾✨
Advanced Lead Techniques
Lead Tricks and Techniques
With the basics of crafting leads and understanding their application firmly under your belt, it’s time to elevate your lead game with some advanced techniques. These tricks can make your gameplay smoother, more efficient, and a lot more fun! 1. Multi-Animal Logistics:
- Ever dreamed of leading more than one animal at once? With leads, you can! When you find a couple of animals in close proximity, you can attach multiple leads to them. This allows you to create a mini-parade of animals, all following you back to your base.
- Ideally, pick animals that are close together, such as sheep and cows. Just have patience; sometimes you may need to coax them into a tight group first!
2. Creative Enclosures:
- Use leads creatively to establish enclosures. For example, if you are building a petting zoo or a menagerie, use leads in conjunction with fence posts. Tie the animals to the posts to keep them in one place while you set up their habitats.
- This technique also lets you showcase different animal breeds you encounter during your exploration, resulting in an enjoyable display when you invite friends over! 🐴
3. Leash Mobility:
- If you find yourself exploring while dragging a group of animals, don’t forget that you can jump over obstacles. The leads will stretch and follow you, allowing for smooth navigation of tricky terrains. Just be careful not to pull your animal companions into a ravine or deep water!
4. Exploration Teams:
- If you’re playing with friends, designate an ‘Explorer’ and an ‘Animal Herald.’ One player can scout new areas while the other corrals animals using leads. This collaboration not only makes exploration efficient but can lead to surprising adventures—think of how many more creatures you’ll gather as a team!
5. The Temporary Lead Trick:
- Create a temporary holding area by using leads. If you’re out and about and find a mob, attach a lead to it and tie it to a block. This way, you can focus on gathering more animals or resources without worrying about losing previously gathered creatures.
I remember one of my most memorable Minecraft sessions where I decided to assemble the most outlandish animal train. I had a cow, several pigs, and even a couple of sheep all in a line, proudly following me home. I felt like a shepherd on an epic quest!🐑🎉
Lead Crafting Strategies
Once you have the hang of lead tricks, it’s crucial to think strategically about how you gather resources and maximize your crafting potential. Here are some effective lead crafting strategies to enhance your game: 1. Stockpiling Resources:
- Make it a point to gather extra slimeballs and strings whenever you find them. A good practice is to turn your successful hunts into crafting sessions. Don’t craft your leads too early; stockpile a few dozen leads to always be ready when an adventure calls.
2. The Investment Mindset:
- Always keep a backup crafting table nearby. When exploring or during long jaunts across biomes, setting up a temporary crafting table lets you quickly create leads on the spot. This way, you can utilize any new animals or mobs you’ve found right away.
3. Collaboration:
- If you’re in a multiplayer world, organize group “animal hunts” where everyone pitches in to collect leads. This way, your collective inventory can go deeper into the crafting strategy. After all, working together can lead to a diverse collection of animals tied up.
4. Trading with Villagers:
- If you’re fortunate enough to find a village, trading can become a valuable strategy. You can trade for string or even other beneficial items while your lead resources dwindle. Always remember: villagers are a hidden treasure right under your nose!
5. Seasonal Resource Farms:
- If you’re consistently harvesting slime, think of creating a small rotation farm. You can create a designated area using slime blocks surrounded by fences. This way, you’ll have a steady supply of slimeballs and very quickly stockpile for crafting.
In summary, mastering advanced lead techniques and crafting strategies can significantly enhance your gameplay experience in Minecraft. Understanding how to efficiently gather and use leads allows you to explore new realms, tame animals, and strategize intelligently as you build your pixelated empire. Embrace these techniques, and remember—the more creative you get with leads, the more adventures await you! 🌟🛠️

Lead Farming
Setting Up a Lead Farm
Now that you’ve harnessed the skills and techniques associated with leads, it’s time to take your resources to another level—welcome to lead farming! Setting up a lead farm is a fantastic way to ensure you always have an ample supply of leads at your disposal, making your animal taming and exploration adventures much smoother. 1. Resource Gathering:
- Before diving into lead farming, ensure you have a reliable source of both slimeballs and string. You can collect slimeballs from slimes that spawn in swamp biomes, while string can be obtained from spiders or by breaking cobwebs.
- It’s a good idea to stockpile these resources in a dedicated chest close to your crafting station so everything is easily accessible when you need to craft leads. 😄
2. Design a Dedicated Farming Area:
- Pick a location close to your habitations, such as near your base or farm. A flat area works best, as it allows for easy movement while crafting and organizing.
- Build fencing or walls around the area to keep any wandering animals or mobs out, and to create a safe zone for working.
3. Create a Crafting Station:
- Place a crafting table and some chests in your lead farming area. This makes it convenient to craft leads and store excess resources without having to run back to your main base.
4. Organize and Optimize:
- Group your chests by resource type. For example, you could have one chest for slimeballs and another for string. This not only helps keep things organized but speeds up the crafting process.
Just recently, I set up my own little lead farm. I chose a cozy spot right next to my base where I usually kept my range of crops. Ensuring that my chests were stocked with resources made crafting leads as simple as pie, and I was able to invite friends over to share the bounty in no time! 🥧
Maximizing Lead Production
Now that your lead farm is up and running, it’s essential to think about how to maximize your lead production. Here are some effective strategies for ensuring you never run out of leads: 1. Consistent Resource Collection:
- Make it a routine to gather slimeballs and string regularly. Set aside specific times in your gameplay schedule to focus solely on resource gathering. For example, dedicate a night to exploring swamps for slimes and a day to hunt spiders in caves for string.
2. Automate Processing:
- Consider setting up automatic farms for string and slime if you want to take your lead farm to the next level! For instance, you can set up a spawning platform in a swamp biome to encourage slime spawning, or use a dark room where spiders spawn so you can farm them continuously.
3. Trade with Villagers:
- Don’t overlook the potential of trading! If you come across villagers offering string or even wool (which can be crafted into string), it’s worth your while to exchange some of your other resources to boost your lead production.
4. Efficient Crafting:
- To maximize crafting, have all your materials in one place and try to craft in batches. Instead of crafting one lead at a time, gather enough resources to produce several leads at once. This way, you will have an abundant stockpile ready for your next adventure.
5. Share the Wealth:
- If you’re playing on a multiplayer server, consider sharing the lead-making responsibility. You might collaborate with friends who can focus on resource gathering, while you do the crafting. This division of labor not only saves time but strengthens teamwork.
In conclusion, setting up an efficient lead farm and maximizing your lead production will enhance your overall Minecraft experience. With a steady supply of leads at your disposal, you can explore, manage animals, and engage in exciting adventures without the stress of running out of resources. So dive into lead farming, and get ready to take your animal taming and exploration game to the next level! 🐾🚀

Creative Builds
Lead Utilization in Creative Builds
In the enchanting world of Minecraft, creativity knows no bounds. As you hone your skills in crafting leads and managing animals, it’s time to explore how you can incorporate them into your creative builds. Leads can add considerable flair and functionality to your structures, making your creations not only beautiful but also more interactive. 🌈 1. Animal Enclosures:
- One of the most practical uses for leads in creative builds is in constructing animal enclosures. You can create visually striking farms or petting zoos where animals are tied to decorative posts or fences. This not only keeps them secure but also adds charm to the overall aesthetic.
- You can design different themed enclosures, for example:
- Woodland Retreat: Use wood, leaves, and grass blocks to create an enchanting, forest-like petting zoo.
- Futuristic Farm: Incorporate glass and metal blocks to craft an innovative-looking structure with leads used as energy conduits connecting animals to their habitats!
2. Decorative Exhibits:
- Create exhibits that showcase exotic animals you’ve collected. Use leads creatively to help display these animals in captivating ways. By tying them to well-positioned fence posts within beautifully crafted environments, you can give visitors the opportunity to admire them easily.
3. Fun Rails and Leashes:
- Turn your lead utilization into a game by designing a fun track or rail system. Picture a carnival-like atmosphere where animals are led around in a loop using leads. Create pathways lined with vibrant blocks and fun lighting to guide animals while players watch them go around.
I built a sprawling petting zoo on my multiplayer server, where I created separate themed regions for different types of animals. It was a sight to behold! Each enclosure featured leads attached to creatively designed posts, making the visit both inviting and interactive. People loved it, and I had the best time leading them through. 🐴😁
Showcasing Lead Crafted Structures
Once you implement leads into your creative builds, it’s time to showcase your impressive structures to the Minecraft community. Sharing your builds can inspire others and lead to collaborations. 1. Organizing a Showcase Event:
- Host a virtual exhibition where others can come to view your creations. Set up a guided tour for visitors, showing off how you’ve used leads to enhance your builds. A fun and lighthearted gathering can turn into a creative brainstorm where everyone shares ideas for lead usage!
2. Create a Building Challenge:
- If you’re part of a multiplayer community, consider initiating a building challenge that focuses on the use of leads. Encourage players to construct something unique, whether it’s a themed animal park or an interactive farm, and share the results. You’ll be surprised at the creativity that emerges!
3. Share on Social Media:
- Don’t keep your masterpieces to yourself! Take screenshots of your creative structures and share them on platforms like Instagram, Twitter, or Reddit. Engage with fellow players and gather feedback or tips. This can also lead to collaboration opportunities with builders from around the world.
4. Tutorials and Guides:
- Creating video content or blog posts showcasing your designs, especially unique lead implementations, can be incredibly valuable to the community. You can share tips on what worked well, challenges faced, and any tricks you discovered along the way. Personalized stories from your builds resonate well!
During a recent showcase event, I decided to share my lead exhibits and found that many players were curious about my unique structures. Everyone had a different interpretation of how leads could be used creatively. Some even shared their builds, leading to an impromptu mini-expo filled with vibrant ideas! It underscored the strength of community in Minecraft. 🌍 In conclusion, incorporating leads into your creative builds adds both practicality and charm. By experimenting with different designs and showcasing them to your community, you’ll not only enhance your Minecraft experience but also inspire others to think outside the box. So grab your leads and let your imagination flourish in building the structures of your dreams! 🏰✨