Overview of DIY Craft Flowers
Creating DIY craft flowers is a delightful and rewarding experience that allows you to express your creativity. Whether you’re a seasoned crafter or a beginner just dipping your toes into crafting, the world of paper and fabric flowers offers something for everyone. These handmade blooms not only add a personal touch to your home decor but also make lovely gifts for friends and family. Imagine walking into a room where vibrant, handcrafted flowers adorn tables and shelves instead of traditional store-bought arrangements. You can choose colors, shapes, and sizes that perfectly suit your style, making your space feel warm and inviting. Plus, the satisfaction of creating something with your own hands is unmatched! DIY craft flowers can range from simple, quick projects to elaborate, intricate designs that challenge your skills. From making a single statement bloom to designing a complete bouquet, the possibilities are endless. You can find inspiration in nature, art, or even your favorite colors.
Benefits of Making DIY Craft Flowers
The benefits of making DIY craft flowers go beyond simple aesthetics. They provide numerous advantages that can enhance your crafting journey:
1. Creative Expression
Crafting your own flowers allows you to tap into your artistic side. You can experiment with various materials, colors, and designs. This hands-on activity can serve as a creative outlet, making it an enjoyable escape from daily routines.
2. Cost-effective Decor
Buying fresh flowers can be expensive and, let’s face it, they wilt after a few days. Making your own DIY flowers can save you money while providing beautiful long-lasting decor. With minimal investment in materials (which you can use repeatedly), you can create an eye-catching centerpiece that never fades.
3. Personalization
When you create your own flowers, every piece can reflect your unique style and preferences. Want a bright yellow sunflower for that sunny corner in your living room? Or perhaps muted pastels for a romantic touch on your dining table? You call the shots, and each flower can tell a story.
4. Therapeutic Benefits
Crafting can be incredibly therapeutic. I’ve found that focusing on creating something beautiful while practicing mindfulness can be a great way to unwind after a busy day. The repetitive motions of cutting, gluing, and assembling flowers can create a meditative experience that calms the mind.
5. Skill Development
Taking on a DIY flower project can help you develop various skills. You’ll learn techniques for cutting, folding, gluing, and even basic sewing if you choose to use fabric. Each flower you make sharpens your skills, and with time, you can tackle more complex designs with confidence.
6. Meaningful Gifts
Handmade gifts carry special sentiments. Crafting flowers for someone – be it a birthday, an anniversary, or just because – shows you took the time and effort to create something unique just for them. Adding a personal touch to your gifts can mean so much more than picking out something from a store.
7. Community Engagement
Joining crafting communities, whether online or in-person, can help you connect with other enthusiasts. You might even find local groups hosting workshops and sharing tips, which can expand your knowledge and ideas in making craft flowers. In summary, making DIY craft flowers is more than just an aesthetic choice; it’s a blend of personal expression and emotional benefits. Each flower crafted not only adds beauty to your space but also contributes to your emotional well-being and growth as a creator. So let’s dive deeper into the materials and techniques that will help you start crafting your beautiful blooms! 🌷

Now that you’ve seen the benefits and endless possibilities of creating your own DIY craft flowers, let’s dive into the materials you’ll need. Having the right supplies can streamline your crafting process and ensure that your flowers turn out beautifully!
Common Supplies
When you’re starting out, there are a few essential materials that every DIY crafter should have in their toolbox. Here’s a handy checklist of common supplies:
Basic Materials
- Paper or Fabric: This is your primary material. For paper flowers, you’ll want to explore different types like card stock, crepe paper, or tissue paper. If you’re leaning toward fabric flowers, cotton, felt, or silk fabric will work wonders.
- Scissors: A sharp pair of scissors is essential for clean cuts, ensuring your flowers look neat and professional.
- Adhesive: You can choose from hot glue guns, tacky glue, or even double-sided tape. For paper flowers, glue sticks can also be handy.
- Wire: Floral wire can serve as stems or support for your flowers. If you’re creating larger blooms, consider using sturdier wire to keep them upright.
- Floral Tape: This is great for wrapping stems or adding a green finish to your flower stems.
- A Cutting Mat: If you’re working with sharp tools, a cutting mat will protect your workspace and keep everything tidy.
Tools for Precision
- Templates and Stencils: These can help you create consistent shapes and sizes for your flowers. You can make your own or find them online for download!
- Tweezers: A pair of tweezers can come in handy for delicate assembly work, especially when dealing with tiny pieces.
- Bone Folder: This tool is great for creating crisp folds in paper, which can elevate the look of your flowers.
I remember when I started crafting, I was so eager that I rushed into buying supplies without thinking it through! I ended up with some fancy materials that I didn’t know how to use. Keeping it simple is always a good idea when beginning your crafting journey.
Optional Embellishments
Once you’ve got your basic supplies sorted, consider adding a few embellishments to make your flowers truly unique. Here are some fun options:
1. Beads: Adding beads to the center of your flowers can create a striking focal point. Choose colors that complement your flower petals—there’s something undeniably charming about a sunflower sporting a beaded center!
2. Ribbons and Bows: A little ribbon can go a long way in enhancing the visual appeal of your flowers. Using them as bows around the stem or as an accent can add a touch of elegance.
- Example: Try using burlap ribbon for a rustic look or satin for a more refined touch.
3. Buttons: Upcycle some old buttons to add character to your flowers. They can serve the same purpose as beads and come in various shapes and colors.
4. Glitter: If you’re looking to add a bit of sparkle, don’t shy away from using glitter. A sprinkle can give your flowers a whimsical appearance, ideal for parties or festive decorations.
5. Paint or Markers: Once your flowers are assembled, consider adding some finishing touches using paint or markers. A little shading can create depth, making them appear more lifelike.
6. Leaves and Greenery: Don’t forget about the green aspects of your arrangements! Add leaves made from paper or fabric for a complete look. You can even create a small bouquet featuring different flower types and colors intertwined with vibrant green leaves.
Equipping yourself with both common supplies and optional embellishments sets a solid foundation for crafting stunning DIY flowers. It can also pave the way for your creativity to shine through! As you gather your materials, look around your home for items you can upcycle or incorporate into your designs. Getting crafty can become a fun treasure hunt in your own space! With your materials ready, you’re one step closer to diving into the techniques for making your gorgeous DIY flowers. Let’s explore those methods next! 🌼
With your materials ready and waiting, it’s time to dive into the exciting world of crafting flowers! There are two primary techniques you can explore: paper flower making and fabric flower making. Each method has its own unique charm and can offer limitless creative possibilities!
Paper Flower Making
Paper flowers are versatile and delightful to create. They can mimic the appearance of real flowers and can be used in various decor settings, from home to weddings and beyond.
Getting Started with Paper Flowers
- Choosing the Right Paper:
- As mentioned earlier, various types of paper work well for flower crafting.
- Crepe paper is stretchy and can create beautiful, realistic petals.
- Card stock is sturdy and works wonders for more structured flowers.
- Tissue paper lends itself well to soft, delicate blooms.
- Cutting Out Petals:
- Start by creating a template for your flower petals. You can find designs online or craft your own based on the flower you wish to replicate.
- Use scissors to cut out multiple petals. Remember, odd numbers usually make for fuller-looking flowers!
- Shaping the Petals:
- Once your petals are cut, shape them! You can slightly curl the edges using a pencil or your fingers for a more natural look.
- A bone folder, if you have one, can help create impressive folds or creases.
- Assembling the Flower:
- Layer the petals on top of each other, gradually shifting them to create a fuller appearance.
- Secure them together using glue, then attach your chosen center (like a bead or a button) to add a finishing touch.
- Adding Stems:
- Attach floral wire to form the stem. You can wrap it with floral tape for a polished look.
- Voila! You’ve crafted a beautiful paper flower.
Personal Tip:
I remember my first attempt at making paper flowers—it was a bit messy! I had glue everywhere, and pieces didn’t stick neatly. But each mistake taught me something. Now I appreciate the learning curve that comes with crafting, and trust me, it gets easier each time you try!
Fabric Flower Making
If you’re looking to create something a little more textural and durable, fabric flowers are the way to go. They can be used in hair accessories, brooches, or even as part of larger fabric arrangements.
Getting Started with Fabric Flowers
- Choosing the Right Fabric:
- Think about the look and feel you want. Cotton fabric is easy to work with and perfect for beginners.
- For a more luxurious touch, consider silk or satin, though these can be a tad trickier to handle.
- Cutting Fabric Pieces:
- Just like with paper flowers, the first step is to cut out your petals. Make sure to use pinking shears if you want to prevent fraying.
- You can create different petal shapes depending on the flower you want to replicate—think dainty daisies to bold peonies!
- Sewing or Gluing:
- You have two main choices for assembling your fabric flowers: sewing or gluing.
- For sewing, stack your petals, and attach them with small stitches. This can give your flower a handmade charm.
- If you prefer the quicker route, using fabric glue works just as well.
- Adding Dimension:
- For a more textured look, consider adding some form of gathering. Gather the edges of the petals by sewing a loose stitch and pulling to cinch them together tightly.
- Add embellishments like beads to the center to elevate your flower even more.
Crafting Tip:
My favorite memory from making fabric flowers was when I added mismatched buttons to the centers. It turned a simple flower into a quirky and personalized piece! Feel free to mix and match colors and fabrics; the only limit is your creativity. As you progress through these techniques, remember to make it your own. Whether you prefer the crispness of paper or the softness of fabric, each flower you create will carry a piece of you. The next time you showcase your beautiful creations or gift them to someone special, you’ll know just how much love and creativity went into their making! 🌸
Now that you’re familiar with the techniques for creating DIY flowers, let’s jump into the nitty-gritty of making beautiful paper flowers! This guide will walk you through the process, ensuring you have everything you need for a successful crafting session. 🌼
Choosing the Right Paper
Choosing the right paper is crucial for the look and feel of your flowers. Each type of paper brings something different to the table, so here are some options to consider:
1. Crepe Paper
- Texture: Soft and stretchy, crepe paper mimics the look of real flower petals beautifully.
- Best For: Flowers like peonies and roses, where you want to create ruffled petals.
- Tip: When you cut crepe paper, try stretching it slightly as you cut, which enhances its natural drape.
2. Tissue Paper
- Texture: Thin, lightweight, and translucent, it can create delicate, airy flowers.
- Best For: Flowers that need a soft, romantic touch—think poppies and daisies.
- Tip: Use layers of tissue paper to create more volume; this gives depth to your blooms.
3. Cardstock
- Texture: Sturdy and thick, cardstock holds its shape well.
- Best For: More structured flowers like tulips or lilies where you want distinct petal shapes.
- Tip: You can also ink edges or color the petals to add depth and dimension.
4. Papercraft Sheets
- Texture: These often come in a variety of patterns and colors.
- Best For: Whimsical flowers that can brighten up any space.
- Tip: Mix and match patterns for a playful look!
Personal Experience:
I remember my first venture into paper flower making involved a mix of crepe and cardstock papers. The contrast between the soft petals and the sturdy base brought my flower to life. Don’t be afraid to experiment with different combinations!
Assembling the Paper Flowers
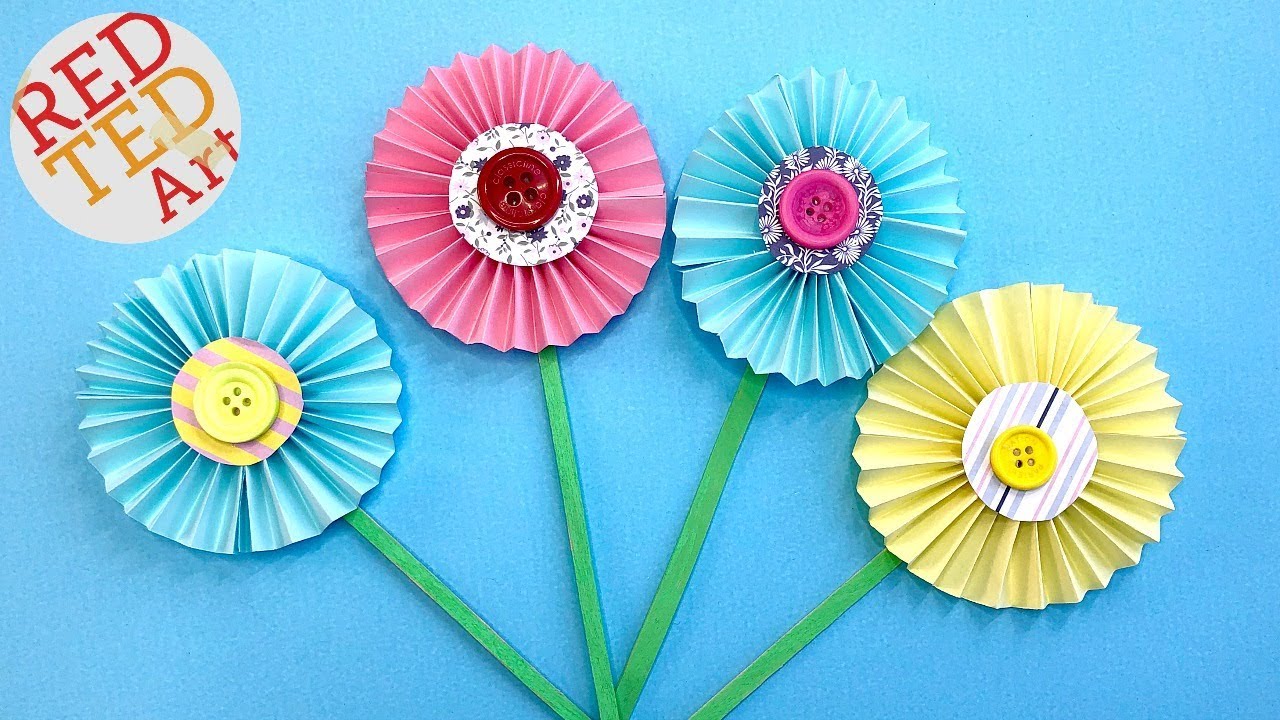
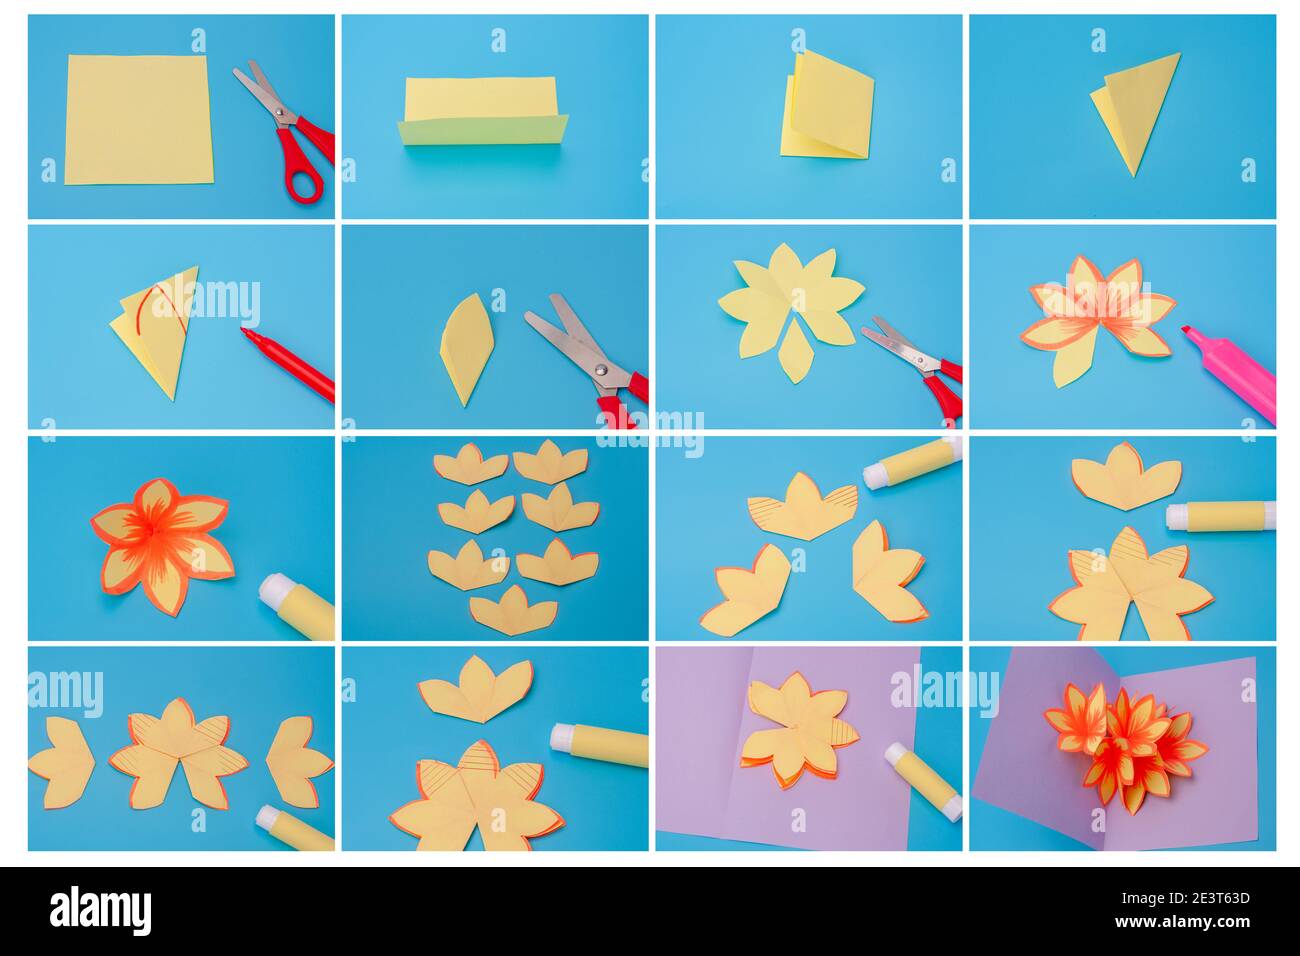
Once you’ve picked your paper, it’s time to assemble your paper flowers! Here’s a step-by-step process to guide you:
Step 1: Cut Petal Shapes
- Use a template or draw shapes directly onto your chosen paper.
- For a classic flower, you might cut out petal shapes resembling ovals or teardrops.
- Tip: For a fuller flower, cut multiple petal shapes in different sizes—this adds dimension!
Step 2: Shape the Petals
- To make the petals more lifelike, gently curl them using a pencil or your fingers.
- If you’re using crepe paper, stretching the edges slightly can create a realistic flowing look.
Step 3: Create the Flower Center
- You can either use an embellishment like beads or create a center from smaller paper circles or pom-poms.
- To make a pom-pom, gather a few small circles of paper and pinch them in the center. Secure with glue!
Step 4: Assemble the Flower
- Start with your largest petals at the back, gluing them to a central hub.
- Gradually layer in smaller petals in overlapping fashion until you’re happy with the fullness.
- Secure each petal with glue as you go.
Step 5: Add a Stem
- Cut a piece of floral wire to your desired length.
- Attach the wire under the bottom petal layer, wrapping with floral tape for a seamless look.
- You can also cover the wire in green floral tape to resemble a natural stem.
Step 6: Final Touches
- Consider adding leaves crafted from green paper.
- Simply cut leaf shapes and attach them to the base of the flower stem for a pop of color.
- You might even add a hint of glitter to the edges for sparkle!
Personal Note:
Every time I assemble a paper flower, I feel a sense of accomplishment watching it transform from simple cutouts to a vibrant bloom. Don’t hesitate to make each flower unique—-it’s all part of the fun!
Summary:
Crafting paper flowers is not just an artistic endeavor; it’s a way to express your creativity while enjoying the process. Remember to take your time and enjoy every cut and fold—before you know it, you’ll have a stunning arrangement to display or gift! 🌷 With this guide, you’re well on your way to creating beautiful paper blossoms that can brighten up any corner of your home or make thoughtful gifts for loved ones. Next up, we’ll explore the exciting realm of fabric flowers!
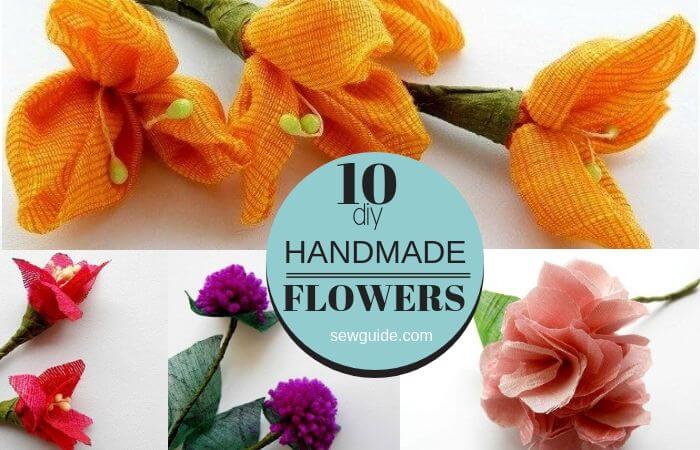
Now that you’re familiar with the art of making paper flowers, it’s time to explore the wonderful world of fabric flowers! Using fabric allows for unique textures and a softer finish, making your creations perfect for accessories, home decor, or gifts. Let’s break this down step by step! 🌸
Choosing the Right Fabric
Selecting the right fabric is essential in achieving the desired look and feel of your flowers. Here’s a rundown of your best options:
1. Cotton Fabric
- Texture: Versatile, soft, and easy to manipulate, cotton is perfect for beginners.
- Best For: Flowers with a structured design, like daisies and tulips.
- Tip: Look for colorful prints or solid colors to match your theme.
2. Felt
- Texture: Thick and sturdy, felt gives a unique shape and texture to your flowers.
- Best For: Playful or whimsical flowers, making it ideal for kids’ projects or themed decorations.
- Tip: No fraying means no sewing required, which makes this a quick option!
3. Silk and Satin
- Texture: Luxurious and elegant, these fabrics can add a sophisticated touch to your flowers.
- Best For: Formal events like weddings or classy home decor.
- Tip: These fabrics may require a bit more care while cutting and shaping.
4. Linen or Canvas
- Texture: Sturdy and textured, these fabrics can create more rustic-looking flowers.
- Best For: Country and bohemian styles.
- Tip: Reinforce the edges with a sewing machine or fabric glue to reduce fraying.
Personal Insight:
When I first started making fabric flowers, I gravitated towards cotton because it felt safe and easy to work with. After trying my hand at silk flowers for a friend’s wedding, I realized how a different fabric could transform the entire creation process—so don’t hesitate to explore!
Sewing or Gluing Fabric Flowers
Once you’ve chosen your fabric, it’s time to dive into assembling your beautiful fabric flowers. You can choose to sew or glue your creations, depending on your comfort level:
Step 1: Cutting the Fabric
- Use a template to trace out petal shapes. You can create various sizes for a more dynamic flower.
- Tip: Use pinking shears to cut the fabric if you’re worried about fraying.
Step 2: Preparing Petals
- For some fabrics, you may want to “burn” the edges slightly to prevent fraying. This works well with synthetic fabrics like satin.
- Alternatively, you can simply fold the edges over and glue them in place for a uniform look.
Step 3: Sewing the Petals
- Start with the larger petals. Layer them onto a sturdy base fabric or felt.
- Use a needle and thread to sew them in a circular pattern.
- Tip: A simple running stitch can work well to attach petals together.
- If you’re aiming for a more intricate flower like a rose, you might want to employ gathering techniques. To gather, create a loose stitch along the fabric’s edge and pull to create ruffles.
Step 4: Gluing the Petals
- For those who prefer a quicker method, fabric glue works perfectly!
- Layer your petals similarly, gluing each one down individually onto a felt backing or directly onto another petal.
- Tip: Use clothespins to hold petals in place while they dry—this prevents any shifting!
Step 5: Adding the Flower Center
- Attach embellishments like buttons, beads, or fabric circles to the center of your flower.
- These can serve as the focal point and add personality!
- For a simple fabric center, cut a small circle from another piece of fabric and glue it in the middle.
Step 6: Finishing Touches
- Once assembled, consider adding leaves! These can be made from green fabric or felt cut into leaf shapes.
- Attach them to the flower base or the stem if you’re making a bouquet.
Reflecting on My Experience:
I fondly recall trying to master the art of gathering to create a beautiful rose. Although it took several attempts to get it just right, the satisfaction when I finally saw those ruffled petals come together was immeasurable! Fabric flowers have a charm all their own, and every little mistake is a step towards becoming a better crafter. By following these steps, you’ll create stunning fabric flowers that can add flair to any project. Whether you’re using them as hair accessories, decorative elements for your home, or heartfelt gifts, these blooms are sure to impress! 🌻

Now that you’ve crafted beautiful paper and fabric flowers, it’s time to focus on the finishing touches that elevate your creations from lovely to absolutely stunning! Adding details such as stems and leaves, along with decorative elements like beads and ribbons, can make your DIY craft flowers truly stand out. Let’s explore both aspects, shall we? 🌼
Adding Stems and Leaves
Stems
The stem is a crucial component of any flower, providing support and a natural look. Here are a few ideas for creating stems for your craft flowers:
- Floral Wire:
- Material: Floral wire is sturdy, bendable, and ideal for supporting larger blooms.
- How to Use: Simply cut the wire to your desired length, then attach it to the base of your flower. You can wrap floral tape around the stem for an elegant finish.
- Paper Straws:
- Material: Paper straws are colorful and eye-catching, perfect for adding a fun touch.
- How to Use: Reinforce straws with floral tape or glue to attach them to the flower base. They make for a lightweight option!
- Wooden Dowels:
- Material: Thin wooden dowels provide a rustic, natural appearance.
- How to Use: Paint or cover them with floral tape to match your flower’s colors. Attach with glue at the base.
Leaves
Adding leaves is essential for creating a full and realistic look. Here’s how to make and attach leaves:
- Create Your Leaves:
- Cut out leaf shapes from green paper or fabric. You can use templates or create them freehand.
- Tip: Vary the sizes and shapes for a more organic appearance.
- Attach the Leaves:
- For paper flowers, glue the leaves directly onto the stem or at the base of the flower.
- For fabric flowers, sew or glue leaves directly to the stem, ensuring they sit nicely against the flower.
- Adding Dimension:
- You can curl the edges of the leaves using a pencil or your fingers for a more realistic look.
- Consider layering multiple leaves together to add depth.
Personal Anecdote:
I once created a bouquet of colorful paper flowers only to realize they felt flat without any leaves. Adding a few green leaves instantly brought my arrangement to life, echoing the freshness of spring. Now, I always make sure to incorporate leaves whenever I craft flowers!
Decorating With Beads or Ribbons
Beads
Adding beads can infuse your flowers with a touch of sparkle and uniqueness. Here’s how to use them effectively:
- Choosing the Right Beads:
- Opt for beads that complement your flower colors. For instance, white pearls work wonderfully with pastel blooms, while bright beads add a pop to vibrant flowers.
- Attaching Beads:
- Flower Centers: Use larger beads or clusters for the center of your flowers. Secure them using glue.
- Embellishing Petals: You can even sew or glue smaller beads along the edges of petals for added texture and detail.
- Play with Styles:
- Mix different types of beads—metallics, glass, or wooden—to create a one-of-a-kind piece.
Ribbons
Ribbons can add elegance and a splash of color, making your flowers truly eye-catching. Here’s how to incorporate ribbons:
- Choosing Ribbons:
- Look for ribbons that are the right width for your flowers—thicker for larger blooms and thinner for smaller ones.
- Satin, burlap, and organza all have unique textures that can change the feel of your flower arrangements.
- Attaching Ribbons:
- Ties or Bows: Wrap the ribbon around the base of the flower and create a bow or knot for a charming finish.
- Fluttering Accents: Hang strands of ribbon from the flower’s center or attach them to the stem for added movement and flair.
- Layering Ribbons:
- Consider layering multiple ribbons in varying widths or colors for a more complex look.
Final Thoughts:
Crafting your flowers with stems, leaves, beads, and ribbons is like icing on the cake—it brings everything together perfectly! Each element contributes to the overall beauty, making your DIY creations look professional and polished. Next time you make flowers, don’t shy away from experimenting with various details; they can transform simple blooms into breathtaking masterpieces! Enjoy the process, and let your creativity blossom! 🌺
:max_bytes(150000):strip_icc()/ml243_spr01_crepe_paper_flowers_ff2_vert-2000-d42aaf9cd6534e9ba9e37ab516ec37e1.jpg)
You’ve put in so much effort crafting your stunning DIY flowers—now it’s time to showcase them! Properly displaying and preserving your creations ensures they retain their charm while adding personality to your space. Let’s dive into some creative display ideas and tips for keeping those flowers looking fabulous over time! 🌼
Creative Display Ideas
Displaying your DIY craft flowers can be as fun as making them. Here are a few creative ideas to inspire your presentation:
1. Mason Jars
- Charming Appeal: Mason jars are not just for canning! Fill them with water, sand, or decorative stones and arrange your flowers inside.
- Theme Ideas: You could paint the jars a soft color and add twine or lace for a rustic touch.
2. Flower Bouquets
- Grouping: Create a mixed bouquet by combining various types of flowers and colors.
- Vase Selection: Use tall, slender vases for elegant looks or short, chunky ones for a more casual vibe. Experiment with different materials—glass, ceramic, or even tin!
3. Wreaths
- Wall Decor: Craft a floral wreath from your flowers and hang it on the wall or door. This can be perfect for seasonal decorations or celebrations.
- Personalization: Add elements like ribbons, leaves, and other embellishments to make it uniquely yours.
4. Hanging Displays
- Suspended Flowers: Consider hanging bouquets or single flowers from the ceiling using clear fishing line. This creates a floating effect and can be a great focal piece.
- Ladder Displays: Use an old wooden ladder leaned against a wall. Add jars or small pots filled with your flowers on its rungs for a quirky and artistic touch.
5. Table Centerpieces
- Dining Table Decoration: Arrange your flowers in small vases or jars along the center of your dining table. This can make for an inviting environment during meals or gatherings.
- Seasonal Rotations: Change the flowers with the seasons to keep things fresh and engaging!
Personal Touch:
Once, I used mason jars filled with fairy lights to display my paper flowers. It absolutely transformed my living room into a cozy, magical space! Sometimes, it’s the simple ideas that make the biggest impact.
Tips for Long-lasting Flowers
While your DIY craft flowers are designed to be long-lasting, there are certain tricks and care tips to keep them looking their best over time. Here are some practical recommendations:
1. Choose the Right Location
- Lighting: Keep your flowers out of direct sunlight, especially for paper flowers. Sunlight can fade colors and weaken materials.
- Humidity: Avoid placing them in areas with high humidity, like bathrooms, which can affect the integrity of the materials.
2. Dusting and Cleaning
- Regular Care: Periodically dust your flowers with a soft cloth or a gentle brush to prevent buildup.
- Spot Cleaning: For fabric flowers, a damp cloth can be used to wipe off any dirt or debris.
3. Keep Away from Extreme Temperatures
- Temperature Control: Avoid exposing your flowers to extreme heat or cold. This can warp and damage materials.
- Room Temperature: Aim to keep them in a temperature-controlled environment.
4. Storage Techniques
- If not Displayed: Store flowers in a cool, dry place. Consider using acid-free tissue paper to wrap around fragile petals.
- Using Boxes: Keep them in boxes with good ventilation to avoid moisture accumulation.
5. Repairs and Refreshments
- Touch-ups: If you notice any disarray, consider doing minor repairs. For instance, re-gluing petals that may have come loose or adding fresh embellishments can reinvigorate the arrangement.
- Renewing Ideas: Every so often, switch up the arrangement or mix in new flowers to keep the display fresh and exciting.
Final Thoughts:
Displaying your DIY craft flowers creatively not only showcases your handiwork but also communicates your style and personality. With proper care, your flowers can be not only a vibrant part of your decor but also cherished keepsakes. So have fun displaying your beautiful blooms, and remember to care for them with love. After all, each flower is not just a decorative piece; it’s a little piece of art you’ve crafted, full of your creativity and effort! 🌺