
Introduction
Crafting has a unique way of bringing joy and fulfillment into our lives, especially for seniors. Whether you’re a seasoned crafter or just starting out, engaging in creative activities can be a delightful medium for expression, connection, and personal growth. You might wonder why it’s particularly beneficial for seniors. Well, let me take you through the myriad advantages that crafting can bring to your golden years!
Fostering Creativity and Learning
As you delve into various crafting projects, you’ll find that creativity knows no age limit. The act of creating something beautiful from scratch is not only gratifying but also stimulates mental agility. Have you ever tried knitting a sweater or painting a landscape? It serves as an excellent way to keep the mind sharp while learning new skills.
Think of it this way: Every project is a new canvas, a new journey. You’ll experience the thrill of creating something uniquely yours!
- Mental Stimulation: Engaging in crafts sharpens your cognitive abilities, helping with focus and concentration.
- Skill Development: Each craft teaches patience and problem-solving, enhancing your toolkit for life.
Building Connections and Community
Crafting can also be a social activity. It’s a fantastic way to meet new people and strengthen bonds with friends and family. For instance, consider joining a local crafting group or inviting neighbors over for a crafting session. You can share techniques, ideas, and laughter, creating memories that will last a lifetime.
- Group Classes: Look for community centers that offer classes in your chosen craft.
- Online Communities: Don’t overlook the wealth of knowledge available through online forums and social media.
I remember when I participated in a weekend pottery workshop; not only did I create a beautiful bowl, but I also struck up lasting friendships with fellow crafters. The shared enemy of clay messes made for plenty of laughs! 🎉
Emotional Well-Being
Lastly, crafting provides therapeutic benefits that boost emotional health. When you immerse yourself in a project, it’s a wonderful way to meditate and unwind. Crafting can alleviate stress and anxiety, providing a much-needed escape from daily worries. Not to mention, the sense of achievement after finishing a project can uplift your mood.
- Mindfulness: The repetitive motions of knitting or painting can act as a form of meditation.
- Celebrating Accomplishments: Whether it’s a handmade gift or a completed scrapbook, celebrate your achievements—they are reminders of your creativity.
In summary, crafting is not just about making things; it’s about making life richer and more enjoyable. As we journey through the following sections, you’ll discover various crafting avenues available to explore and thrive in. So, grab your supplies and get ready to unleash your inner artist! 🌟

Benefits of Crafting for Seniors
As you embark on your crafting journey, it’s essential to recognize the myriad benefits that this engaging activity provides, particularly for seniors. The joy of creating extends beyond just the final product; it’s about the process and what crafting brings into your daily life. Let’s dive into some of the most remarkable advantages of crafting!
Enhancing Cognitive Function
One significant benefit of crafting is its positive impact on mental health. Engaging in hands-on activities stimulates the brain, keeping it alert and agile. Crafts involve various skills, from following patterns in knitting to color theory in painting, encouraging cognitive engagement.
- Brain Exercise: Think of crafting as a fun workout for your brain! It helps with memory retention and concentration.
- Problem-Solving Skills: Each project presents its own challenges, requiring solutions that engage critical thinking.
I recall a time when I attempted to follow a complex crochet pattern. What began as frustration quickly turned into joy when I finally deciphered the instructions! That moment of triumph was not just about finishing a blanket; it was a workout for my brain.
Improving Fine Motor Skills
Crafting can enhance fine motor skills, which may diminish with age. Activities like sewing, painting, or even assembling jewelry demand precision and coordination, making them excellent for maintaining dexterity.
- Hand-Eye Coordination: Focusing on small details in a scrapbook can significantly improve coordination.
- Grip Strength: Regular crafting enhances the strength and flexibility of your hands.
Remember the excitement of threading beads for a necklace? Each action helps keep those fingers nimble and strong!
Creating a Sense of Accomplishment
Completing a crafting project brings an unparalleled sense of achievement. It instills pride and boosts self-esteem, which is particularly valuable for seniors. It’s rewarding to see a tangible result from your efforts.
- Mark Your Progress: Setting small goals for each project helps track your progress and keeps motivation high.
- Display Your Work: Consider showcasing your creations around your home to celebrate your journey.
For instance, after finishing my first quilt, I proudly hung it on my wall, a constant reminder of my creativity and perseverance.
Promoting Social Interaction
Let’s not forget the social aspect of crafting! It can be an excellent way to bond with family or meet new friends. Whether you’re attending a workshop or simply inviting friends for a crafting night, shared creativity fosters connection.
- Crafting Groups: Local community centers or senior centers often host crafting meet-ups.
- Online Classes: With the rise of technology, plenty of virtual crafting classes exist, making it easy to connect with like-minded individuals across the globe.
By participating in groups, not only do you gain crafting knowledge, but you also form lasting friendships. Having someone to share your passion with enhances the joy of crafting! 🌈 In summary, crafting isn’t just an activity; it’s a holistic way to enhance the body, mind, and spirit. So, grab those supplies and let’s get started on this beautiful journey together! 🥳

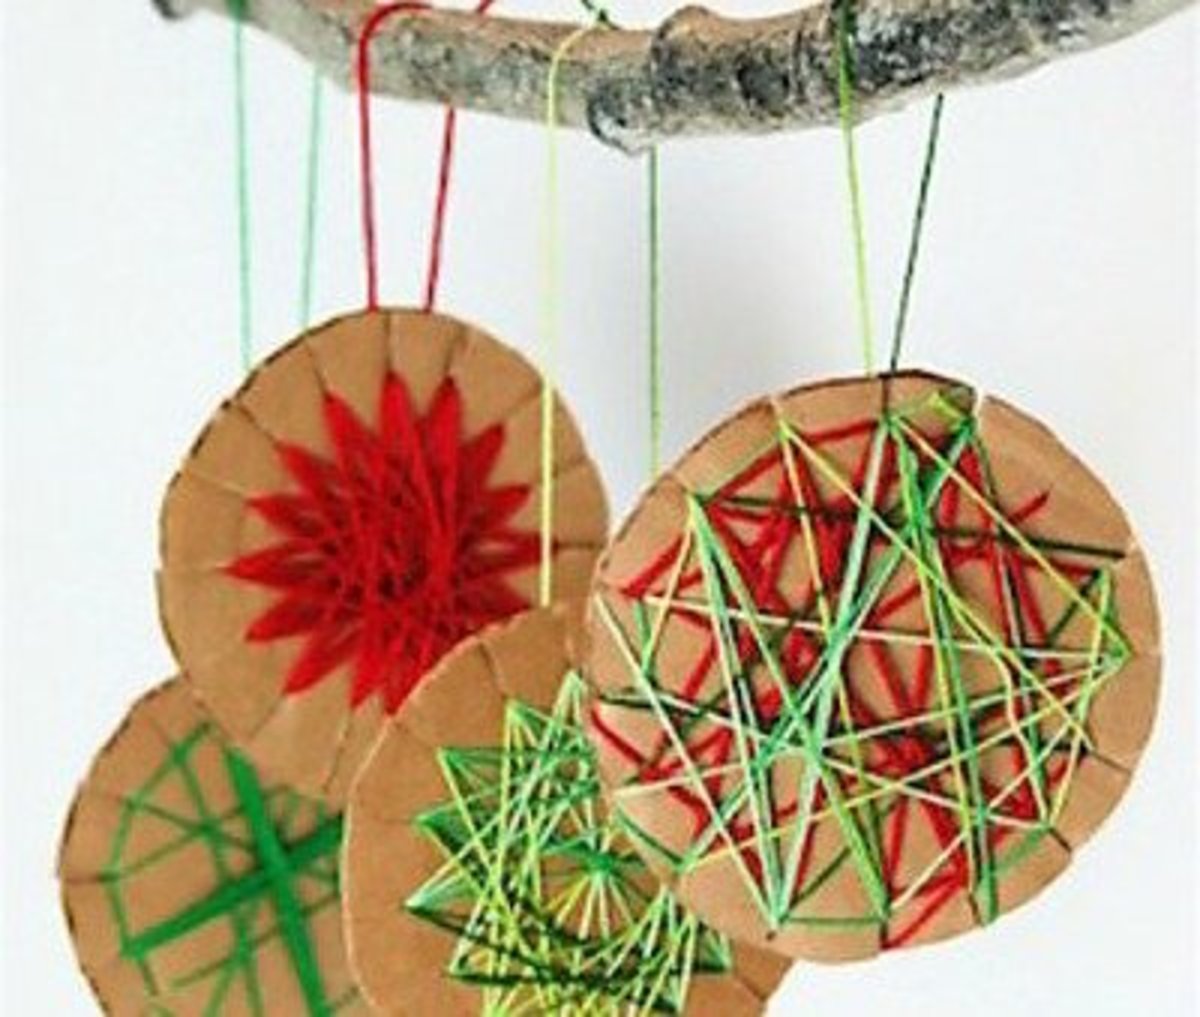
Section One: Knitting and Crocheting
Now that you’re aware of the tremendous benefits crafting can offer, let’s dive into one of the most beloved activities: knitting and crocheting! 🧶 Whether you’re interested in making warm scarves, cute hats, or cozy blankets, these crafts provide endless possibilities for creativity and relaxation.
How to Get Started
If you’re new to knitting or crocheting, it’s easier than you might think to dive in! Here’s a simple breakdown to get you started on your journey.
- Gather Your Supplies:
- For Knitting: You’ll need a pair of knitting needles (size 8-10 are perfect for beginners) and yarn (choose a worsted-weight yarn for easy handling).
- For Crocheting: Start with a size H (5mm) crochet hook and the same worsted-weight yarn.
- Learn the Basics:
- Look for tutorials online or consider picking up a beginner’s book. There are fantastic resources available, sometimes even within your community, such as classes at local craft stores.
- Familiarize yourself with basic stitches like the knit stitch, purl stitch (in knitting), and chain stitch or single crochet (in crocheting).
- Practice Patience:
- It’s normal to make mistakes when starting. Embrace them! I still remember my first project—a lopsided scarf that became a beloved gift for my best friend’s cat. The cat didn’t mind the imperfections!
By practicing regularly, you’ll soon find your rhythm, and it will become second nature.
Easy Knitting Patterns
Now that you’re equipped with the basics, let’s explore some simple patterns suitable for beginners. Here are a few classic ideas to spark your creativity:
- Garter Stitch Scarf: The garter stitch is achieved by knitting every row. Simply cast on 30 stitches and knit until your scarf reaches your desired length—perfect for a first project!
- Basic Beanie: This is a great project to practice knitting in the round. Start with a simple knit pattern, and soon you’ll have a warm and stylish hat to wear or gift.
- Crochet Granny Squares: If you’re leaning towards crochet, granny squares are a fantastic way to learn! Just a few rows of chain and double crochet stitches will give you beautiful squares that can later be sewn together into blankets or bags.
- Dishcloths: These are quick and practical projects. You’ll perfect your technique while creating something useful for your kitchen!
Feeling adventurous? You can mix and match stitches and create your patterns or color combinations! Here’s a simple checklist for starting your first project:
| Material | Quantity |
|---|---|
| Yarn | 1 skein |
| Knitting Needles | 1 pair |
| Crochet Hook | 1 (if crocheting) |
| Scissors | 1 (for cutting yarn) |
| Tapestry Needle | 1 (for weaving in ends) |
As you engage in knitting or crocheting, remember to have fun! Your creations will be a reflection of your time and love poured into each stitch. Plus, the projects can be a beautiful means of sharing your handiwork with loved ones. So grab those needles and hooks, and let’s create something amazing! 🎉
Section Two: Painting and Drawing
After getting the hang of knitting and crocheting, let’s shift our focus to another form of artistic expression: painting and drawing! 🎨 Both activities are fantastic ways to unleash your creativity, relax your mind, and even improve your mood. With just a few supplies, you can transform a blank canvas into a breathtaking masterpiece or engage in the simple joy of doodling.
Basic Supplies Needed
Before you dive into the world of painting and drawing, it’s essential to have the right tools. Here’s a handy list of basic supplies to get started:
- Pencils and Charcoal: A good set of pencils (HB, 2B, 4B) and some charcoal sticks will help you sketch your ideas. If you’re like me, you might even find joy in experimenting with different pressures to achieve various lines!
- Paper: Use a sketchbook for drawing. If you’re painting, opt for watercolor paper or canvas boards that can handle the paint’s moisture without warping.
- Paints: Depending on your preference, gather watercolor paints, acrylics, or oils. Acrylics are a favorite of many beginners, as they’re versatile and quick-drying.
- Brushes: A range of brushes—from flat to round—allows for varied techniques and strokes. Start with a basic set to find what feels right for you.
- Palette: This is where you’ll mix your paints. You can use an old plate or purchase an artist’s palette.
- Easel (Optional): An easel can elevate your painting experience, but a flat surface works just as well, especially when starting out.
Having these supplies will set you up nicely for your artistic endeavors. Remember, simplicity is key when you’re beginning.
Step-by-Step Tutorials
Once you have your materials, it’s time to dive into some fun projects! Here are two simple step-by-step tutorials to guide your initial exploration of painting and drawing: Tutorial 1: Simple Landscape Painting (Acrylics)
- Prepare Your Canvas: Start with a blank canvas and set up your easel or flat surface.
- Choose a Color Palette: For a serene landscape, you might choose blues for the sky, greens for the grass, and earthy browns for any trees.
- Block In the Background: Use a large brush to paint the sky, blending in the colors to create a sunset effect. Allow this layer to dry.
- Add Foreground Elements: Once dry, paint rolling hills or a tree using smaller brushes. Remember to layer your colors for depth!
- Finishing Touches: Add details, like a few clouds or highlights on the tree bark, and sign your masterpiece!
Tutorial 2: Basic Still Life Drawing
- Select Your Objects: Gather a few simple items—a fruit bowl, a vase, or some flowers.
- Sketch Lightly: Use a pencil to lightly sketch the outline of the objects on your paper. Don’t worry about perfection; the goal is to capture the essence.
- Add Details: Gradually add shading and texture. Observe the light source and highlight areas that would catch the light.
- Finishing Up: Once you’re satisfied, go over your pencil lines with a darker pencil or pen to define your artwork.
Exploring painting and drawing opens up a world of possibilities. Allow yourself to experiment without fear of mistakes—every artist has been there! Embrace the process, and most importantly, enjoy creating. 🌼
Section Three: Scrapbooking
Moving on from the freedom of painting and drawing, let’s explore another wonderful creative outlet: scrapbooking! 📚 This craft combines memories, art, and design, allowing you to tell your story in a visually appealing way. Whether you’re preserving family memories or documenting a special event, scrapbooking can be incredibly fulfilling.
Choosing Photos and Materials
The first step in creating a scrapbook is selecting your photos and materials. Here’s how to approach it:
- Select Your Photos:
- Choose photos that resonate with you. They could be from a recent vacation, family gatherings, or daily life moments that bring joy.
- Aim for a variety—landscapes, candid shots, and posed pictures create a diverse collection!
- Gather Supplies:
- Album or Binder: Start with an album that suits your style. Many opt for a 12×12-inch format, which provides ample space for creativity.
- Paper and Backgrounds: Choose patterned paper and cardstock that complement your photos. Think about colors that evoke the feeling of the memory you’re capturing.
- Embellishments: Look for stickers, washi tape, and die-cuts to add fun details and accents. The first time I went to a craft store, I felt like a kid in a candy shop with all the colorful options!
- Tools:
- Gather scissors, glue or double-sided tape, and a paper cutter for clean lines. Some also use decorative scissors for stylistic edges.
Having these essentials makes the process smooth and enjoyable. Remember, there’s no right or wrong way when it comes to choices—let your heart guide you! ❤️
Creative Layout Ideas
With your photos and materials collected, it’s time to think about layout! Here are some creative layout ideas to ignite your imagination:
- Chronological Layout: Arrange your photos in chronological order to tell a story as it unfolded. For instance, document a recent trip with each page representing a different day or activity.
- Themed Pages: Create themed pages that focus on a particular event or sentiment. For holidays, you might use colors and shapes related to the occasion—red and green for Christmas, or pastels for Easter.
- Collage Style: Don’t be afraid to mix and match various photos on a single page. This freeform style can capture the fun and spontaneity of a particular moment, allowing you to tell multiple stories at once!
- Incorporate Journaling: Add captions or short stories next to your photos. This personal touch adds depth and emotion, allowing you to share your thoughts behind the images. I often find myself reminiscing as I write down the memories tied to each photo, which adds a richer context to my pages.
- Flip-out Pages: For those special memories that need a bit more space, consider adding flip-out pages. They add an interactive element to your scrapbook and make discoveries for viewers.
By combining these layout ideas with your creativity, you’ll create a unique scrapbook that not only preserves memories but also serves as a beautiful piece of art. So grab those photos, unleash your imagination, and let the story unfold on your pages! 🌟
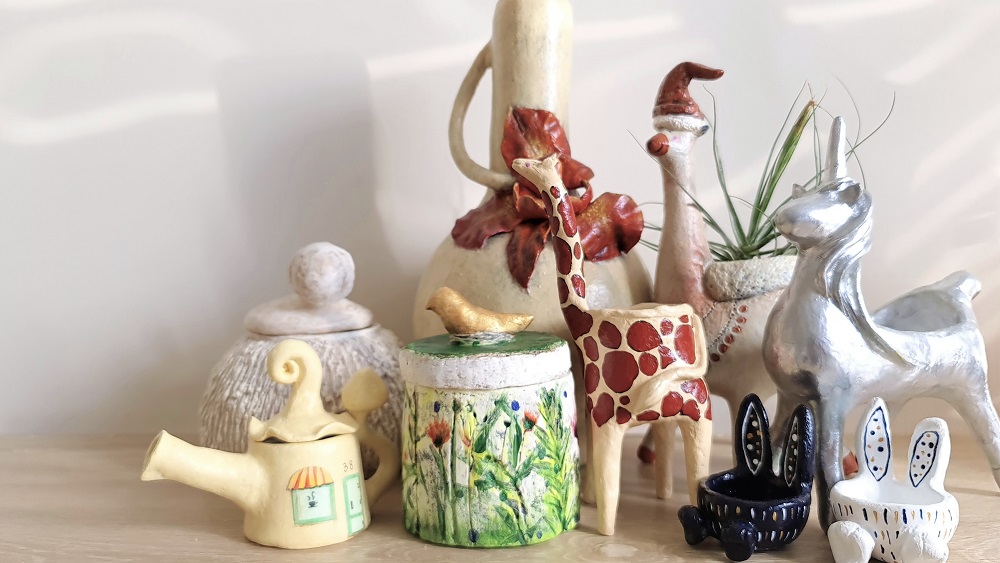
Section Four: Pottery and Clay Crafting
After delving into the world of scrapbooking, let’s explore yet another wonderful craft: pottery and clay crafting! 🎉 Working with clay is an engaging experience that allows you to create functional items and sculptures, all while honing your artistic skills. Whether you’re molding a clay pot or shaping whimsical figures, the tactile nature of clay can be incredibly satisfying.
Hand-Building Techniques
Before diving into pottery, it’s crucial to get acquainted with various hand-building techniques. You don’t always need a pottery wheel to create stunning pieces! Here are a few methods to get started:
- Pinch Pots:
- This is one of the simplest and most fun techniques. Start by rolling a ball of clay into your desired size.
- Pinch the clay between your fingers and thumb to create a hollow shape. You can shape it into a bowl or cup!
- These pots are perfect for practicing your handling skills. One of my first pinch pots turned into a cheerful little planter for my kitchen herbs!
- Coil Building:
- Roll long, snake-like coils of clay, then stack them on top of each other to create walls.
- Blend the coils together on the outside and inside for a seamless finish. This technique is great for building larger items like vases or sculptures.
- The first time I tried this, I made a coil pot that turned out quirky and unique. It made a lovely gift for a friend who appreciated handmade treasures.
- Slab Construction:
- Roll out flat slabs of clay and cut them into shapes to assemble structures. This method is great for making plates or boxes.
- You can create intricate designs by adding texture with stamps or tools as you cut your shapes.
- I remember hosting a pottery day with friends, and we had a blast creating personalized coasters using slabs!
Experimenting with these techniques can lead to all sorts of creative possibilities.
Decorating and Firing Methods
Once your pieces are shaped, it’s time to let your creativity shine with decoration and firing methods.
- Surface Decoration:
- Texture and Imprint: Use stamps, found objects, or even your fingers to create interesting textures on your pieces.
- Glazing: Applying glaze can add color and shine. Don’t hesitate to layer different colors for effects!
- Under-glazing: For intricate designs, paint with under-glaze before firing. This is an excellent way to incorporate details and patterns.
- Firing Methods:
- Bisque Firing: After decorating, the piece needs to be bisque fired in a kiln. This process hardens the clay, preparing it for glazing.
- Glaze Firing: Once glazed, your piece goes through another firing to set the glaze. Each firing brings out the colors and finishes beautifully.
- Alternative Firing Techniques: If you don’t have access to a kiln, consider low-fire alternatives such as air-dry clay or using a microwave kiln for smaller pieces.
Throughout my pottery journey, I’ve learned that each piece tells a story, especially with its decorative choices. One of my favorite projects was a collection of colorful planters, each with different textures and glazes—a beautiful way to showcase the results of creative experimentation! Pottery and clay crafting is not just about creating items; it’s about enjoying the process and expressing your creativity. So roll up your sleeves, get your hands dirty, and let the clay take shape into something uniquely yours! 🌟

Section Five: Jewelry Making
After exploring the satisfying world of pottery and clay crafting, let’s shine a light on another delightful craft: jewelry making! 💍 This allows you to express your style and personality while creating beautiful pieces. Whether you want to make gifts for loved ones or elevate your accessory game, jewelry making is a rewarding and fun craft to dive into.
Tools and Materials Overview
Before you start creating, it’s essential to gather the right tools and materials for jewelry making. Here’s a handy list to help you get started:
- Basic Tools:
- Wire Cutters: Perfect for cutting wire and stringing materials.
- Pliers: Round-nose pliers help form loops, while flat-nose pliers are great for holding small pieces.
- Tweezers: Handy for handling small beads and components.
- Materials:
- Beads: You can choose from various types, including glass, wooden, and gemstone beads. Mixing types adds character to your designs!
- Wire: Use jewelry wire (e.g., copper or sterling silver) for creating chains and structure.
- Stringing Material: Nylon thread, elastic cord, or beading wire are great for necklaces and bracelets.
- Findings: These include clasps, jump rings, and earring hooks. They’re essential for finishing your pieces.
- Workspace:
- Create a tidy workspace with a comfortable surface, good lighting, and organizers for your beads and tools. I’ve found that having everything within reach makes the creating process flow smoothly!
Once you have your tools and materials sorted, you’re ready to create stunning jewelry pieces.
Simple DIY Jewelry Projects
Now that you’re equipped with supplies, let’s look at some simple DIY jewelry projects to spark your creativity!
- Beaded Bracelet:
- Materials Needed: Beads of your choice, elastic cord, scissors.
- Instructions:
- Cut a length of elastic cord based on your wrist size, adding a few extra inches for tying knots.
- String the beads onto the cord in your desired pattern.
- Once you reach the desired length, tie a secure knot. Trim any excess cord.
- This project is perfect for beginners and can be personalized with any color or bead type!
- Simple Wire-Wrapped Pendant:
- Materials Needed: A cabochon stone or any flat-backed bead, jewelry wire, wire cutters, and rounded pliers.
- Instructions:
- Cut a length of wire, about 20 inches long.
- Position the stone in the center of the wire and wrap the wire around the stone to create a secure hold, leaving a few inches for a loop at the top.
- Form a loop at the top and twist it tightly. Cut off any excess wire.
- Attach the pendant to a chain or a simple cord for a necklace!
- I still wear the first wire-wrapped pendant I made! It’s a lovely reminder of my crafting journey. 🌟
- Earring Set:
- Materials Needed: Earring hooks, beads, jump rings, and pliers.
- Instructions:
- Create a beaded dangle using a headpin to thread your chosen beads.
- Use the round-nose pliers to make a loop at the top of the headpin and attach it to the earring hook using a jump ring.
- The simplicity of this project makes it quick to create matching sets or various styles!
Jewelry making is an enriching activity that brings together creativity, craftsmanship, and personal flair. With just a few tools and materials, you can create timeless pieces that convey your unique style! So, gather your supplies, roll up your sleeves, and let your imagination run wild as you embark on your jewelry-making journey. ✨
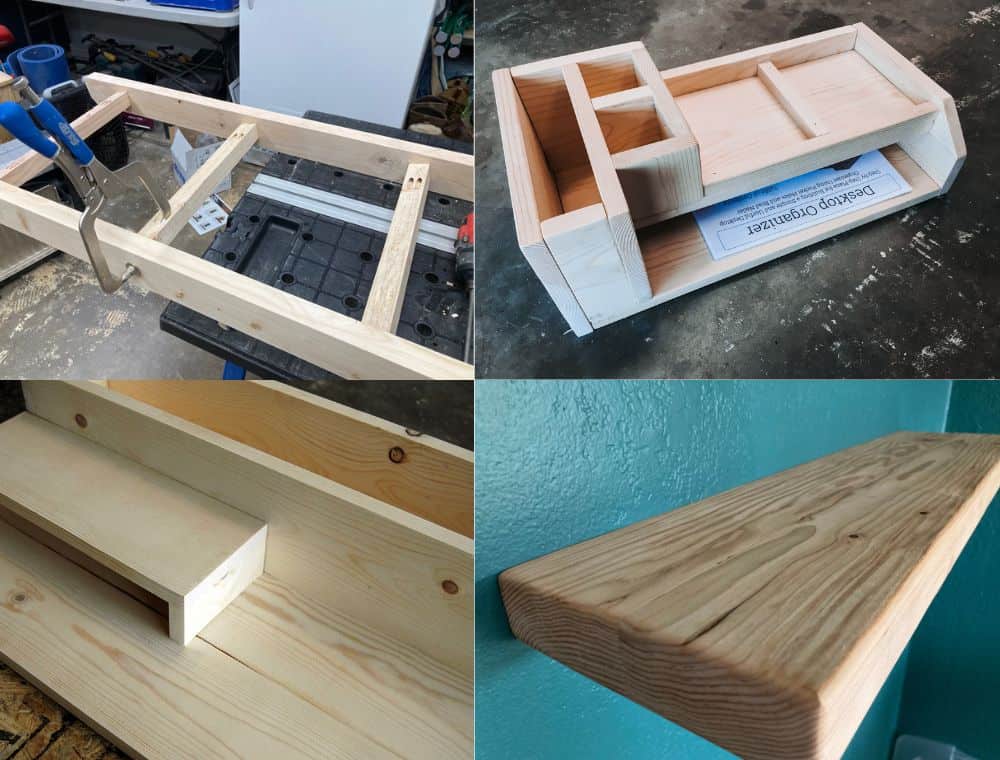
Section Six: Woodworking
Transitioning from the delicate world of jewelry making, let’s explore the robust and rewarding craft of woodworking! 🪵 This activity not only allows you to create beautiful and functional items, but it also connects you with the beauty of nature through the materials you work with. Whether you’re building furniture or crafting decor, woodworking provides a great sense of accomplishment and creativity.
Essential Woodworking Tools
Before diving into woodworking projects, it’s important to have the right tools in your workshop. Here’s a list of essential woodworking tools that every beginner should consider:
- Measuring Tools:
- Tape Measure: An accurate tape measure is a must-have for ensuring your pieces fit as intended.
- Square: A framing square helps you create perfect right angles in your cuts, which is vital for strong joints.
- Cutting Tools:
- Hand Saw: A basic hand saw is great for simple cuts and can serve as a good introduction to cutting techniques.
- Power Saw: For more advanced projects, consider investing in a power saw like a circular saw or jigsaw.
- Drilling Tools:
- Drill: A power drill is essential for making holes and driving screws. A cordless option offers mobility and ease of use.
- Sanding Tools:
- Sandpaper: Various grit levels of sandpaper are crucial for smoothing your finished pieces.
- Orbital Sander: This electric tool can speed up the sanding process significantly.
- Clamps:
- A set of clamps is essential for holding your pieces together while gluing or screwing them.
- Safety Gear:
- Don’t forget your safety gear! Safety glasses, ear protection, and dust masks are vital for protecting yourself while woodworking.
Having these essential tools can pave the way for starting your wooden creations with confidence and safety.
Beginner-Friendly Woodworking Projects
Now that you’re equipped with tools, it’s time to get started on some beginner-friendly woodworking projects that can help you hone your skills while having fun!
- Simple Wooden Shelf:
- Materials Needed: Wooden boards, screws, brackets, sandpaper, and wood finish.
- Instructions:
- Measure the space where you want to install the shelf and cut the wood to size.
- Sand all edges until smooth to avoid splinters.
- Attach the brackets to the wall and then secure the shelf onto them.
- This project teaches measuring, cutting, and using hardware, all crucial skills for future woodworking.
- Birdhouse:
- Materials Needed: Untreated wood panels, nails or screws, wood glue, and paint (optional).
- Instructions:
- Use simple dimensions to create the base, walls, and roof of the birdhouse.
- Assemble the components using nails or screws, then paint or decorate as desired.
- I still remember how excited I was to hang my first birdhouse in my backyard! Watching the birds come and go was incredibly rewarding. 🐦
- Wine Rack:
- Materials Needed: Wooden planks, screws, and wood finish.
- Instructions:
- Create a simple design that can hold several bottles at an angle.
- Cut and assemble the wood, ensuring stability. Sand and finish to taste.
- This project allows creativity in the design, and you can customize it to match your home decor!
Woodworking can be a wonderful avenue for expressing creativity while producing useful items. As you take your first steps into this craft, let your imagination guide your hands, and remember to enjoy the process. So grab your tools, choose a project, and start building something special today! 🌟
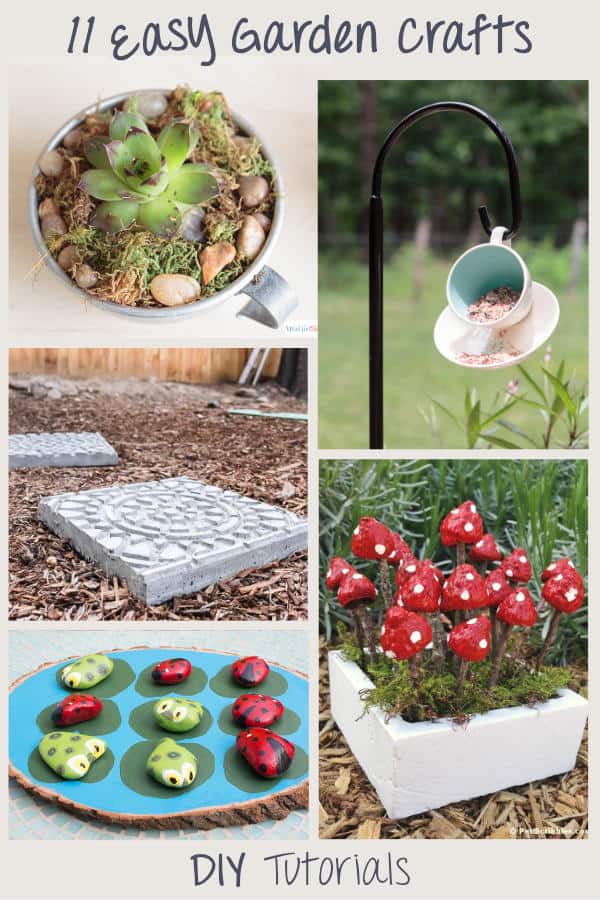
Section Seven: Gardening and Planting
After immersing yourself in the creativity of woodworking, let’s step into the refreshing world of gardening and planting! 🌱 Gardening is not just a hobby; it’s an enriching experience that connects you with nature, provides physical activity, and yields beautiful plants or delicious produce. With options for both indoor and outdoor gardening, there’s something for everyone, regardless of space or experience level.
Indoor vs. Outdoor Gardening
Before you start planting, it’s essential to determine whether indoor or outdoor gardening suits your lifestyle better. Each has unique benefits:
- Indoor Gardening:
- Space-Saving: Perfect for those with limited outdoor space, such as apartments or condos.
- Year-Round Productivity: You can grow plants regardless of the weather outside! Think of all the fresh herbs you can enjoy throughout the year.
- Air Quality Improvement: Indoor plants can help purify the air in your home, creating a healthier living environment.
Personal Experience: I started an indoor herb garden on my kitchen windowsill, and now I never run out of fresh basil or mint for my recipes. It’s like having my own little grocery store right at home! 🌿
- Outdoor Gardening:
- Space for Larger Plants: Ideal for growing vegetables, flowers, and larger shrubs. If you have a backyard, the possibilities are endless!
- Community: Gardening outdoors often encourages a sense of community with neighbors. Sharing tips and even plants can create lasting friendships.
- Therapeutic Exercise: Working outside can be invigorating and is a great way to get your daily exercise while enjoying the sunshine.
Both indoor and outdoor gardening can be rewarding and enjoyable, so consider your available space, climate, and personal preferences when deciding where to start.
Low-Maintenance Plant Suggestions
Whether you choose to go indoors or outdoors, starting with low-maintenance plants can help you build confidence in your gardening skills. Here are some lovely options: Indoor Plants:
- Snake Plant: Often dubbed “mother-in-law’s tongue,” this resilient plant thrives in low light and requires minimal watering. Plus, it looks sleek and modern!
- Pothos: Known for its trailing vines, pothos is forgiving and thrives in various lighting conditions. As a bonus, it helps improve indoor air quality.
- ZZ Plant: This beauty can tolerate neglect and low light, making it perfect for beginners! Its glossy leaves add a touch of elegance to any space.
Outdoor Plants:
- Lavender: This fragrant herb requires little water once established and attracts pollinators like bees and butterflies, enhancing your garden’s ecosystem.
- Sedum: A low-growing succulent that thrives in poor soil and withstands drought conditions, sedum comes in various colors and textures.
- Marigolds: These cheerful flowers are drought-resistant and easy to grow. Plus, they repel certain pests, making them great companions for vegetable gardens.
Starting with low-maintenance plants helps build your confidence and gradually enhances your gardening skills! Gardening and planting are wonderful activities that can enrich your life, connect you with nature, and bring a sense of peace and accomplishment. So grab your gloves, choose your plants, and let’s get gardening! 🌺
Conclusion
As we wrap up this exploration of various creative crafting activities, it’s clear that there are countless ways to engage with your creativity and enrich your life. From the tactile satisfaction of woodworking to the bountiful beauty of gardening, each craft offers unique benefits and joys. 🌟
Reflecting on Your Creative Journey
Throughout this journey, we’ve discussed different forms of crafting, including knitting, painting, scrapbooking, pottery, jewelry making, woodworking, and gardening. Each of these activities promotes self-expression, cognitive engagement, and emotional well-being. Many crafters, myself included, often find that stepping into a creative project can lift spirits and provide a fulfilling escape from daily routines. For example, I still vividly recall how starting my very first woodworking project—a simple wooden bench—turned into not just a functional piece for my backyard, but also a delightful moment of accomplishment. The process of measuring, cutting, and assembling connected me with the material world and gave me a deep sense of pride.
Embracing the Joy of Crafting
Crafting isn’t just about creating physical items; it’s about the experiences and the memories made along the way. Here are a few key points to remember as you embark on or continue your crafting journey:
- Start Small: If you’re new to any craft, begin with simple projects to build your confidence. Every craftsperson was once a beginner!
- Explore and Experiment: Don’t be afraid to try new techniques or materials. Each project is an opportunity to learn and grow.
- Celebrate Your Achievements: Whether it’s finishing a scarf or planting a garden, take the time to appreciate your hard work. Consider showcasing your creations in your home or gifting them to friends and family.
- Connect with Others: Join local classes or online communities to share tips and inspiration. Crafting can indeed be a social experience that fosters friendships and creativity!
Your Next Steps in Crafting
So, what’s next for you? Perhaps it’s diving into a new woodworking project, rearranging your indoor plants, or seeking out a painting class. The beauty of crafting is that it’s a lifelong journey—you can explore new mediums, refine your techniques, and discover new passions. In conclusion, let passion guide you into your next crafting adventure! Whether it’s through the rhythm of knitting, the magic of pottery, or the tranquility of gardening, there’s immense joy to be found in creating. Embrace your creativity, cultivate your skills, and most importantly—enjoy every moment of this exciting journey! Happy crafting! 🌈💖