

Understanding Live Sound Mixers
Introduction to Live Sound Mixers
When it comes to live performances, one piece of gear can truly make or break the experience: the live sound mixer. Imagine standing in a packed venue, the excitement buzzing in the air, and then the music starts. The quality of that music—the what you hear, how you feel—largely comes down to the mixer. It’s your best friend and your greatest ally during events, seamlessly blending vocals, instruments, and effects to create a cohesive sound experience. A live sound mixer allows sound to be manipulated in real-time, ensuring that every note and lyric is heard clearly. This is where an understanding of mixing becomes crucial. A good mixer isn’t merely adjusting knobs; they are the architects of sound, shaping the listener’s experience with every decision.
Types of Live Sound Mixers
Now that you’re excited about sound mixers, let’s explore the different types that are available:
- Analog Mixers: The classic ones, often favored for their warmth and simplicity. Great for smaller gigs, they rely on physical controls for sound adjustments.
- Digital Mixers: These beauties offer advanced features like programmable settings, effects, and virtually unlimited channels. They may seem complicated at first but are incredibly versatile.
- Powered Mixers: A perfect choice for smaller events, powered mixers come with built-in amplifiers. They simplify setup, especially if you’re needing a compact solution.
- Field Mixers: Specifically designed for location audio, these are lightweight and portable, perfect for filmmakers and podcasters.
Understanding the right type for your needs can empower you to make better choices in live sound mixing.
Importance of Mastering Live Sound Mixing
Mastering the intricacies of live sound mixing is essential for several reasons:
- Quality Control: The primary goal of mixing is to enhance audio quality. Poorly mixed sound can lead to dissatisfaction and a negative audience experience.
- Audience Engagement: A well-mixed sound keeps the audience engaged. The right balance can bring them to their feet, captivate their attention, or create an intimate atmosphere, depending on the event.
- Technical Skills: Knowing how to operate a mixer allows you to troubleshoot issues on the fly, such as feedback or imbalance, ensuring the show goes on without a hitch.
- Creativity: The mixer is not just a tool; it’s a medium for artistic expression. You have the power to shape the sound to match the mood you want to create, whether it’s a lively concert or a whispered theatrical moment.
In conclusion, understanding live sound mixers is crucial for anyone involved in live events. From selecting the right type to mastering the art of mixing, every step significantly impacts the quality of the performance. The right knowledge can not only improve sound delivery but also enhance your skills, ultimately making every live event memorable. 🎤🎶

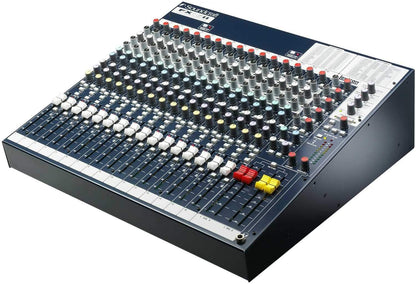
Overview of Soundcraft FX16 Mixer
Features of the Soundcraft FX16 Mixer
Transitioning from understanding the general concepts of live sound mixing, let’s delve deeper into a specific mixer that stands out in today’s audio landscape—the Soundcraft FX16. This mixer is not just another piece of gear; it’s a reliable workhorse packed with functionalities that make it ideal for various live sound applications. The FX16 is designed to deliver professional quality while being user-friendly, making it a fantastic choice for both beginners and seasoned sound engineers. Here are some of its standout features:
- 16 Channels: With 16 input channels, you can manage a variety of instruments and vocals simultaneously, making it perfect for bands, theater productions, or any sizeable event.
- Built-in Effects: The FX16 comes equipped with a powerful digital effects processor, offering reverb, delay, and other effects, so you can shape sound right from the mixer without extra outboard gear.
- 4-Bus Configuration: The four-bus routing allows for versatile monitoring options—a game-changer when it comes to managing live sound for different performers.
- High-Quality Mic Preamps: The mixer boasts high-quality microphone preamps that capture every nuance of performance.
The combination of these features means the FX16 provides the flexibility needed for various live scenarios while still ensuring top-notch audio quality.
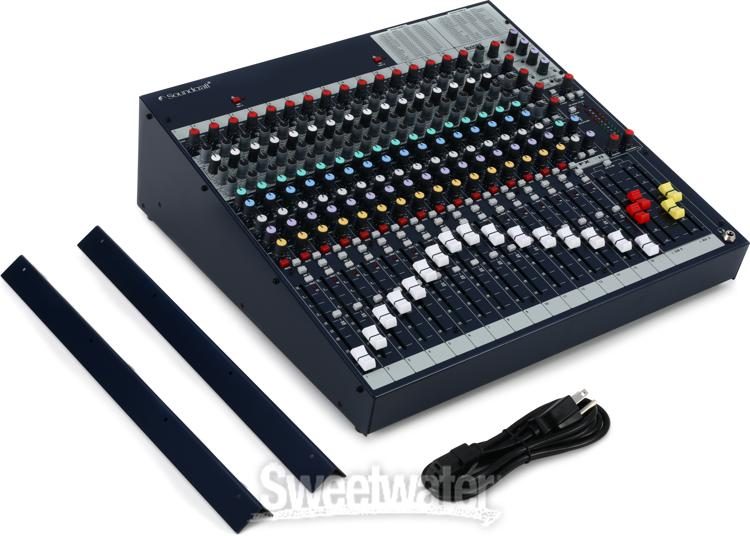
Interface and Controls
One of the best aspects of the Soundcraft FX16 is its intuitive user interface. Even if you’re new to mixing, you’ll find it approachable. Here’s what you’ll typically encounter:
- Channel Strips: Each channel strip features a fader, gain control, and EQ knobs. The layout is tidy, so you won’t feel overwhelmed while adjusting levels live on stage.
- Dedicated Effects Control: You can easily manage effects levels per channel, allowing for fast adjustments during performances.
- LED Metering: The built-in LED meters on each channel give you visual feedback of audio levels, helping you avoid clipping and maintain a good balance.
The interface is thoughtfully designed to ensure you get hands-on control without getting lost in complex functionalities.
Connection and Setup
Setting up the Soundcraft FX16 is straightforward and can be done quickly, making it a favorite for live events. Here’s how you can get started:
- Input Channels: Simply connect your mics and instruments to the XLR and TRS inputs. The FX16 can handle both types of connections seamlessly.
- Outputs: Use the main outputs for connecting to your sound system. The mixer also includes auxiliary outputs for monitors, perfect for giving performers their own mix.
- Power On: After all your connections are in place, switch it on and check for active lights on the LED meters—this lets you know everything is functioning.
One thing to remember is to take advantage of the FX16’s routing capabilities. You can set up monitor mixes for performers with ease, ensuring everyone gets the best sound on stage without complications. In summary, the Soundcraft FX16 mixer shines with its impressive features, user-friendly interface, and straightforward connection process. Whether you’re a professional or just starting out, this mixer offers everything you need to create great live sound experiences. 🎚️✨

Mastering Live Sound with Soundcraft FX16 Mixer
Preparing for a Live Sound Event
Having discussed the features and setup of the Soundcraft FX16 Mixer, let’s move on to mastering live sound with it. Preparing for a live sound event is crucial for ensuring everything goes off without a hitch. Picture this: you’ve got a band ready to rock, a crowd buzzing with anticipation, and you’re responsibly in charge of the sound. Here’s how to prepare effectively:
- Know Your Venue: Familiarize yourself with the venue layout—where the speakers will go, where the audience will be, and if there are any acoustic challenges. Every venue has its quirks, and knowing them helps you optimize sound.
- Coordinate with Performers: Talk to the musicians about their sound needs—what instruments they’re using, any special effects, and what their monitor mixes should be. A personal touch here can create a smoother performance.
- Plan Your Channel Assignments: Map out which instruments and microphones will go on which channels of the mixer. This planning avoids confusion when you’re adjusting levels during the performance.
Setting up the Soundcraft FX16 Mixer
Once you’re prepared, it’s time to set up the Soundcraft FX16 Mixer. You’ll want your mixer ready to go, like a reliable co-pilot in the cockpit. Here’s a simple setup routine:
- Connect Input Sources: Plug in microphones and instruments into the correct channels. Make sure everything is secure—no loose cables allowed!
- Set Up the Outputs: Connect the main outputs to your sound system. If you’re using monitors, connect those as well. Useful tip: label your cables to save time during a busy event.
- Power Up and Check: Before the event starts, power on the mixer and make sure all connections function correctly. Don’t forget to do a level check on all input sources.
Doing a soundcheck with the performers present is invaluable. You can adjust and optimize levels based on their feedback.
Adjusting Levels and EQ
With everything connected and ready to roll, adjusting levels and EQ becomes your next priority. This step greatly impacts the overall sound quality. Here’s how to master it:
- Begin with Gain Controls: Start by adjusting the gain on each channel to ensure a strong signal without clipping. Aim for a healthy level—often around -12 to -6 dB on the meters.
- Balance the Mix: Gradually bring up the faders for each channel. Pay attention to balance—vocals should be clear above the instruments, and no channel should overpower the others.
- Utilize EQ: The FX16 allows you to tweak the EQ on each channel to enhance clarity. A good rule of thumb is to cut frequencies rather than boost them, making room for other sounds. For example:
- Boosting around 12 kHz can add brightness to vocals.
- Cutting below 80 Hz on instruments can reduce muddiness.
Utilizing Built-in Effects
Finally, let’s talk about using the built-in effects that make the Soundcraft FX16 shine. These effects can elevate the live sound experience. Make the most of your mixer:
- Reverb for Vocals: Adding a subtle reverb to vocals can create a sense of space without drowning them out. Choose a preset that blends well with the venue’s acoustics.
- Delay for Impact: A touch of delay on instruments can enhance solos or create echoes that add dimension to the mix without overwhelming it.
- Experiment: Don’t hesitate to try different combinations of effects during soundcheck. Finding the right mix may surprise you and can transform the sound!
In summary, mastering live sound with the Soundcraft FX16 Mixer involves thorough preparation, an organized setup, precise adjustments, and effective use of built-in effects. Your expertise behind the mixer can make every performance truly memorable! 🎤✨
Troubleshooting and Tips
Common Issues and Solutions
Moving forward, let’s tackle the inevitable bumps you may encounter while mixing live sound with the Soundcraft FX16. Every sound engineer faces challenges—it’s part of the gig! Let’s explore some common issues and straightforward solutions to help you maintain a smooth performance.
- Feedback: Ah, the dreaded screeching sound. This can occur when microphones pick up sound from speakers.
- Solution: Adjust the EQ, particularly cutting frequencies around 2-4 kHz. Positioning microphones away from speakers also helps.
- Low Volume Output: Sometimes, the sound just doesn’t fill the space.
- Solution: Check gain levels on each channel. If the master fader is not responding, ensure that the output is connected properly and is powered on.
- Inconsistent Levels: Sudden jumps or drops in volume can disrupt a live performance.
- Solution: Check all connections and ensure that cables are properly secured. Use the channel meters to monitor input levels and keep them within a consistent range.
- Hum or Buzzing Noise: This can be annoying and distracting.
- Solution: Inspect your cables for damage and ensure all connections are properly grounded. Often, relocating power supplies can eliminate interference.
By keeping these issues and solutions in mind, you can react quickly and maintain professionalism during live events.
Tips for Optimizing Sound Quality
Now that you’re equipped to troubleshoot, let’s focus on elevating the sound quality of your live mixes. Good sound isn’t just about avoiding problems; it’s about crafting an experience for your audience.
- Start with a Clean Mix: Begin with all channels set to a neutral state. Use high-pass filters on channels that don’t need low-end frequencies (like vocals). This clears up headroom for other instruments.
- Use Subtle EQ Adjustments: Approach EQ changes gently. Small adjustments of 2-3 dB can make a significant difference. Avoid drastic cuts or boosts.
- Monitor Levels in Real-Time: Keep an eye on the LED meters on your FX16 during performances. This helps catch any clipping before it affects the audience’s experience.
- Check Your Monitors: Make sure the performers’ monitors are clear and balanced. Clear on-stage sound enhances their performance and reduces issues like unnecessary shouting into the mic.
Personal experience tells me that investing time into sound checks—involving musicians—creates a more harmonious environment on stage. Everyone is happier when they can hear themselves properly.
Best Practices for Live Sound Mixing
Establishing effective mixing practices can significantly improve your output. Here are a few best practices that I swear by:
- Document Your Settings: Use a notebook or mobile app to document settings for different events. This helps streamline your setup for future gigs.
- Communicate with Performers: Create a rapport with the performers. Their input on monitor levels and effects will lead to a better overall mix.
- Record Sound Checks: If possible, record sound checks for review. This footage can provide valuable insights into how adjustments impact sound quality.
- Stay Calm Under Pressure: Live events can be frenetic, and unexpected challenges arise. Keeping a cool head allows you to think clearly and solve problems efficiently.
In summary, troubleshooting common issues, optimizing sound quality, and adhering to best practices are foundational elements in mastering live sound mixing. Each event will be a learning opportunity, and with each experience, you’ll become more adept at delivering stellar mixes with the Soundcraft FX16. Keep rocking those events! 🎶🎛️
Advanced Techniques
Using Monitor Mixes
Diving deeper into mastering sound mixing with the Soundcraft FX16, let’s explore some advanced techniques that can elevate your audio game. One of the most critical elements is using monitor mixes effectively. Monitor mixes are essential for providing performers with tailored sound during live shows, allowing them to hear what they need for the best performance. Here are some key points to consider:
- Communicate with Performers: Talk to the musicians directly. Each performer has different preferences; for example, a vocalist might want to hear more of themselves, while a drummer may prefer a strong backbone of rhythm instruments.
- Utilize Auxiliary Sends: The FX16 has multiple aux sends that allow you to create unique mixes for different performers. You can send varying levels of each channel to the monitors based on individual requirements.
- Balance and Adjust: During soundcheck, have each performer adjust their own monitor mix to ensure comfort. Regularly check back in during the performance since their needs may change as they perform.
From my experience managing bands, seeing just how much an artist benefits from a personal monitor mix can positively impact their performance and the overall sound.
Creating Custom Effects
Next up, let’s get creative with custom effects! The built-in effects on the Soundcraft FX16 provide a solid foundation, but you can take it a step further.
- Experiment with Different Effects: Delve deep into the available reverb and delay options. Different rooms can cast different sounds, so adapting effects accordingly creates a richer experience. For instance, using a longer delay on a vocal during a ballad can evoke emotion and depth.
- Layer Effects: By layering effects, you can craft a unique sound for each artist. For example, combining a slight reverb with a touch of delay on guitars not only enhances their presence but also creates a sense of space.
- Create Presets: If you find a combination of effects that works well for a specific venue or artist, create a preset. This saves time during future performances, allowing you to maintain consistency.
Customizing effects became a pivotal moment during one local band’s performance; their sound transformed from ordinary to captivating, and they instantly connected better with the audience.
Incorporating External Equipment
Finally, let’s discuss incorporating external equipment. The Soundcraft FX16 has the versatility to work with various gear to enhance your mixing capabilities.
- Plugging in Outboard Gear: Whether it’s compressors, gates, or equalizers, using outboard gear can elevate the overall sound. You can route these devices through the FX16’s effects return or patch bay.
- Using External Digital Effects Processors: If you’re looking for specialized effects not available in the built-in bank, consider integrating a digital effects processor. This expands your creative possibilities even further.
- Mixers and Interfaces: For multi-track recording, consider routing your mix to a digital audio interface. This allows you to capture high-quality recordings if you plan to release the performance later or use it for promotion.
As a mixing engineer, I found that combining external gear significantly improved the resolution and detail of the sound mix, making every performance memorable. In summary, leveraging monitor mixes effectively, crafting custom effects, and integrating external equipment are advanced techniques that will enhance your mixing expertise with the Soundcraft FX16. By implementing these strategies, you not only boost your own skills but also enrich the sound experience for everyone involved! 🎧🎸

Live Sound Mixing for Different Venues
Indoor Venues
Taking your mixing skills on the road means adjusting to different environments, and that starts with understanding the unique characteristics of indoor venues. Let’s dive into the nuances that come with mixing in these more controlled spaces.
- Acoustic Considerations: Indoor venues often have walls that can reflect sound, leading to potential echoes or resonance problems.
- Solution: Use EQ to cut problematic frequencies and avoid excessive reverb, allowing for clarity in vocals and instruments. Be sure to listen carefully during soundchecks; small adjustments can make a world of difference.
- Monitor Placement: Often, indoor venues are smaller but filled with vibrant energy. Ensure monitors are placed optimally to avoid feedback yet remain effective for musicians.
- Tip: Use wedge monitors on stage to enhance performer comfort without disrupting audience sound.
- Adjusting Levels: In tightly packed indoor spaces, the sound can easily become overwhelming. Aim for a balanced mix from the start, keeping in mind that audience members are often closer to the sound source.
- Example: During a local gig, I noticed that adjusting the vocal levels slightly lower compared to instruments helped create a cohesive sound that didn’t overpower the audience experience.
Outdoor Events
Next, let’s talk about the challenge of outdoor events, which can be exciting yet unpredictable. Mixing sound outdoors introduces environmental variables you need to tackle.
- Weather Challenges: Wind, rain, and ambient noise can affect sound quality. Setting up shields or barriers to reduce wind effects can help maintain clarity.
- Solution: Use directional microphones to mitigate unwanted noise.
- Sound Spread: Unlike indoor venues, sound can dissipate quickly outdoors. You may need to adjust speaker placements to project sound effectively across varying distances.
- Tip: Consider using multiple speaker sources (front-of-house and delay speakers) to ensure a consistent sound experience throughout the audience area.
- Monitor Management: In outdoor setups, performers can struggle to hear their monitors over ambient noise.
- Strategy: Work on creating individualized monitor mixes to help artists find their “sweet spot” even amidst competing sound sources.
I recall a summer festival where trial and error taught me the importance of sound delay to prevent echoes from bouncing back, transforming the performance quality from good to outstanding!
Small vs. Large Venues
Lastly, let’s explore the dynamics of mixing sound in small versus large venues. The approach differs significantly, and being adaptable is crucial.
- Small Venues: In intimate settings, less is more. Here’s what to keep in mind:
- Simple Setup: With fewer performers, a straightforward setup is often more efficient. Use fewer channels, allowing you to focus on the details.
- Close Monitoring: You can often communicate directly with performers, tailoring the sound to enhance their comfort.
- Large Venues: More space means a more complex setup.
- Advanced Equipment: You might find yourself needing more processing power, additional effects gear, and possibly digital mixers to handle larger input counts.
- Sound Checks: Allocate extra time for sound checks to adapt to the acoustics of larger spaces. Consider conducting test runs with the full band to fine-tune the mix.
In summary, addressing the unique demands of indoor and outdoor events, as well as adapting your mixing approach for small versus large venues, will help you become a versatile sound engineer. Transitions between venues can be challenging, but with the right strategies and attention to detail, you’ll create memorable audio experiences no matter the stage! 🎤🎼
Recording and Broadcasting with Soundcraft FX16
Connecting to Recording Devices
Now that we’ve explored live sound mixing for different venues, let’s shift our focus to recording and broadcasting with the Soundcraft FX16. This mixer is a powerful tool that can greatly enhance your audio capture skills, whether for music production or live broadcasting. When connecting to recording devices, the setup is usually straightforward. Here’s how to get started:
- Direct Outputs: The FX16 features direct outputs on each channel. These allow you to send a clean signal directly to your recording device without passing through the mixer’s main outputs.
- Tip: This is particularly useful if you want to retain control of the individual tracks during mixing later.
- Multitrack Recording Interface: If you’re using a digital audio workstation (DAW), connect the FX16 outputs to an audio interface that supports multitrack recording. This enables you to record each channel separately, maintaining flexibility in post-production.
- Example: During a previous recording session for a local band, utilizing direct outputs allowed us to create a balanced final mix, isolating each instrument clearly.
- XLR and TRS Connections: These are standard connections for most recording devices. Ensure that you’re using high-quality cables to minimize interference and maintain sound clarity.
Being mindful of these connection strategies will ensure you capture high-quality recordings that do justice to the performance.
Live Streaming Setup
As live streaming grows in popularity, the Soundcraft FX16 offers a solid foundation for broadcasting events. To set up for live streaming, consider the following:
- Mixing Console as a Hub: Use the FX16 as the main mixing console for all audio sources. This allows you to blend vocals, instruments, and even backing tracks seamlessly before sending them out for streaming.
- Connecting to Streaming Software: Route the output from the FX16 to a computer running streaming software like OBS or Wirecast. You may need a USB audio interface depending on the software requirements.
- Tip: Ensure your streaming setup is tested well in advance to avoid any technical snags during the live event.
- Monitor Sound Levels: Regularly check levels during the stream. Since you can adjust the audio in real-time with the FX16, you can respond to changes in performers’ volume or microphone placement quickly, ensuring a consistent sound.
I found that during one streamed concert, being proactive about sound monitoring kept everything running smoothly; viewers appreciated the polished audio, which truly elevated their experience.
Recording Live Performances
Finally, let’s discuss recording live performances. Capturing the energy of a live event can be challenging but rewarding. Here’s how to do it effectively with the Soundcraft FX16:
- Soundcheck: Before the performance, conduct a thorough soundcheck. This is your chance to balance levels and fine-tune effects. It’s vital for ensuring that the captured audio matches the live experience.
- Capture the Atmosphere: To truly reflect the vibe of the event, consider using ambient mics alongside direct inputs from the mixer. Ambient microphones can pick up the audience’s energy, enhancing the live recording’s feel.
- Post-Performance Mixing: After recording, spend time mixing the audio tracks. The FX16 allows you to go back to your recordings and adjust EQ levels or add effects to ensure the final product sounds polished.
I remember one particular live performance we recorded; creatively layering direct signals with ambient sounds turned a standard recording into a vibrant journey that listeners enjoyed well beyond the event. In summary, by learning how to connect to recording devices, setting up for live streaming, and effectively recording live performances, you can utilize the Soundcraft FX16 to its full potential. Whether you’re capturing studio quality or broadcasting live, these techniques will help you create professional sound experiences for your audience. 🎙️🎶

Maintenance and Care
Cleaning and Maintenance Tips
Continuing with making the most out of your Soundcraft FX16, let’s talk about maintenance and care. Just like any valuable equipment, taking good care of your mixer ensures it operates at peak performance and lasts longer. Regular cleaning and maintenance can prevent a wide array of issues.
- Regular Dusting: Dust can accumulate on your mixer quickly, especially if it’s used frequently.
- Tip: Use a soft, dry microfiber cloth to wipe down the exterior and avoid damaging any controls or connectors.
- Cleaning Faders and Knobs: Grime can build up around faders and knobs. To clean them without harming the mixer:
- Use a can of compressed air: This helps blow out dirt from tight spaces.
- Dab a little isopropyl alcohol on a cotton swab: Gently clean around knobs and sliders.
- Check Cables Regularly: Inspecting cables for wear and tear is crucial. A faulty cable can lead to frustrating sound issues during a live performance.
- Tip: Label cables to ensure easy identification and to quickly spot any problems in your setup.
During one particularly hectic gig, I learned the importance of cable management. A single fraying cable went unnoticed and caused intermittent dropping of sound; that was a lesson I won’t forget!
Storage Recommendations
Proper storage is just as important as cleaning. When it comes to keeping your FX16 in great shape, consider the following guidelines:
- Use a Protective Case: Investing in a high-quality case designed for the FX16 provides essential protection from dust and moisture when not in use. This is crucial for preserving both the electronics and physical components.
- Avoid Humidity: Store the mixer in a dry environment. High humidity can lead to damage over time. Consider using desiccants in storage areas if the climate is particularly humid.
- Temperature Control: Try to keep your mixer in a temperature-controlled environment. Extreme heat can affect performance and longevity.
- Position: Always store the mixer in an upright position. Placing it flat can put stress on faders and connectors.
I once didn’t pay enough attention to my storage setup, and letting the mixer sit in a damp corner caused issues with its electrical components. Learn from my oversight!
Troubleshooting Hardware Issues
Even with regular maintenance, hardware issues can arise. Knowing how to troubleshoot these challenges can save you time and frustration during a performance.
- No Power: If the mixer doesn’t power on, check the power cable and connection.
- Solution: Test the outlet with another device to rule out power supply issues.
- Distorted Sound: If you’re experiencing clipping or distortion:
- Solution: Check the gain levels on each channel, ensuring they aren’t set too high. A visual inspection of the EQ settings is also worthwhile.
- Faders Not Responding: Sometimes, faders can become unresponsive. This may indicate dirt or dust build-up.
- Solution: Clean the faders as mentioned previously, but if the issue persists, you may need to consult a professional for deeper inspection.
- Muffled Sound: A common issue that can occur:
- Solution: Check EQ settings for excessive low-frequency boosts; sometimes clarity can be restored just by balancing frequencies.
In summary, consistent cleaning, proper storage, and troubleshooting hardware issues will contribute to the longevity and reliability of your Soundcraft FX16 mixer. Investing a little time in maintenance pays off significantly, ensuring you deliver exceptional sound quality at every performance. 🎚️✨
Conclusion
Recap of Key Points
As we wrap up this comprehensive exploration of mastering live sound with the Soundcraft FX16 mixer, it’s essential to reflect on the key points we’ve covered. This journey has been about more than just understanding a piece of gear; it’s about elevating your overall sound mixing skills to create unforgettable experiences.
- Understanding Live Sound Mixers: You learned about the importance of mixers in live performances, the types available, and the critical nature of mastering sound mixing for optimal audience engagement.
- Overview of the Soundcraft FX16: The extensive features of the FX16, including its built-in effects, intuitive interface, and versatile connection options, position it as a strong choice for both novices and professionals in the field.
- Mastering Techniques: We delved into advanced techniques such as using monitor mixes, creating custom effects, and incorporating external equipment, all pivotal for refining your live sound mixing.
- Adapting to Different Venues: Whether you’re in a cozy indoor setting, an expansive outdoor festival, or switching between small and large venues, recognizing the distinct nuances is key to delivering quality sound.
- Recording and Broadcasting: We explored how to effectively set up your FX16 for recording and live streaming—from connection tips to capturing live performances.
- Maintenance and Care: Regular cleaning, proper storage, and troubleshooting techniques ensure that the FX16 remains in peak operating condition, ready for any performance.
Each of these components builds on the idea that mixing sound is both a technical task and an art form.
Final Thoughts on Mastering Live Sound with the Soundcraft FX16 Mixer
Mastering live sound mixing takes time, practice, and a willingness to learn from each performance. The Soundcraft FX16 is a versatile ally on this journey, capable of delivering exceptional audio quality for various applications. What I’ve found to be most rewarding is the connection it creates between the artist and audience. Having mixed sound for a variety of events, I can confidently say that the learning curve may seem steep at first, but with dedication, you’ll begin to notice a marked difference in your mixing skills. The effects you’ll achieve, the audience’s engagement, and the energy in the room will be your rewards for honing your craft. Remember, every performance is an opportunity to experiment and refine your techniques. Don’t shy away from trying new approaches or settings based on the venue and artist needs. The FX16, with its robust features and user-friendly layout, provides you with the tools necessary to explore this exciting audio landscape. It’s a chance to express your creativity while ensuring that every detail of the performance resonates with the audience’s ears. In conclusion, embracing the power of the Soundcraft FX16 and dedicating time to perfecting your skills will yield tremendous results. So, gear up, have fun, and let your sound journey begin! Here’s to many successful live performances and unforgettable sound experiences! 🎤🎶✨

